
CAFM Way User Guide
Platform Console
The operator console CAFM Way staff use to register new companies, collect subscription payments, and run the SaaS platform.
admin.cafm-way.com · Last updated: 26 Sep 2026
Getting started
What the console is for
- Who uses it: CAFM Way staff only (platform administrators). Customers never see this console.
- Address:
admin.cafm-way.com - Language: the console's screens are in English.
The console sits above every customer company (tenant). From here you:
- Receive requests from companies that want to join, and approve or reject them.
- Review what each company registered, price its subscription, and send the payment offer.
- Confirm the payment, which creates the company's account, administrator and facility hierarchy in one step.
- Watch companies, subscriptions, payments and platform health afterwards.
The sidebar groups the screens by job:
| Section | Screen | Use it to |
|---|---|---|
| — | Overview | See platform totals and the latest companies |
| TENANTS | Companies | Find a company, open its details, suspend or extend it |
| Register Requests | Approve who may register (invite links) | |
| Subscription Requests | Price and activate registrations and upgrades | |
| Plans | Maintain the subscription tiers | |
| Billing | Read recurring revenue | |
| Payments | See every confirmed payment and each company's billing terms | |
| CONFIGURATION | Global Values | Platform-wide reference lists |
| Feature Flags | Switch features on or off | |
| OPERATIONS | Monitoring | API and database health |
| Analytics | Growth and plan mix | |
| Reports | PDF and Excel exports | |
| Announcements | Messages for customer dashboards | |
| Audit Log | Who did what in the console | |
| SYSTEM | Settings | Platform administrators and your account |
| Notifications | The operator inbox |
Sign in
- Who: a platform administrator
- Screen: the console's sign-in page
- Open
admin.cafm-way.com. - Enter your Platform Email and Password.
- Click Sign in to Control Panel. The console opens on Overview.

To sign out, click the exit icon next to your name at the bottom of the sidebar, or go to Settings → Account → Sign Out.
Onboarding a new company
The path at a glance
Registration is by invitation only. A company cannot create an account on its own. Every new customer goes through two gates: CAFM approves the enquiry, then CAFM confirms the payment.
flowchart TD
  A[Enquiry
website or operator] --> B{Register Requests}
  B -- Approve & send link --> C[Company fills the
registration wizard]
  B -- Reject --> X1[Closed]
  C --> D{Subscription Requests
New}
  D -- Save approved limits --> E[Under review]
  E -- Send payment offer --> F[Awaiting payment]
  F -- Confirm payment & activate --> G[Activated
company + admin + hierarchy + invoice]
  D & E & F -- Reject --> X2[Rejected
company emailed]
The example on the following pages follows one fictional company, Oasis Facilities Management, through every step.
Step 1 — Receive a registration enquiry
- Who: the prospect (public website) or a platform administrator
- Screen: Register Requests
A request reaches the queue in one of two ways:
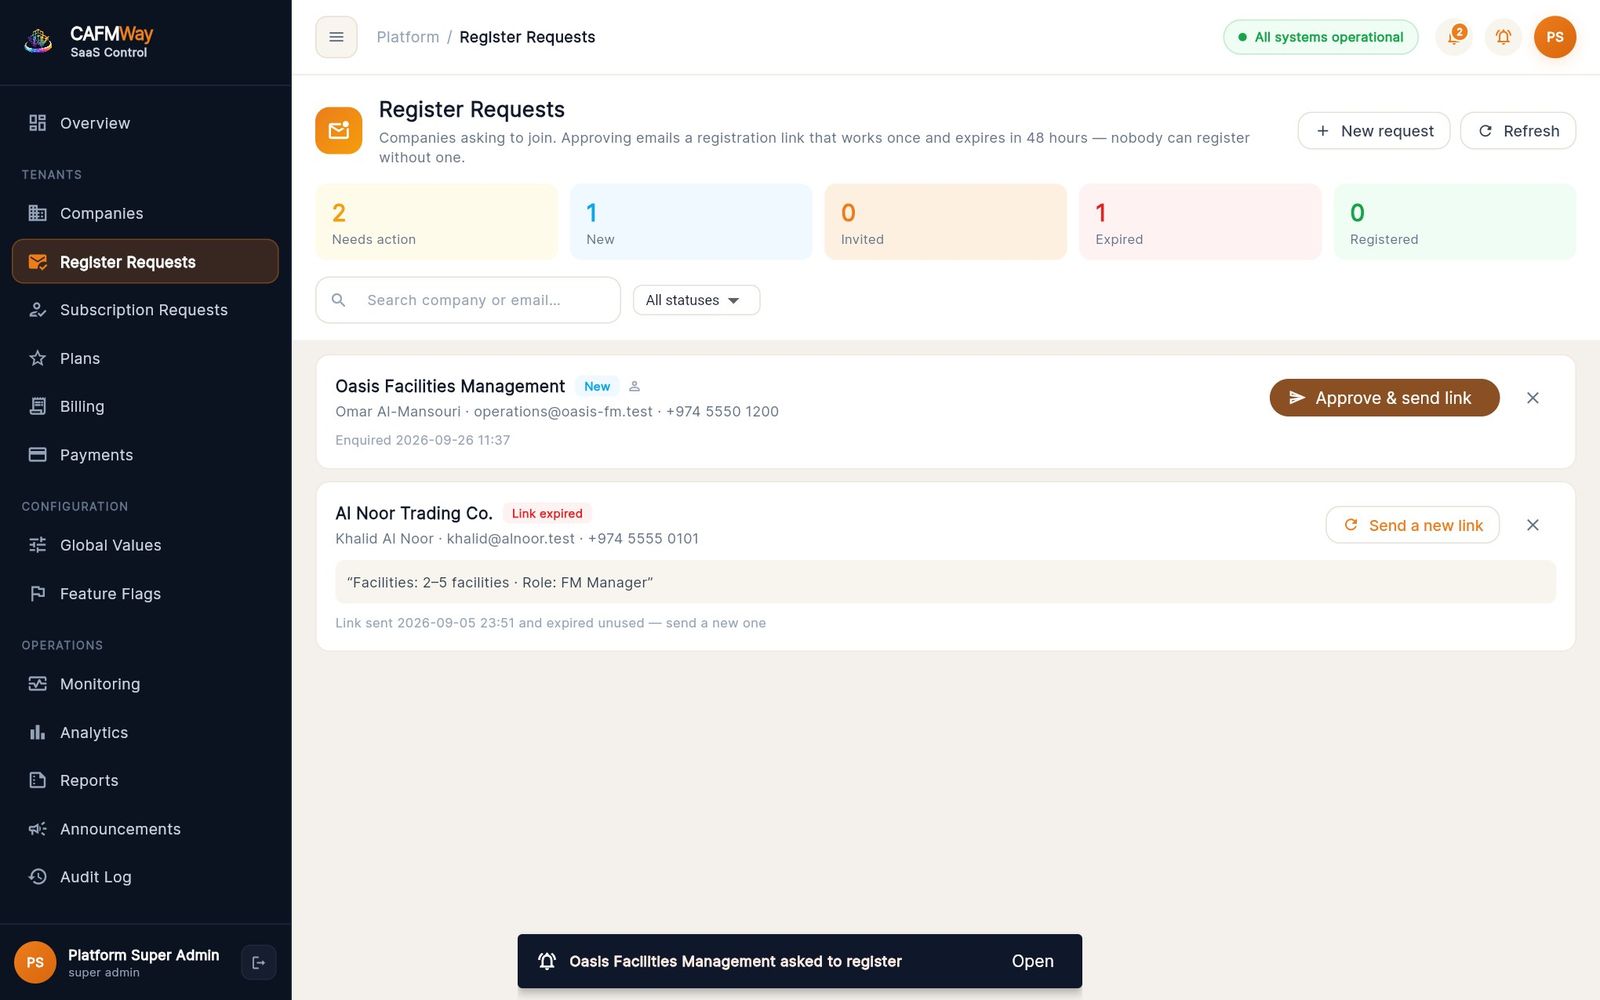
- From the website. The prospect fills the "Schedule your demo" form on the marketing site. The request arrives with the source website, the operators get an email, and a live alert appears in the console: "{Company} asked to register".
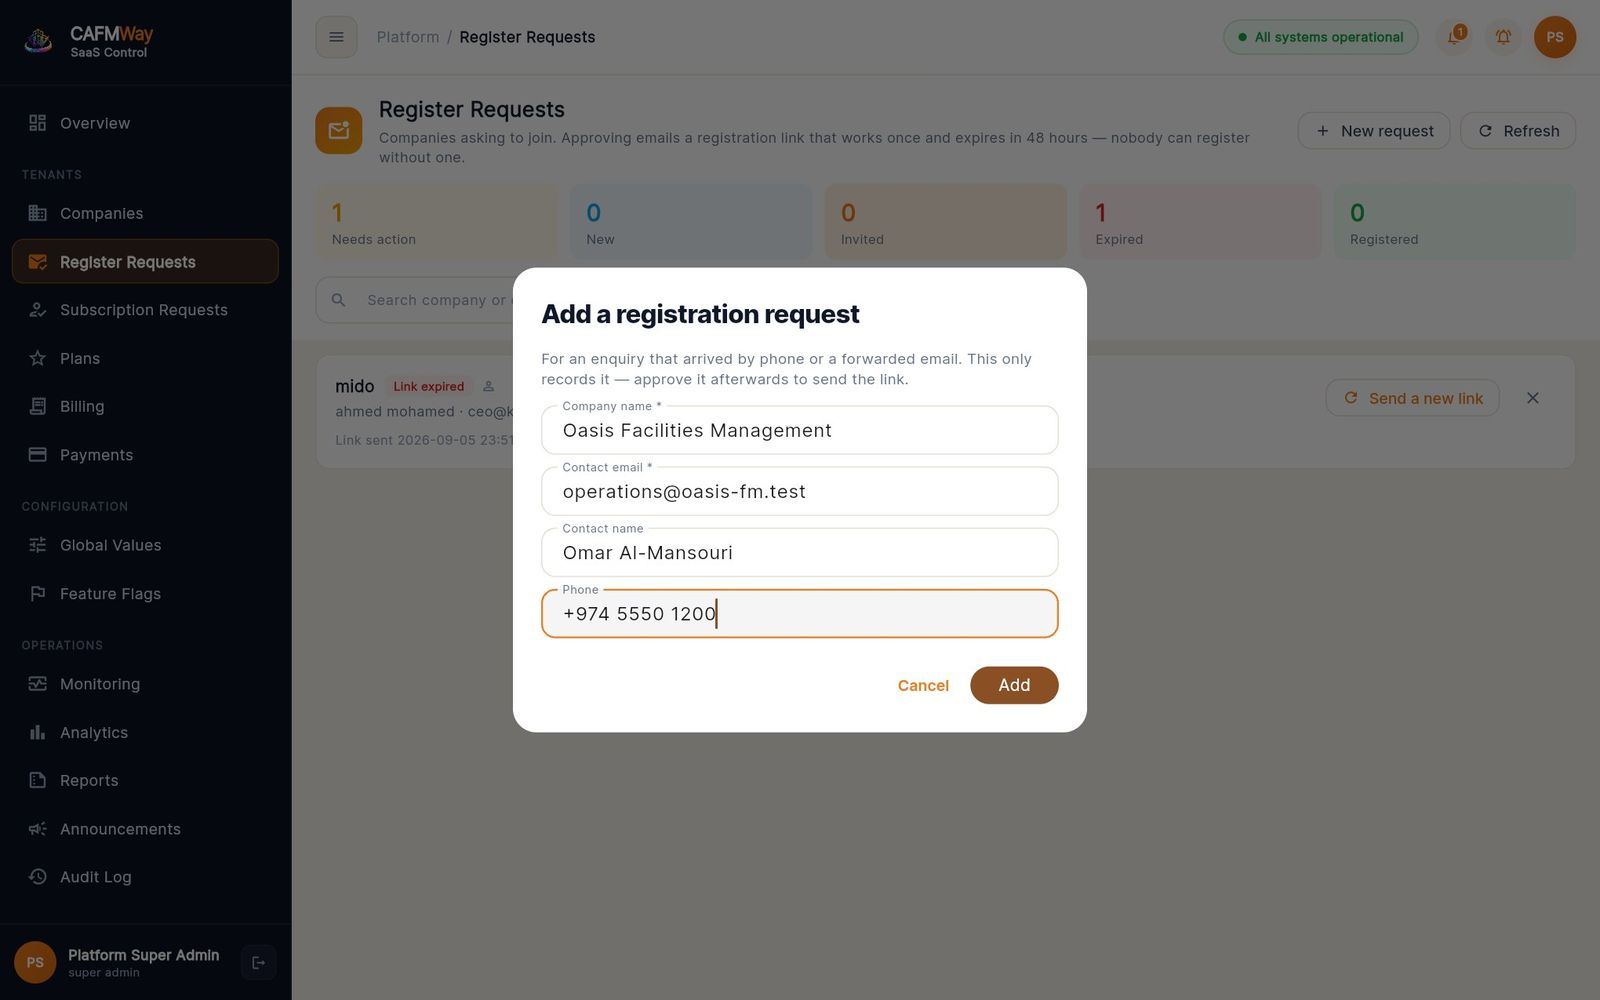
- Added by an operator. For an enquiry that came by phone or email:
- Open Register Requests and click New request.
- Fill Company name, Contact email, and optionally Contact name and Phone.
- Click Add.
Step 2 — Approve and send the registration link
- Who: a platform administrator
- Screen: Register Requests
The tiles at the top count requests by state: Needs action (new plus expired), New, Invited, Expired and Registered. Use the search box and the status filter to narrow the list.
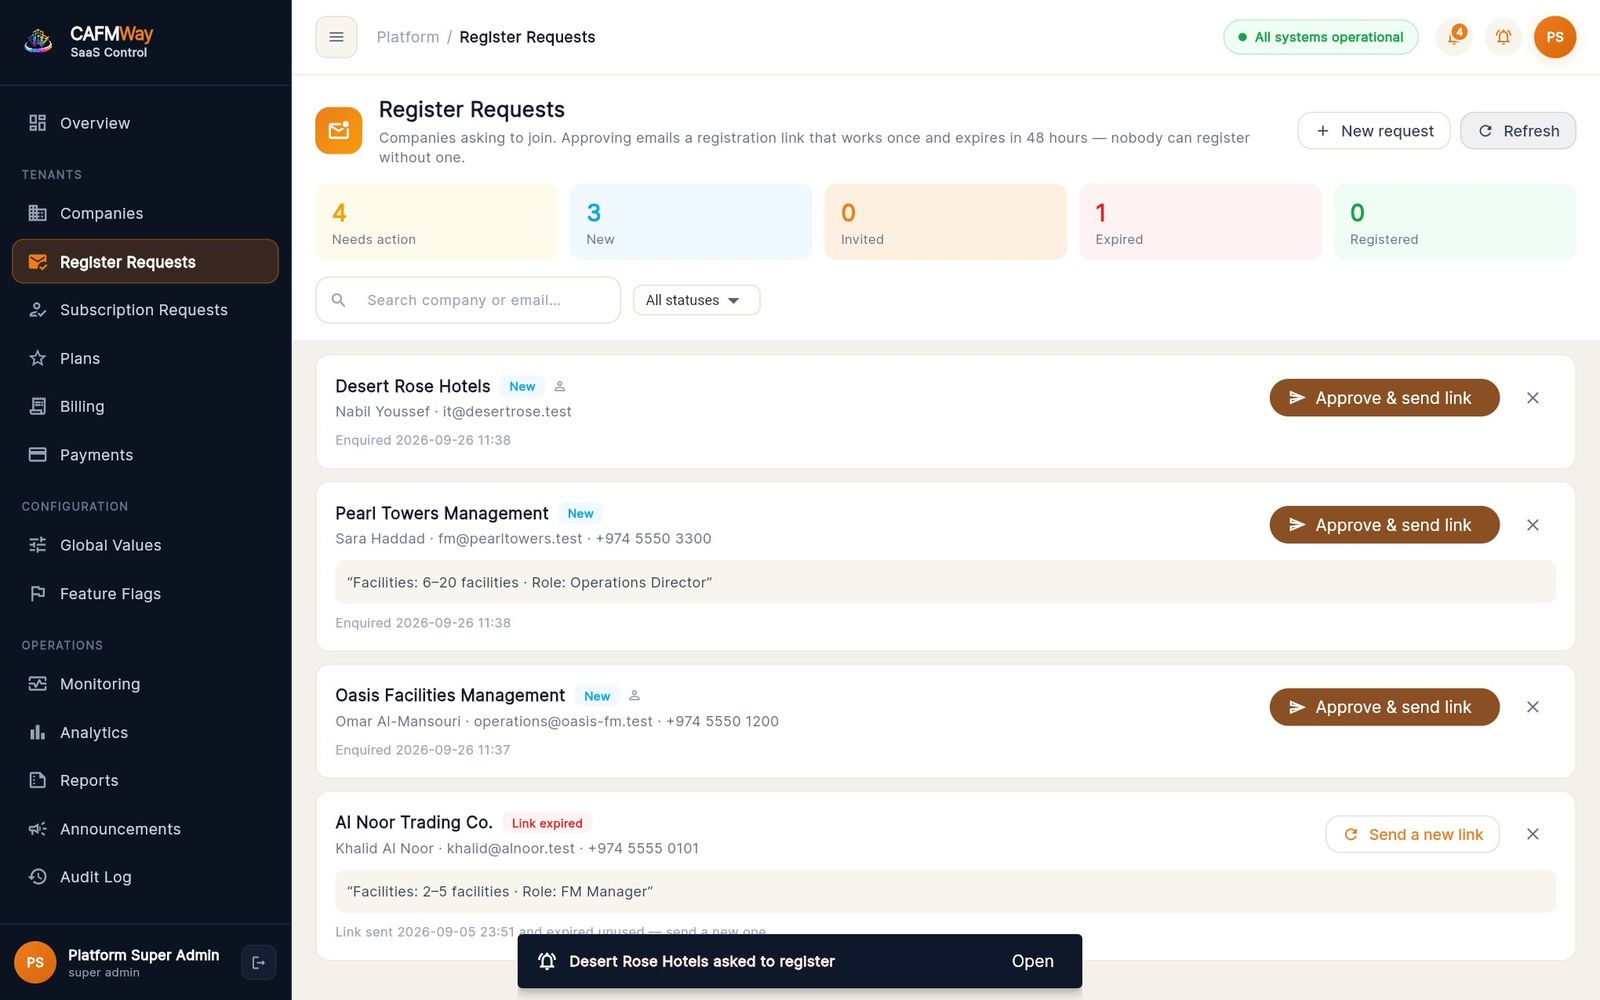
- On a New card, click Approve & send link.
- Read the confirmation and click Approve and send link.
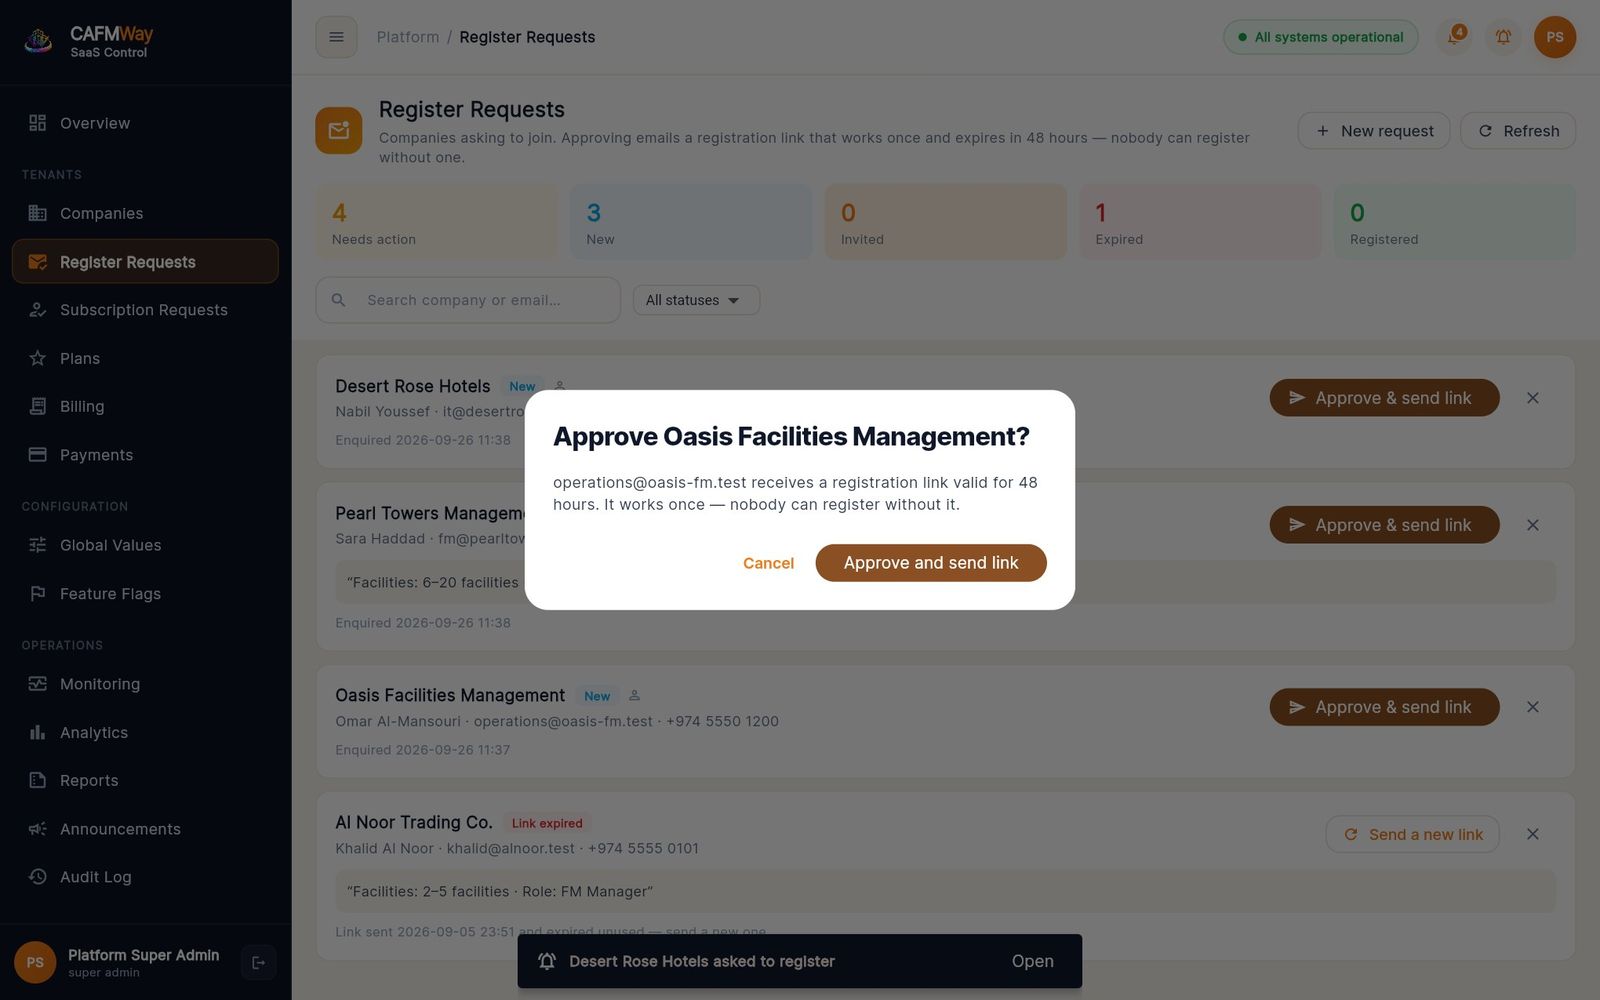
The company receives an email with a registration link. The link works once and expires after 48 hours. The card changes to Invited and shows when the link was sent and when it expires.
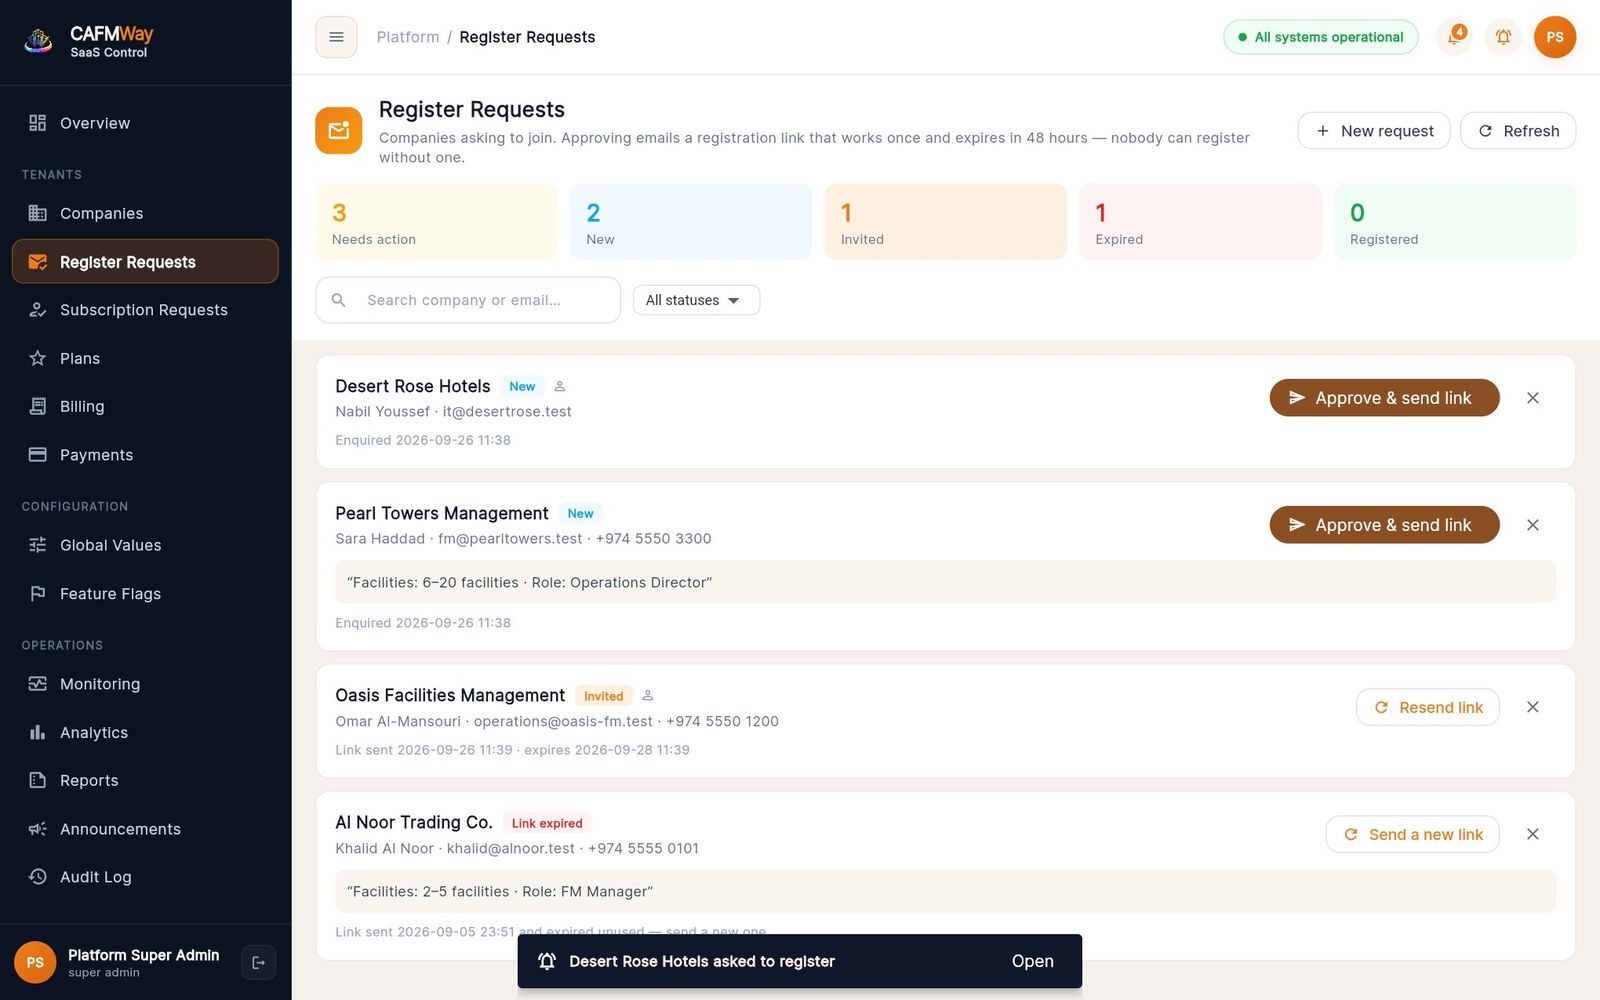
If the link expires unused, the card shows Link expired. Click Send a new link to issue a fresh 48-hour link. Resend link on an invited card does the same thing, and the earlier link stops working immediately.
Step 3 — Reject a registration enquiry
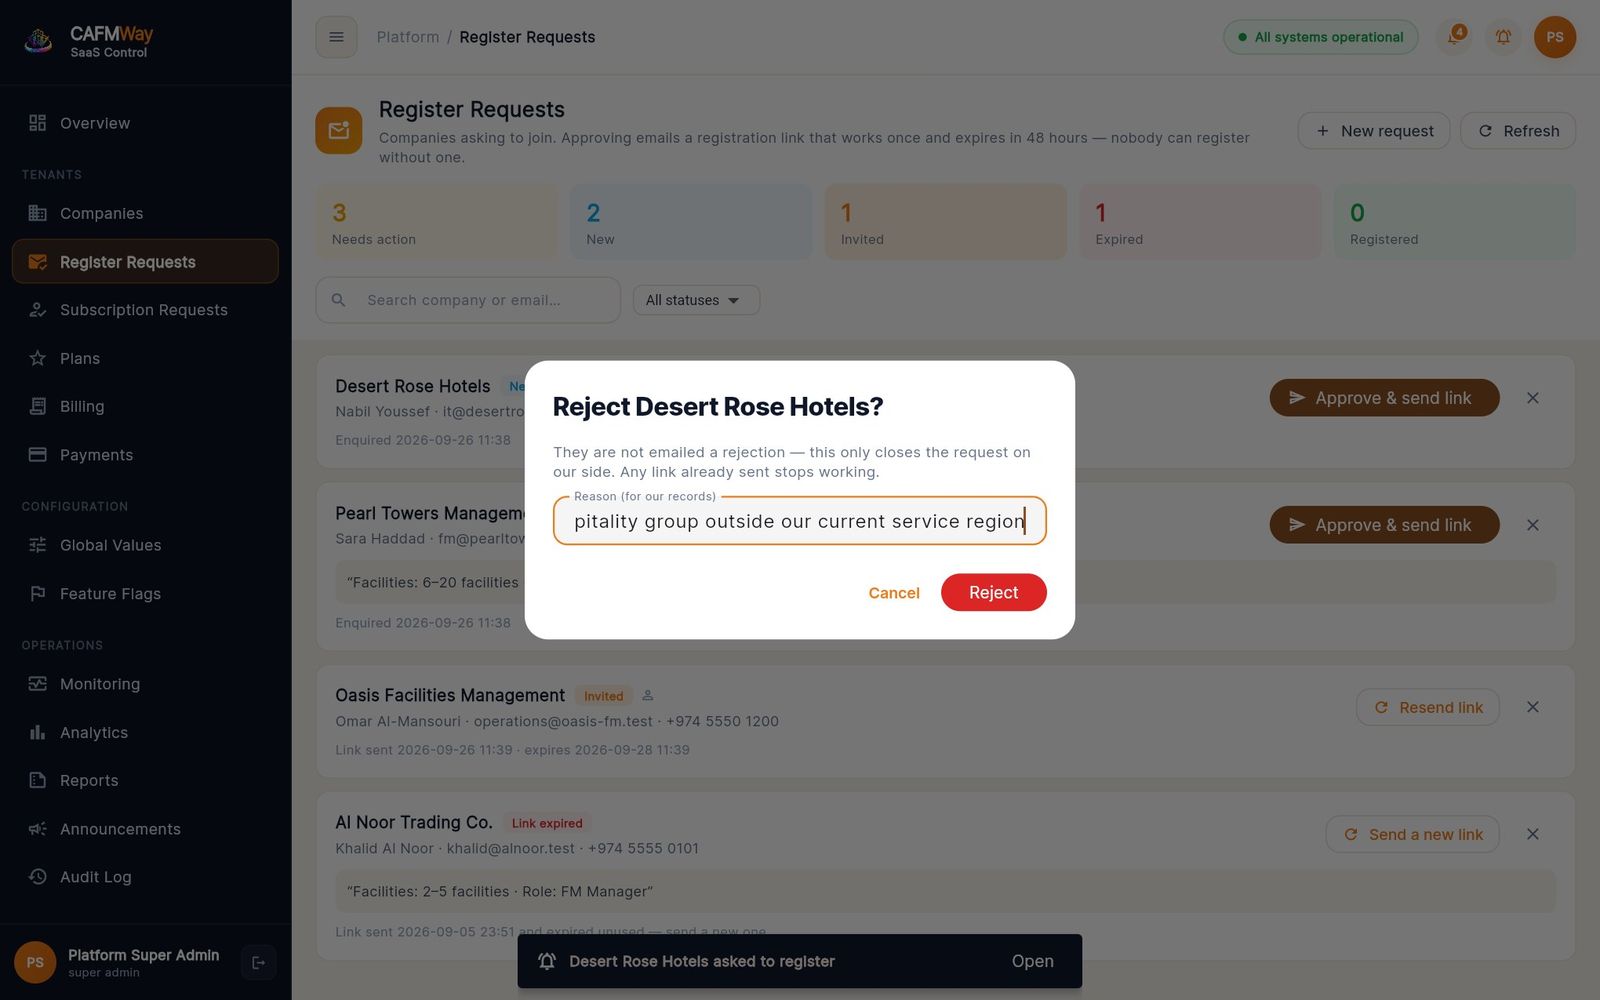
- Click the × (Reject) on the request card.
- Enter a Reason (for our records).
- Click Reject.
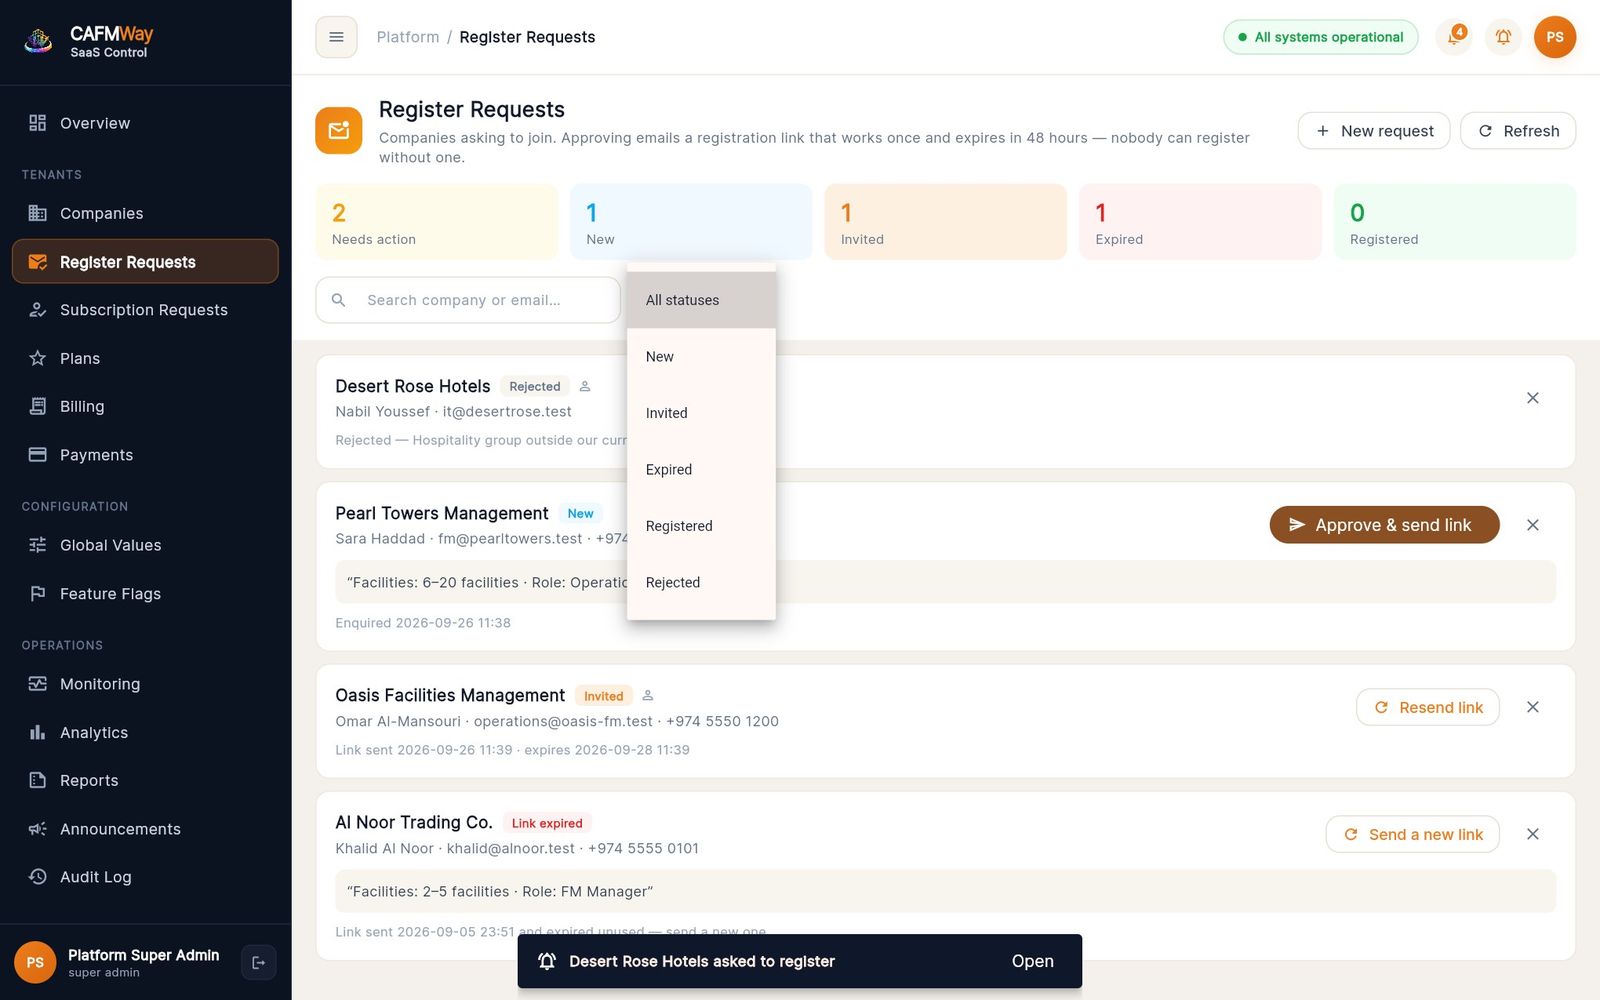
The status filter lets you see each group: New, Invited, Expired, Registered, Rejected.
Step 4 — The company registers
- Who: the invited company
- Screen: the registration wizard in the CAFM Way web app
The link in the invitation email opens a three-step wizard in the customer web app (app.cafm-way.com). Unlike the console, the wizard is available in Arabic and English.
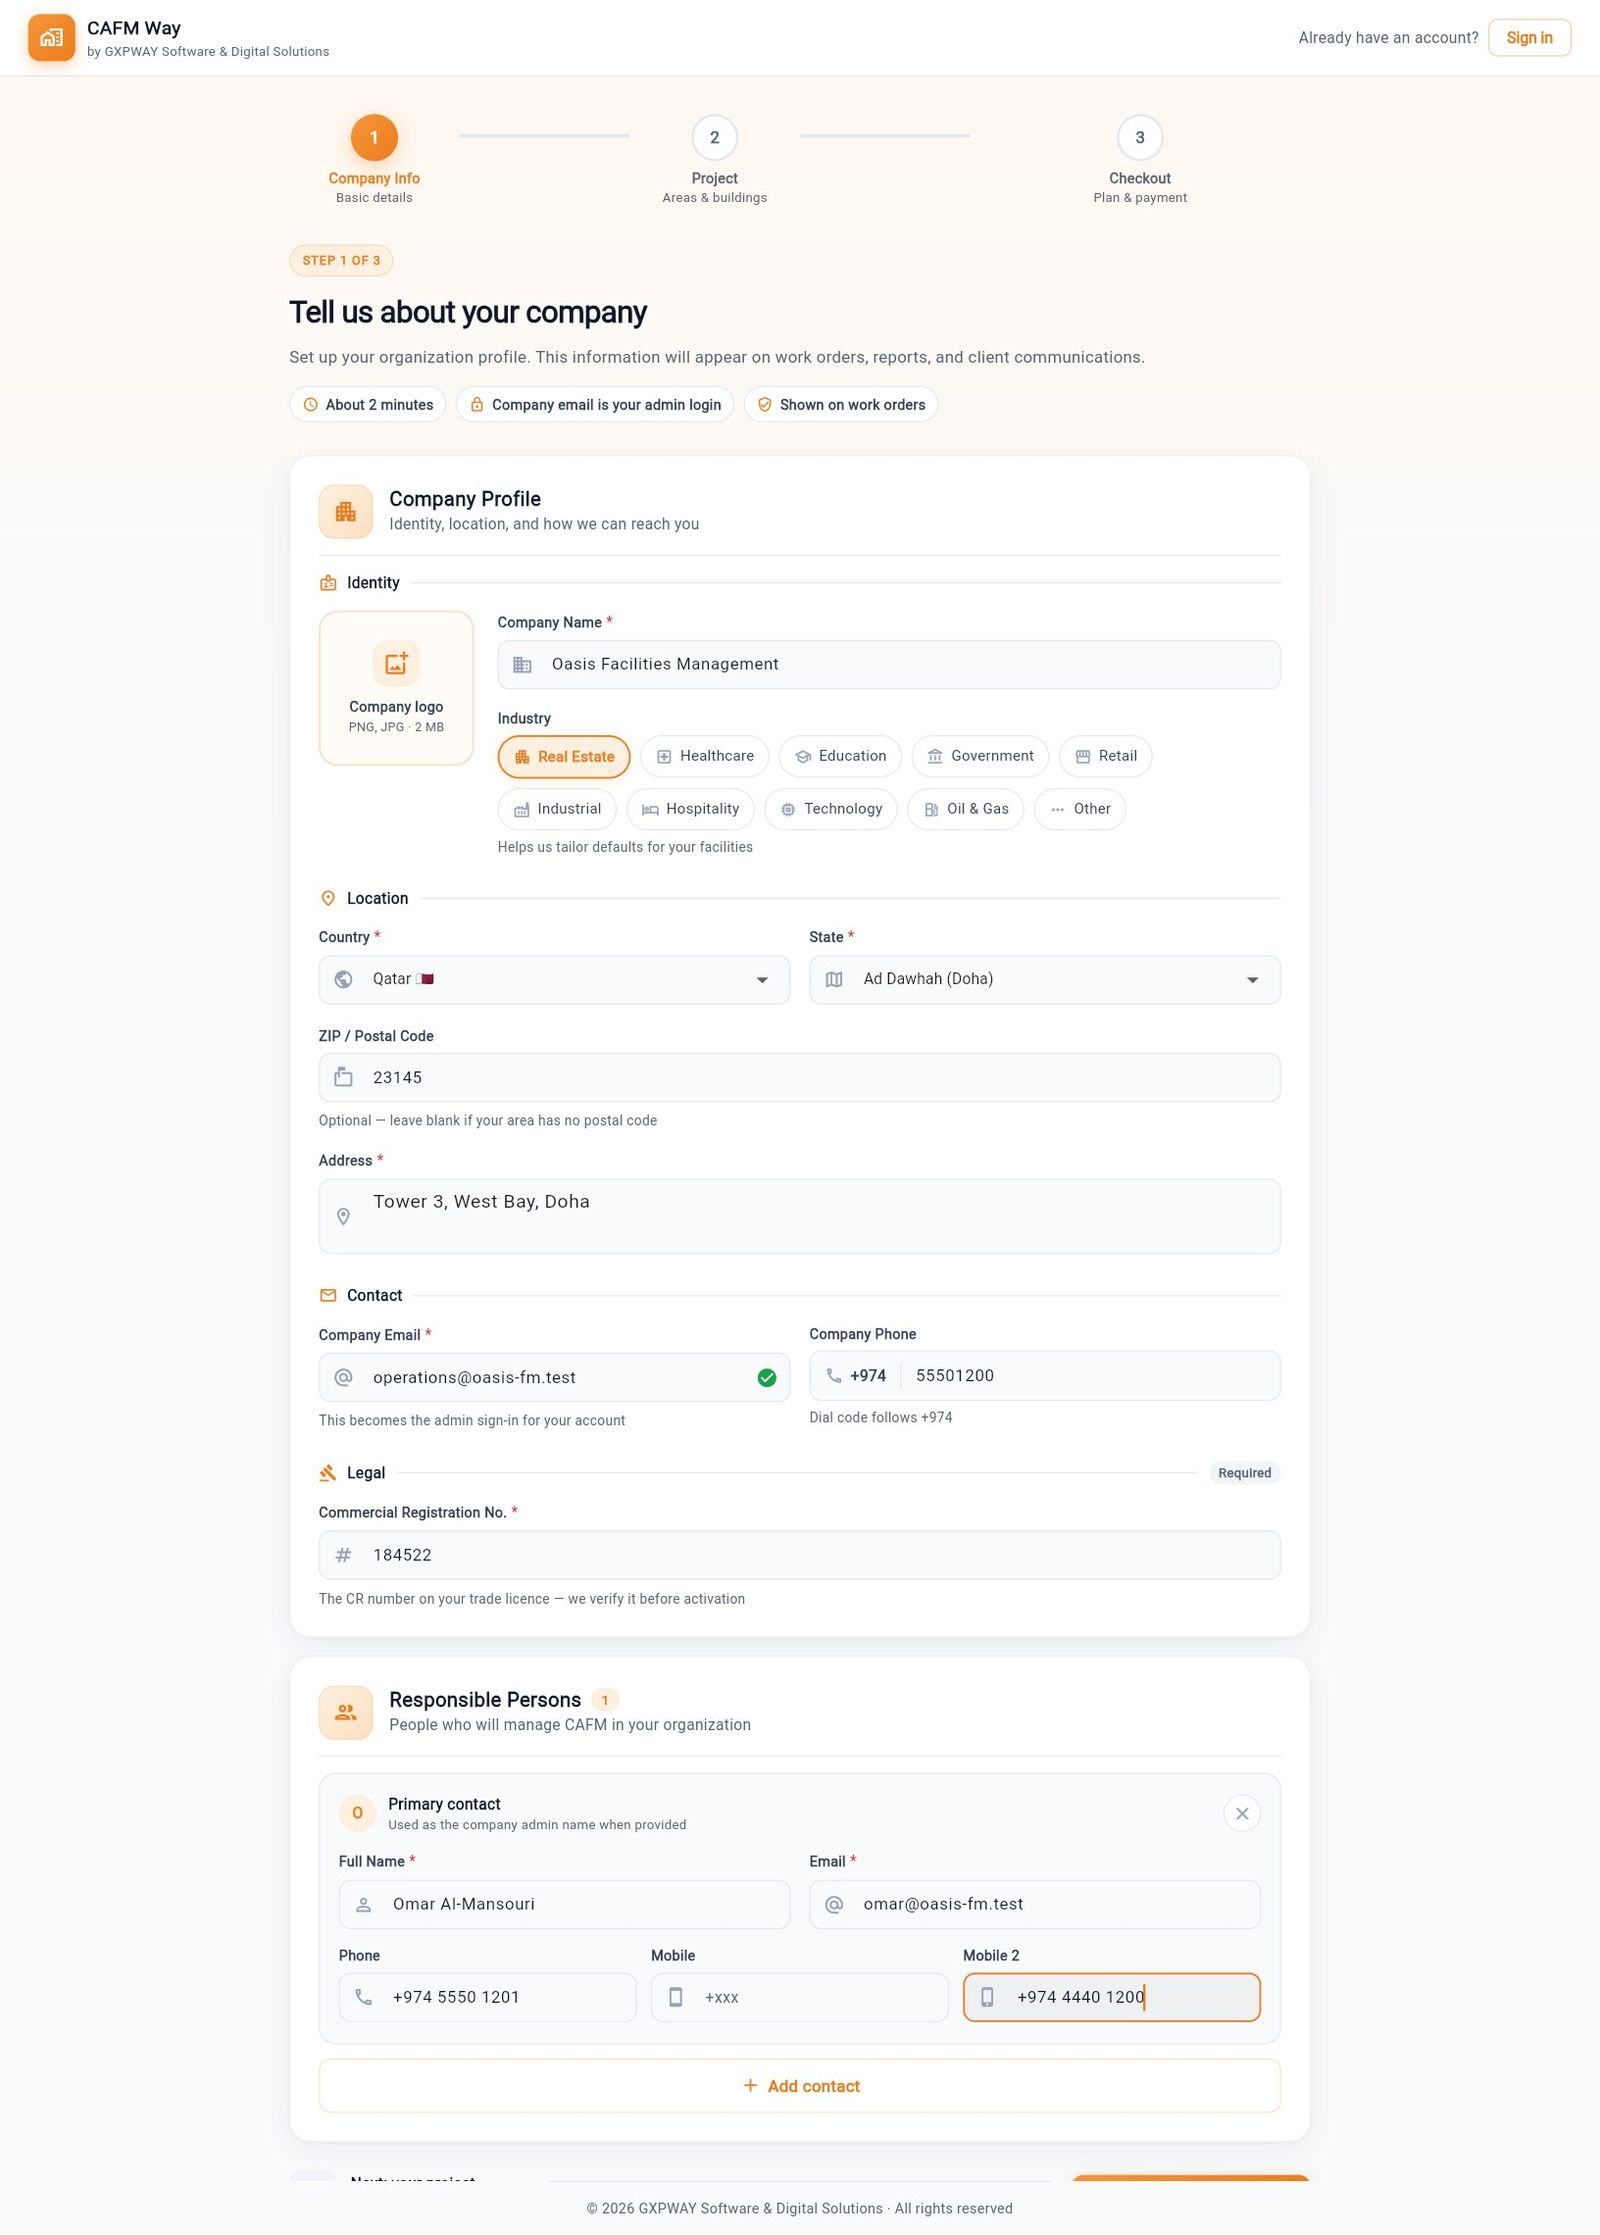
Step 1 — Company Info. The company enters its profile: name, industry, country and state, address, company email (which becomes the administrator's sign-in), phone and commercial registration number. Under Responsible Persons it adds the people who will run CAFM.
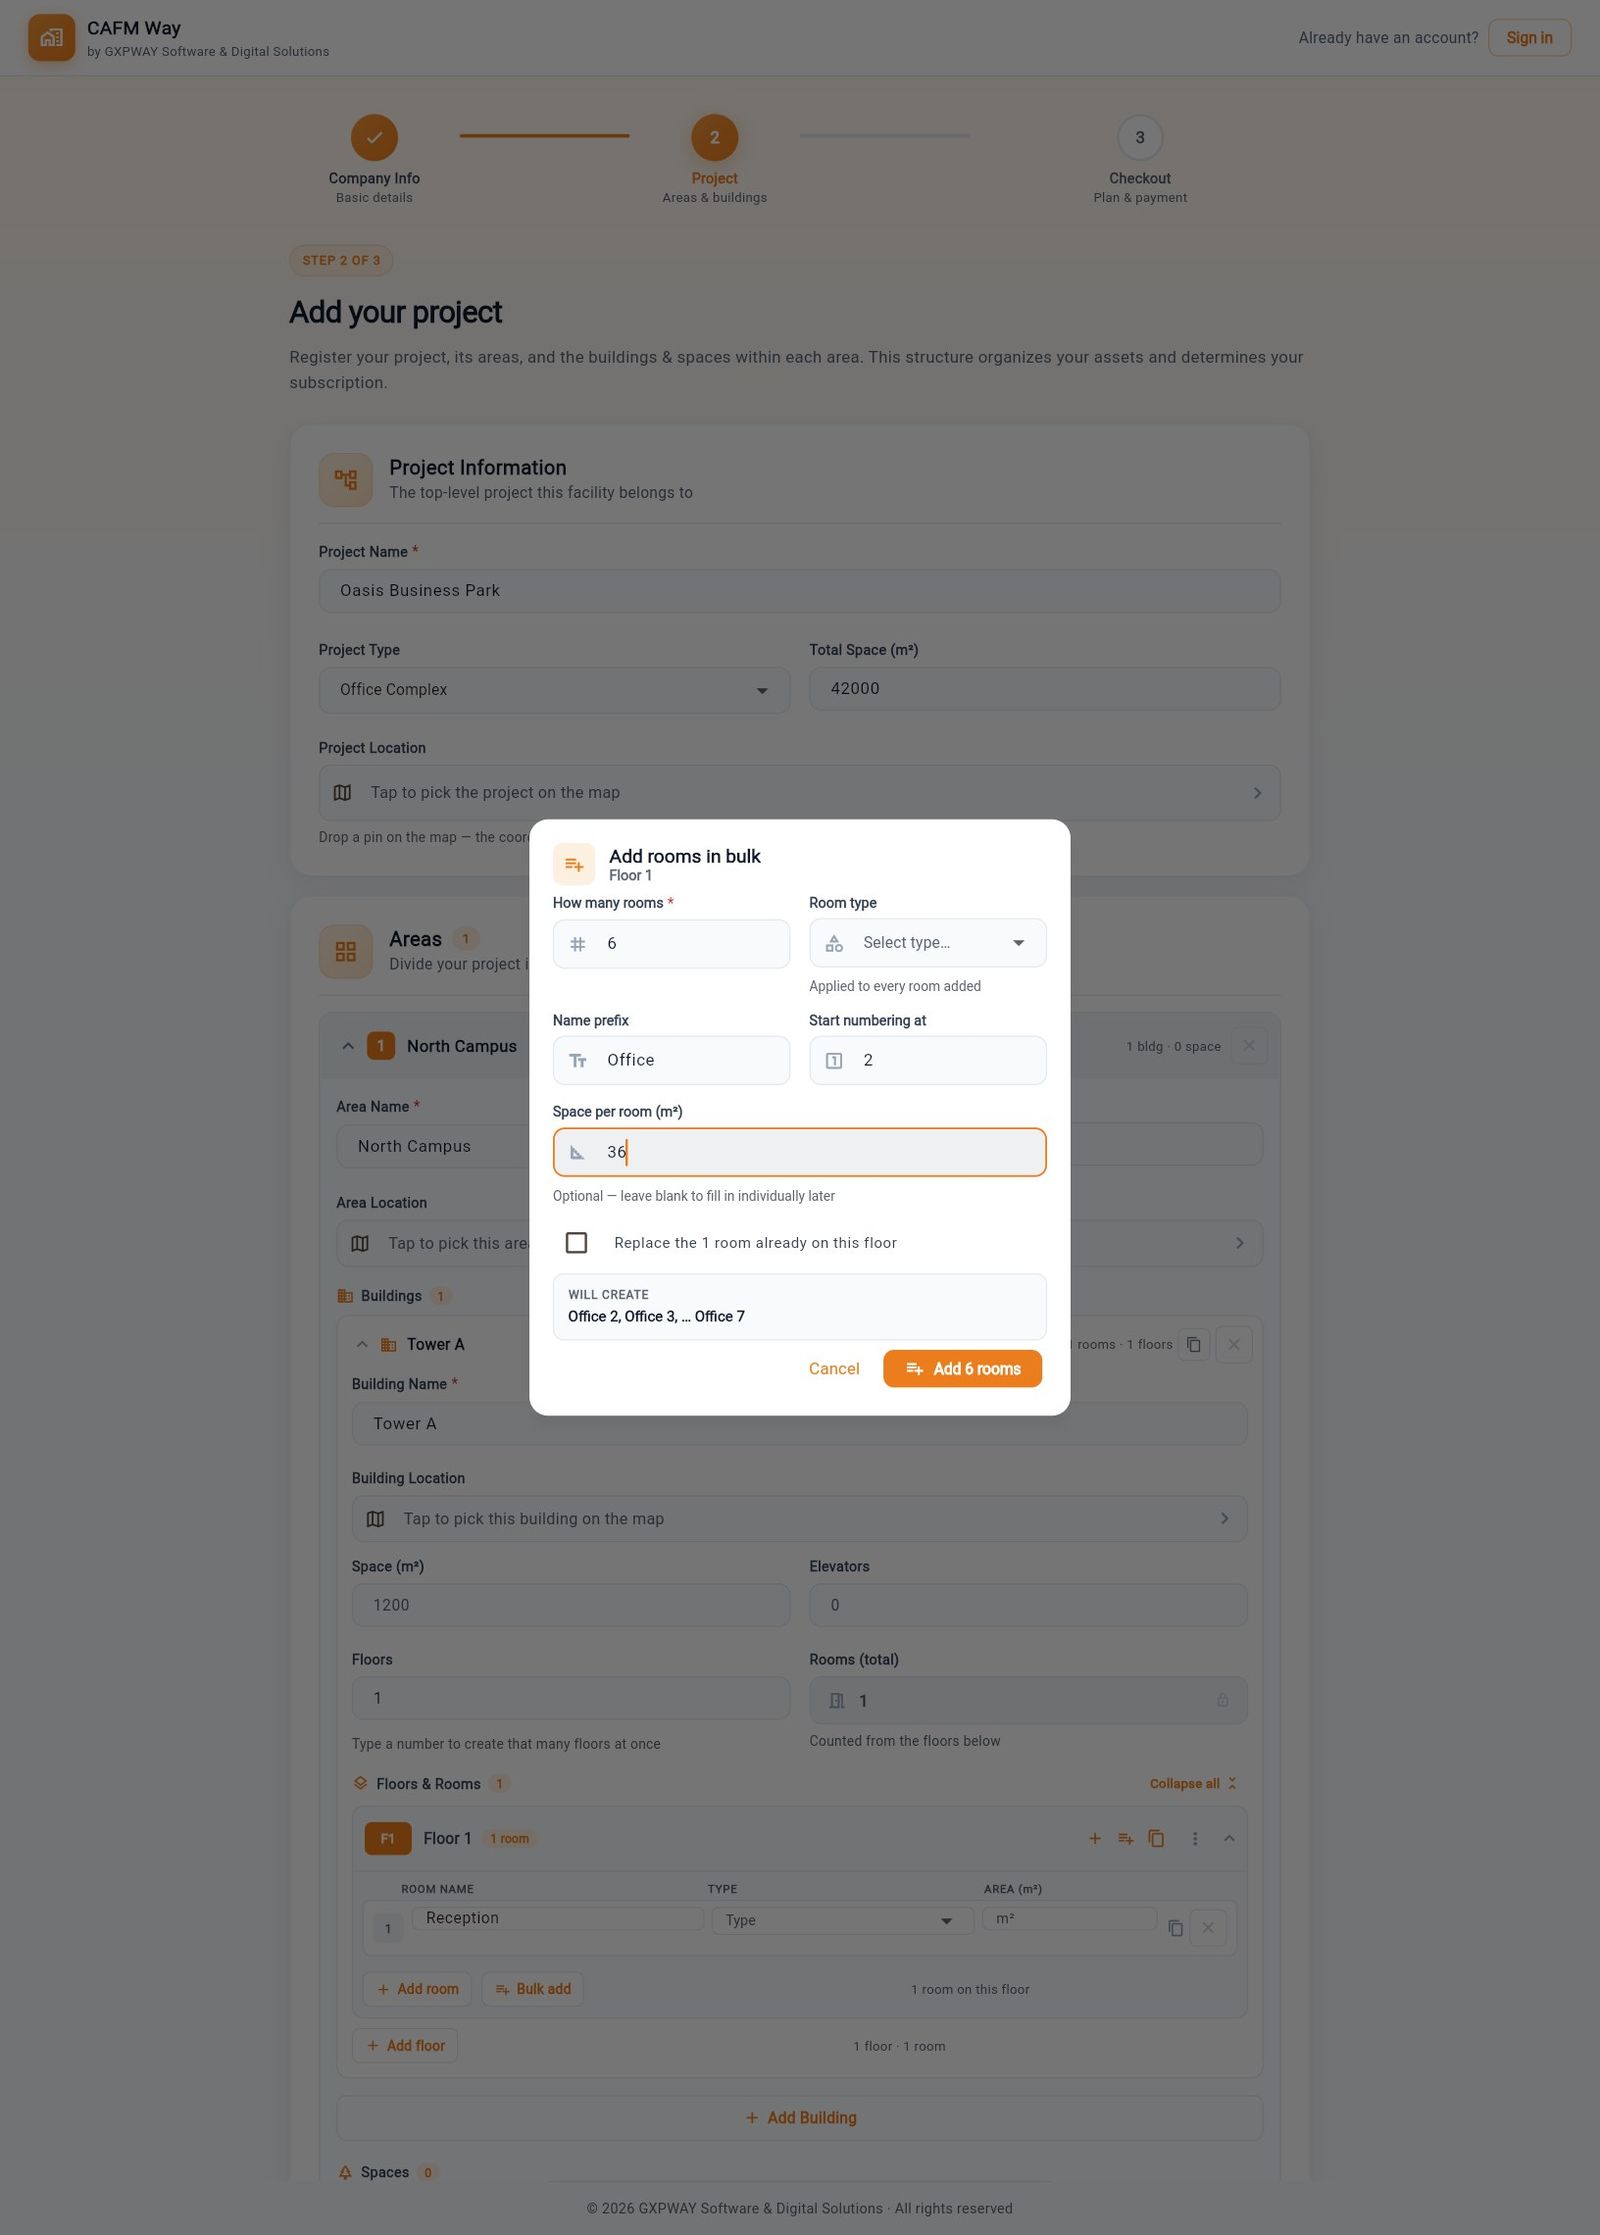
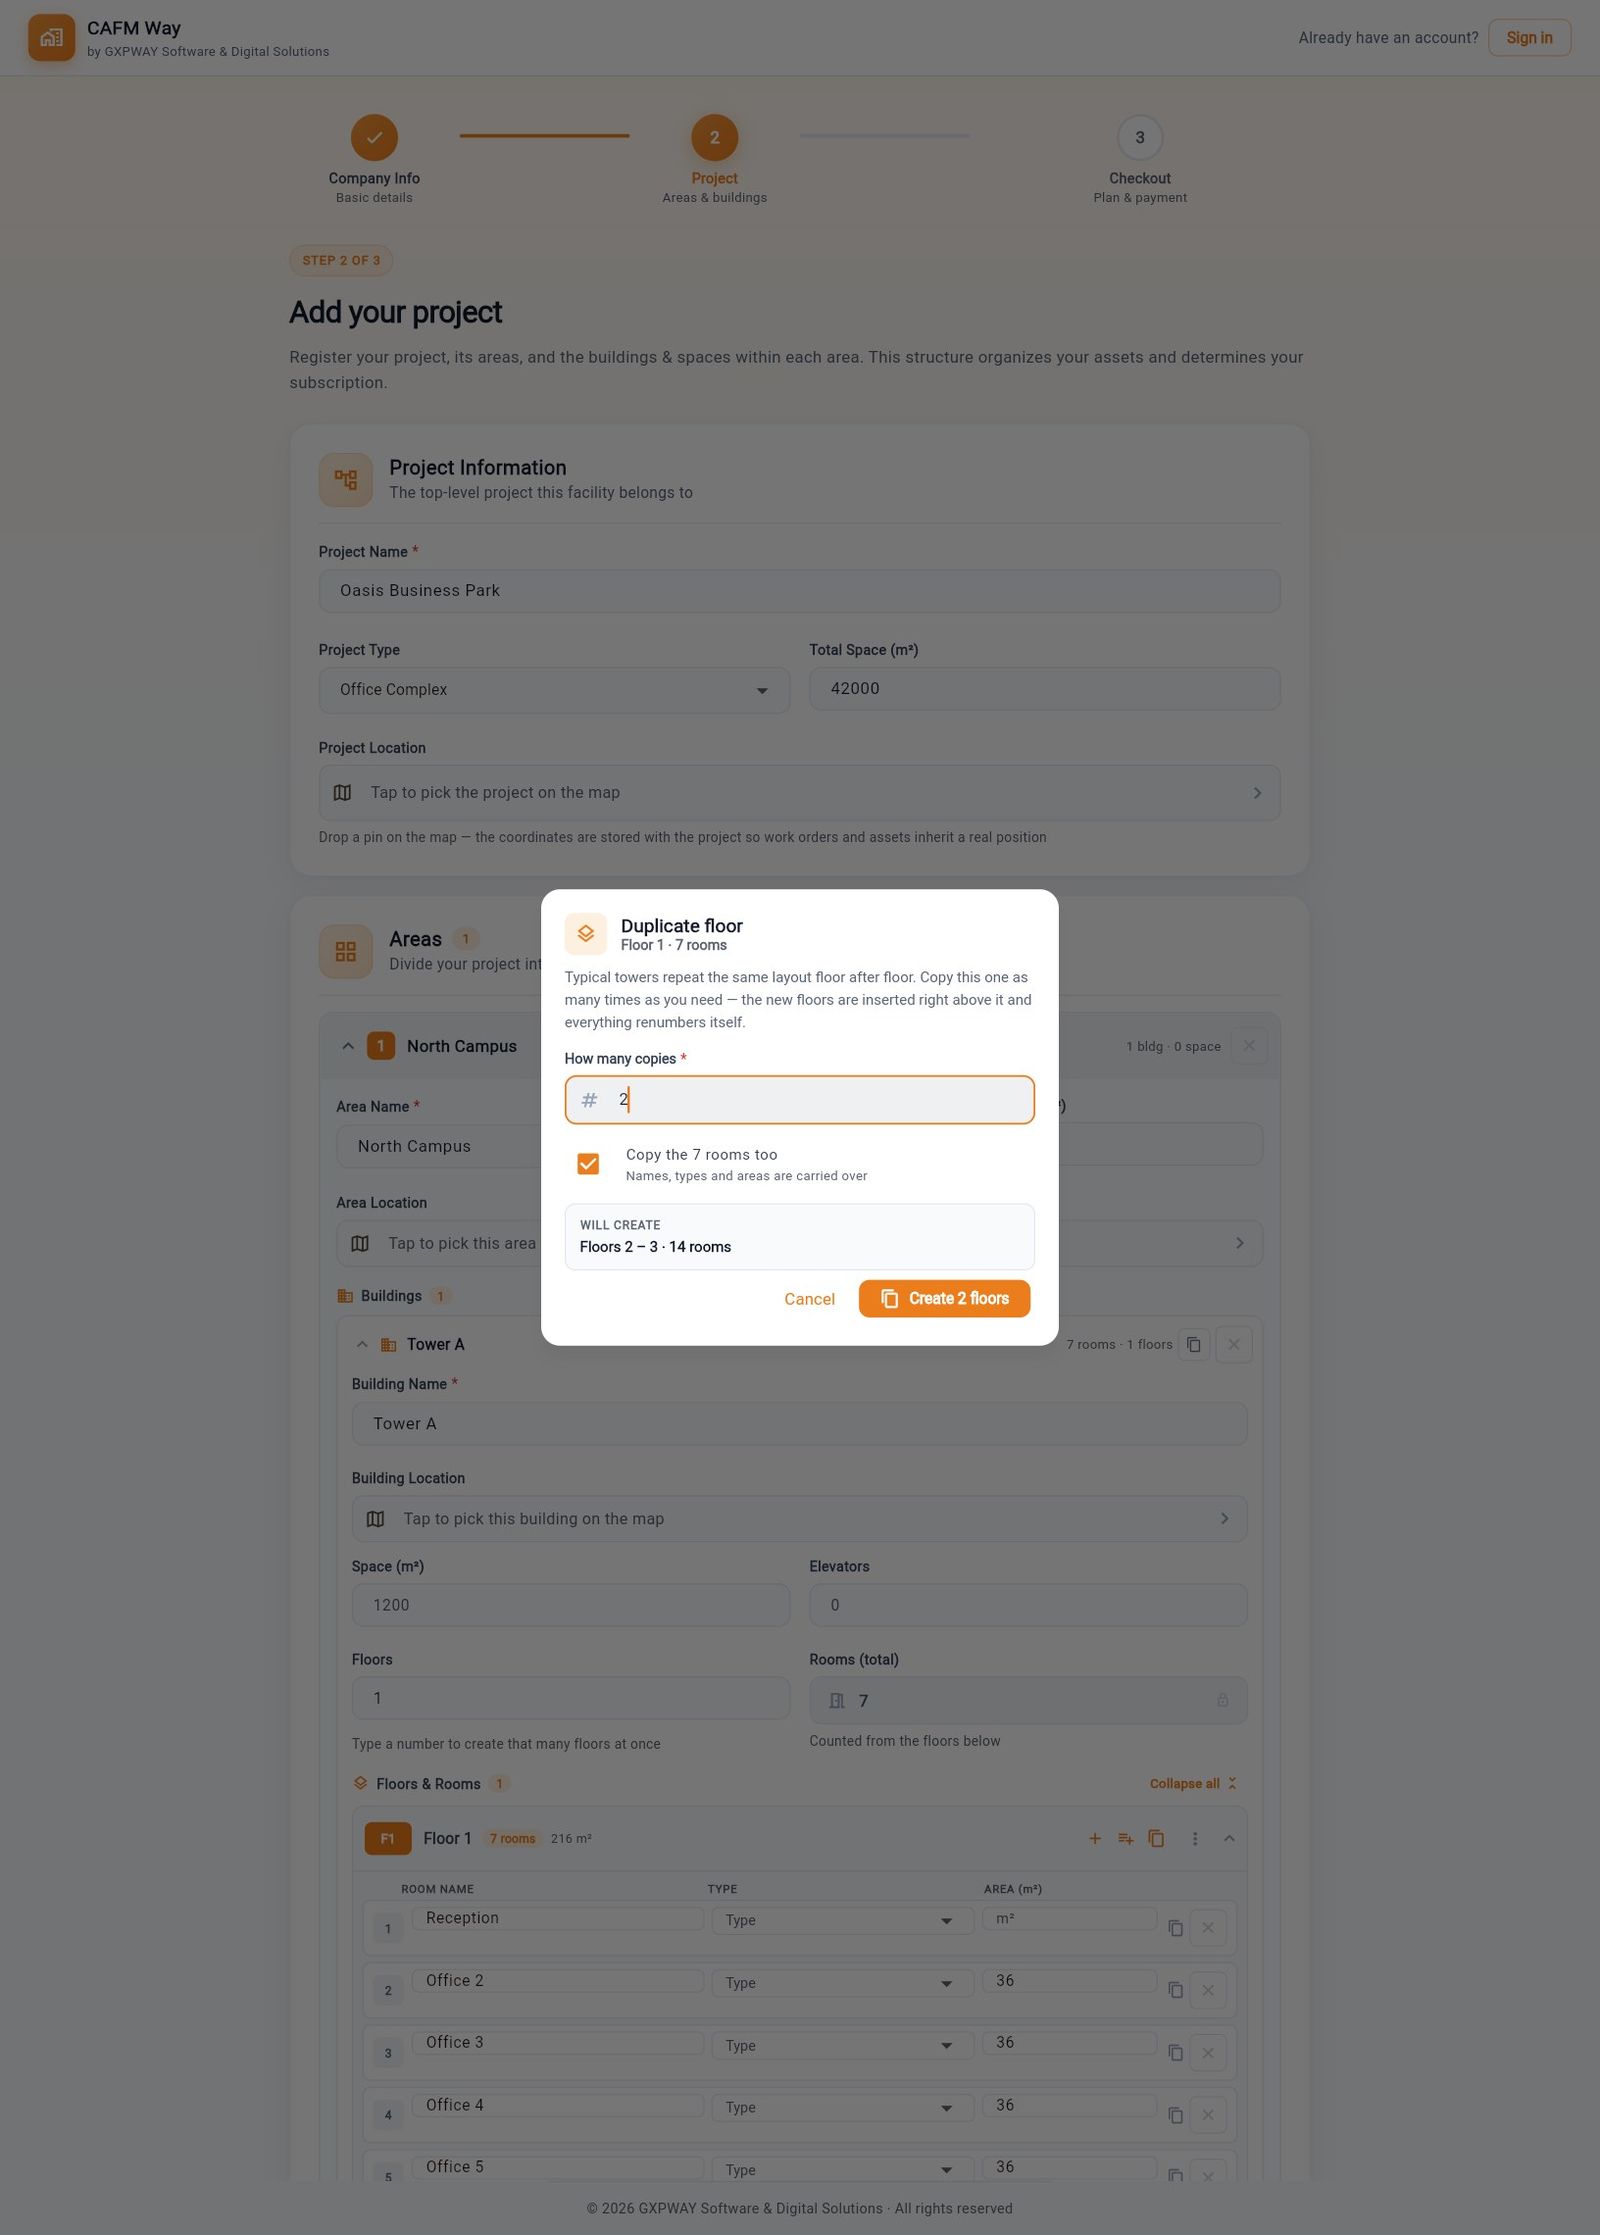
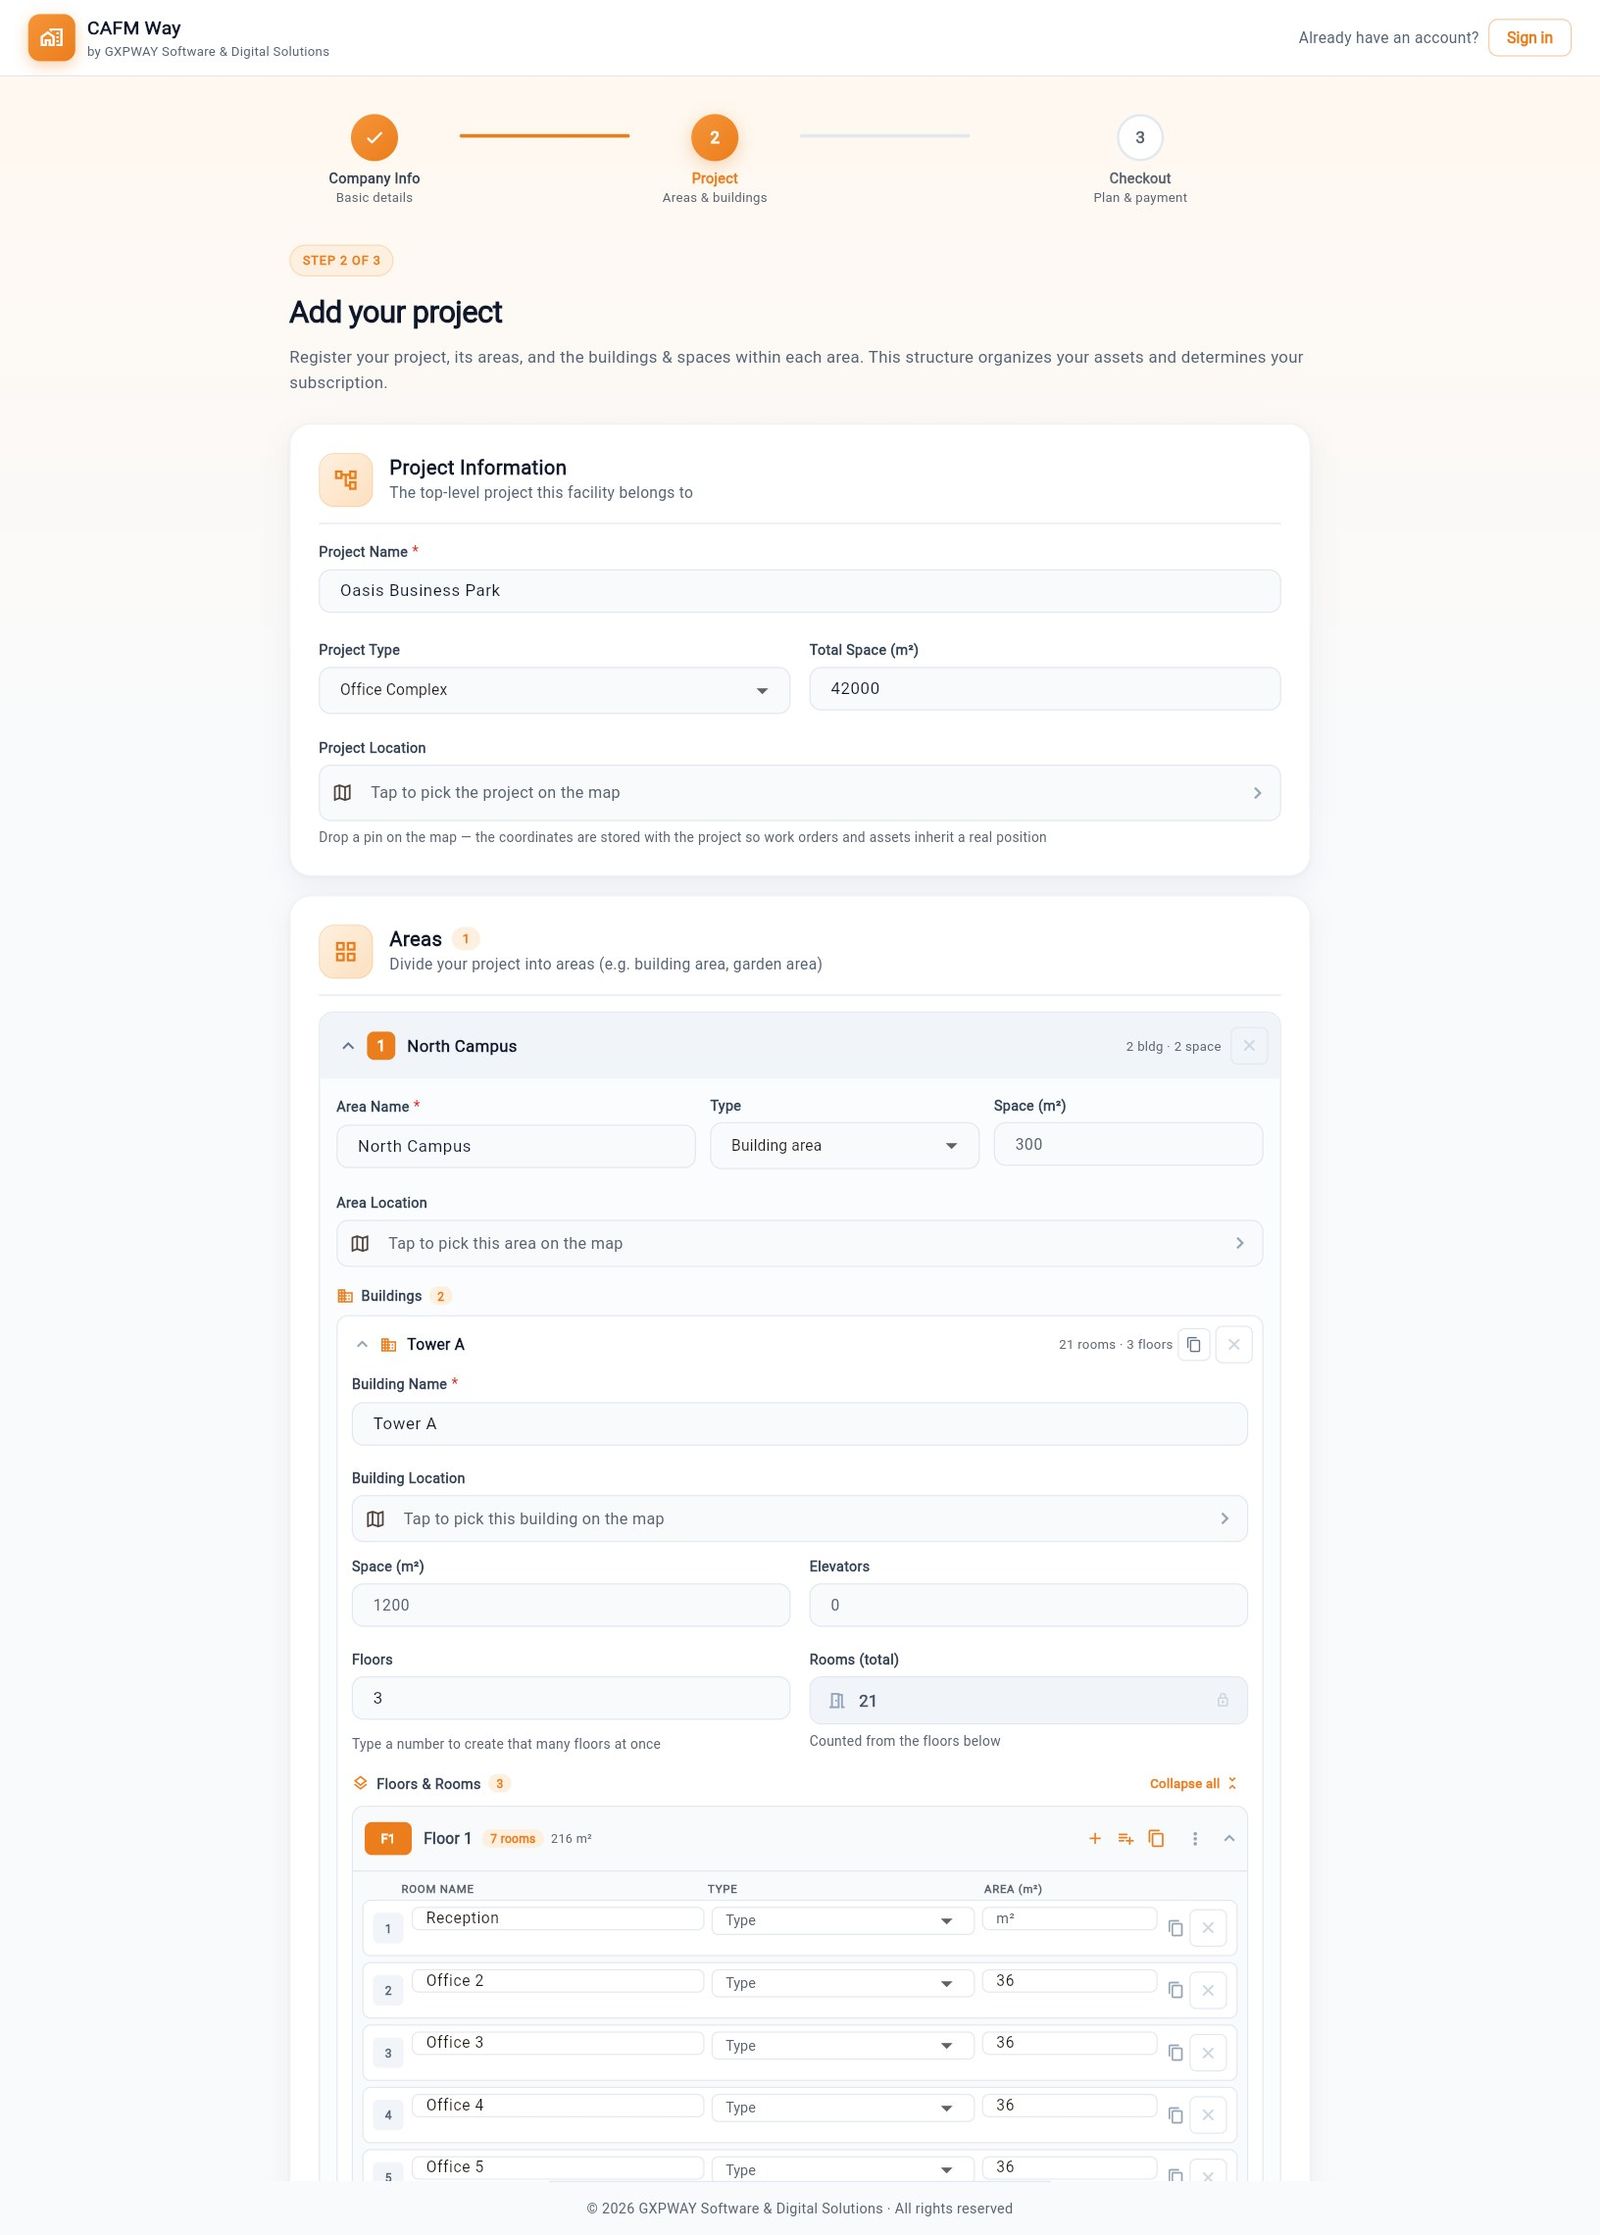
Step 2 — Project. The company describes its facility hierarchy: the project, its areas, the buildings in each area with their floors and rooms, and open spaces such as parking or gardens. Several shortcuts speed this up:
- Bulk add creates many rooms at once with a name prefix and numbering.
- Duplicate this floor copies a floor and its rooms.
- Duplicate this building structure copies a whole building.
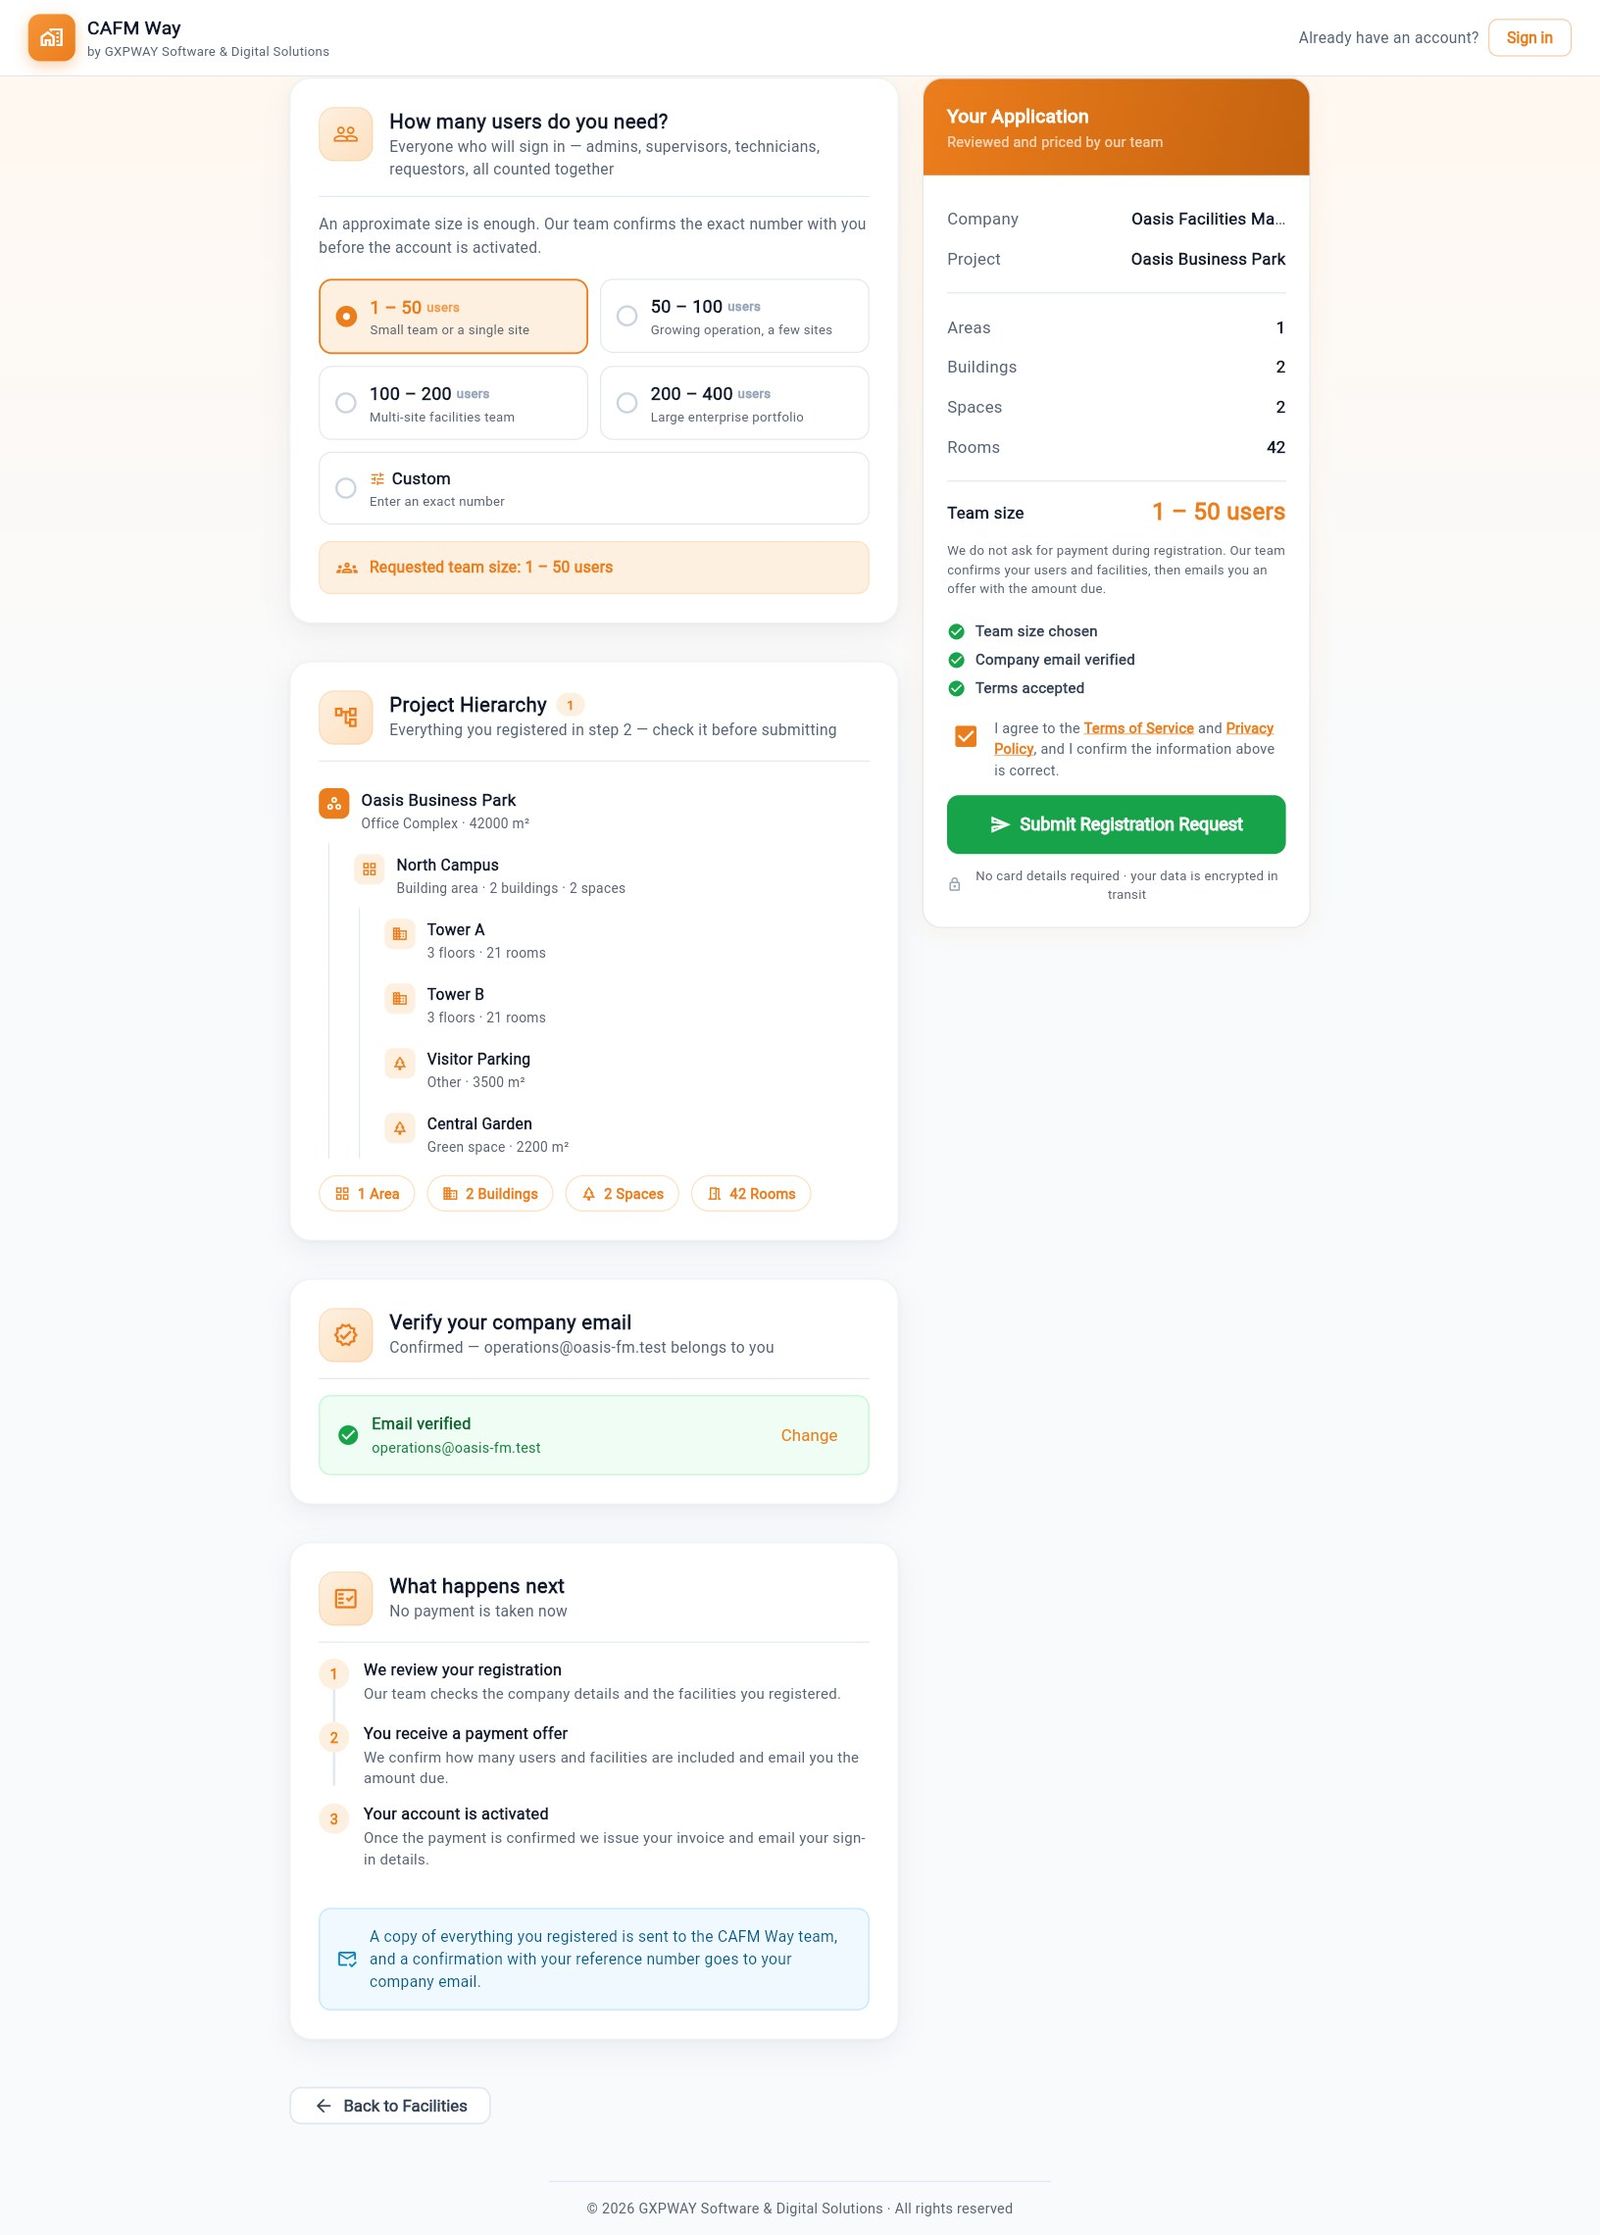
Step 3 — Checkout. The company chooses its team size, reviews the hierarchy, and verifies its email with an 8-digit code. It then accepts the terms and clicks Submit Registration Request. No payment is taken at this point.
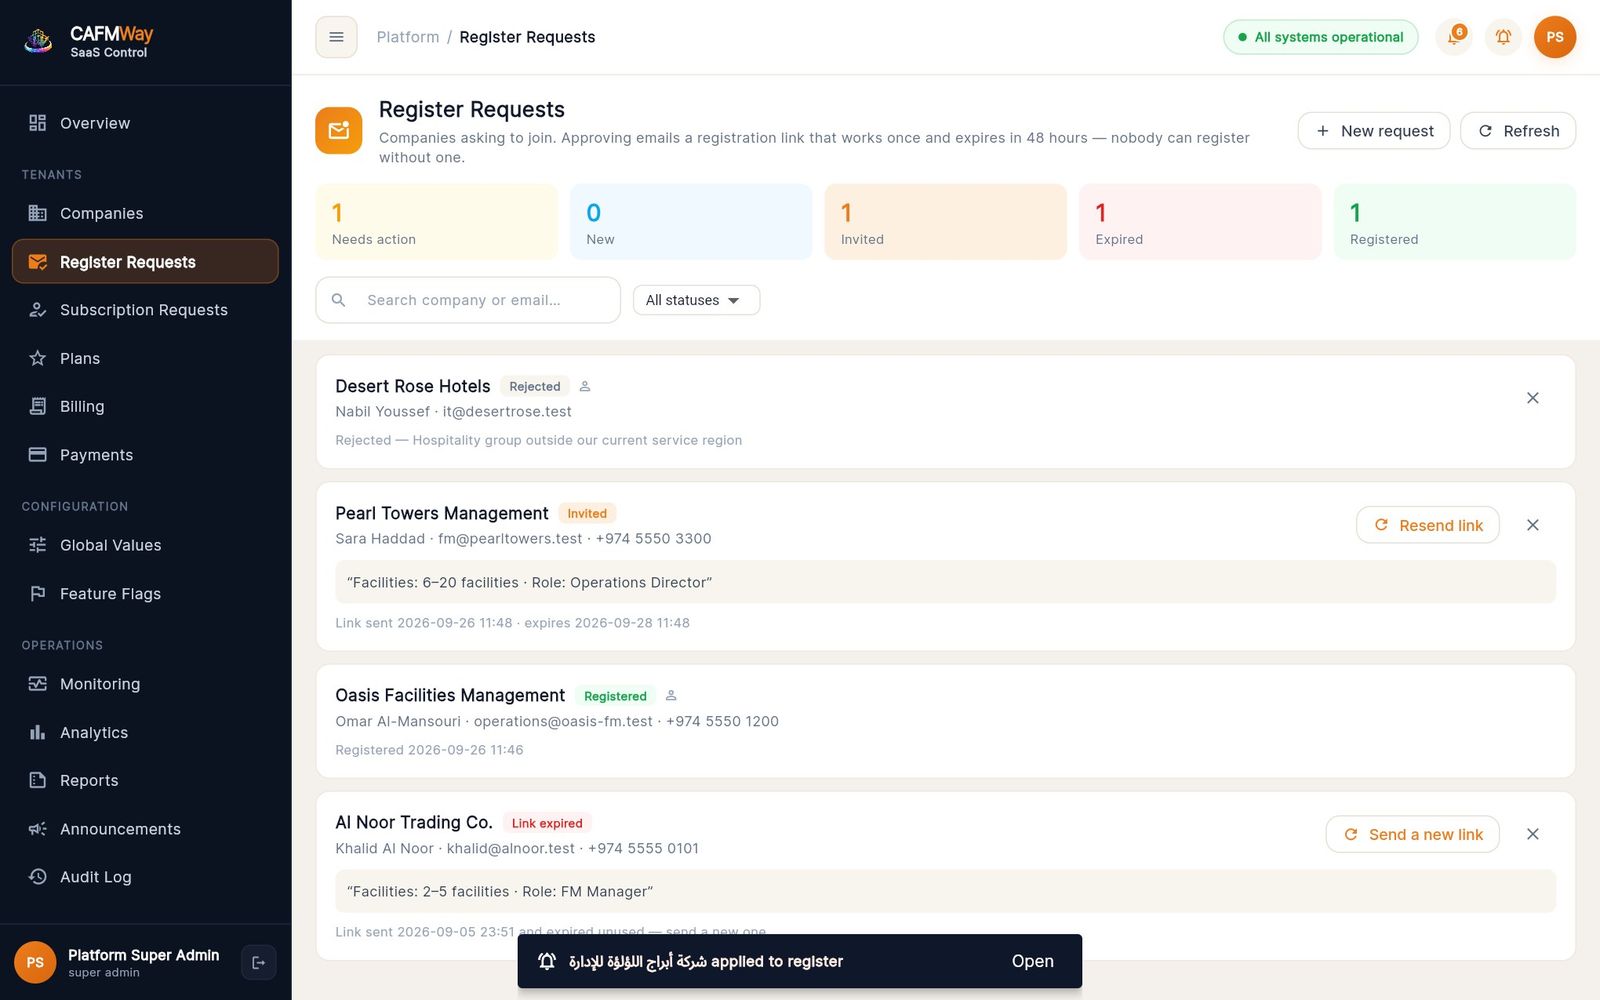
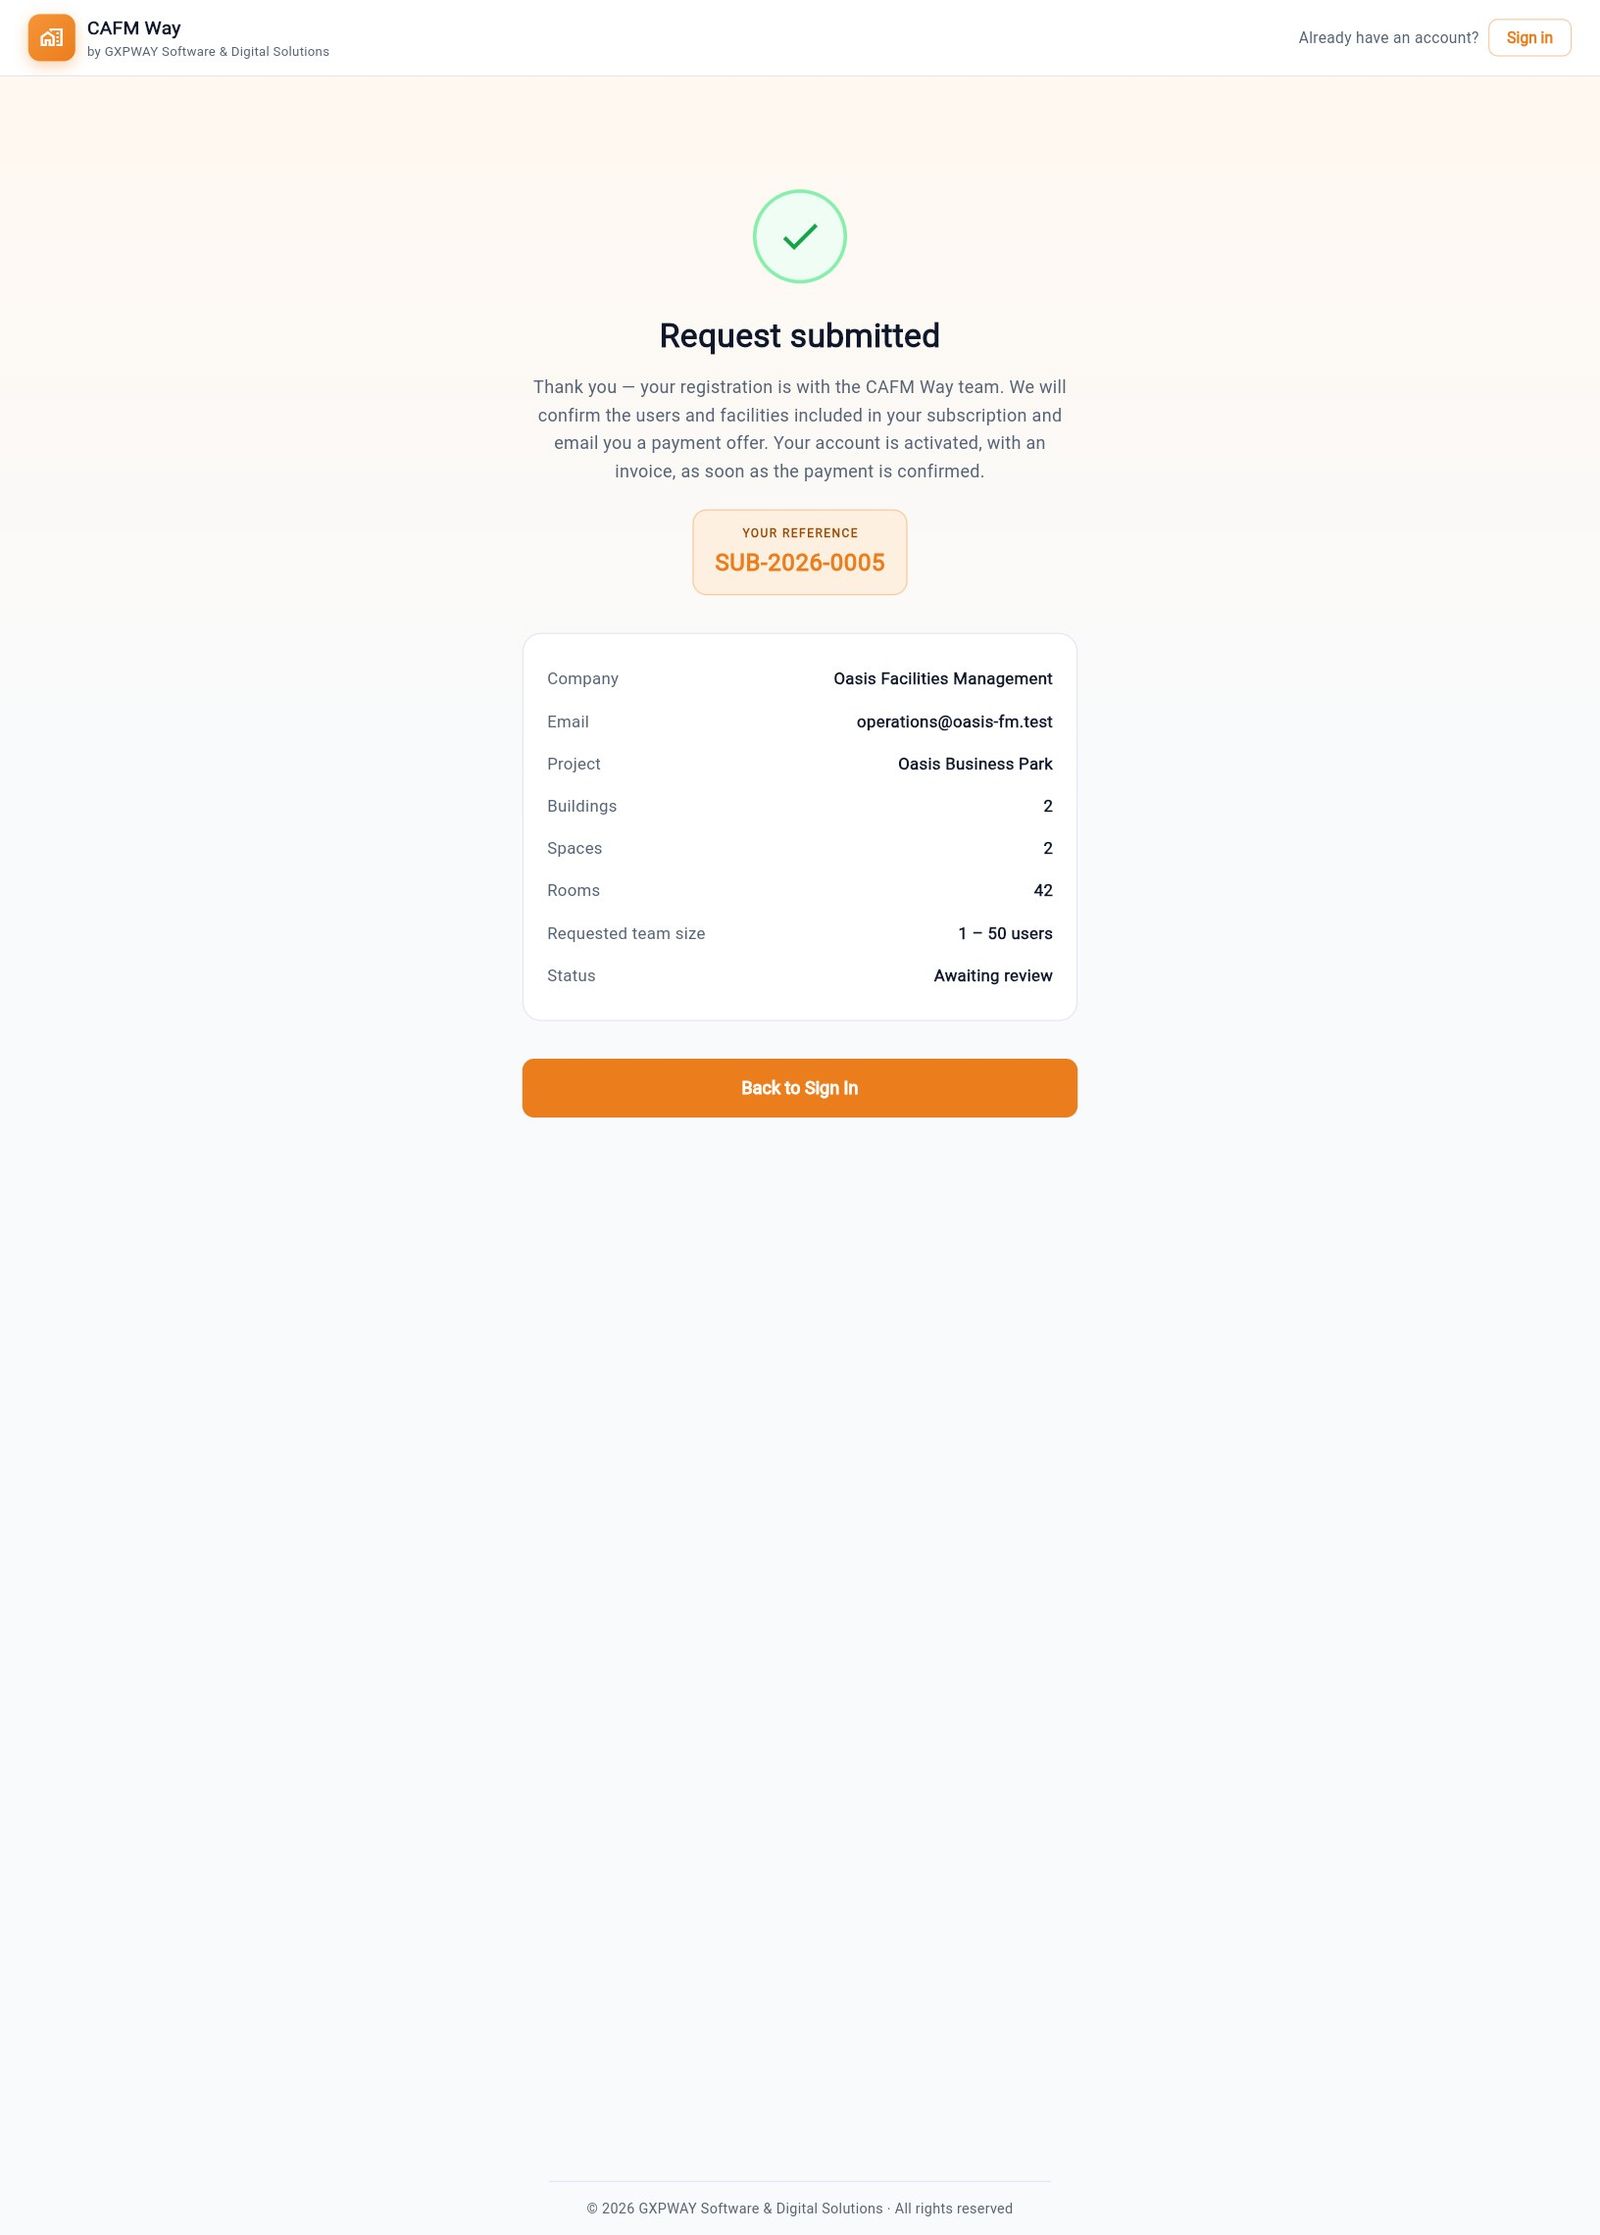
The company sees a reference number such as SUB-2026-0005. Both the company and CAFM receive a confirmation email, and the console shows "{Company} applied to register".
Step 5 — Review the request and set what to grant
- Who: a platform administrator
- Screen: Subscription Requests → request details
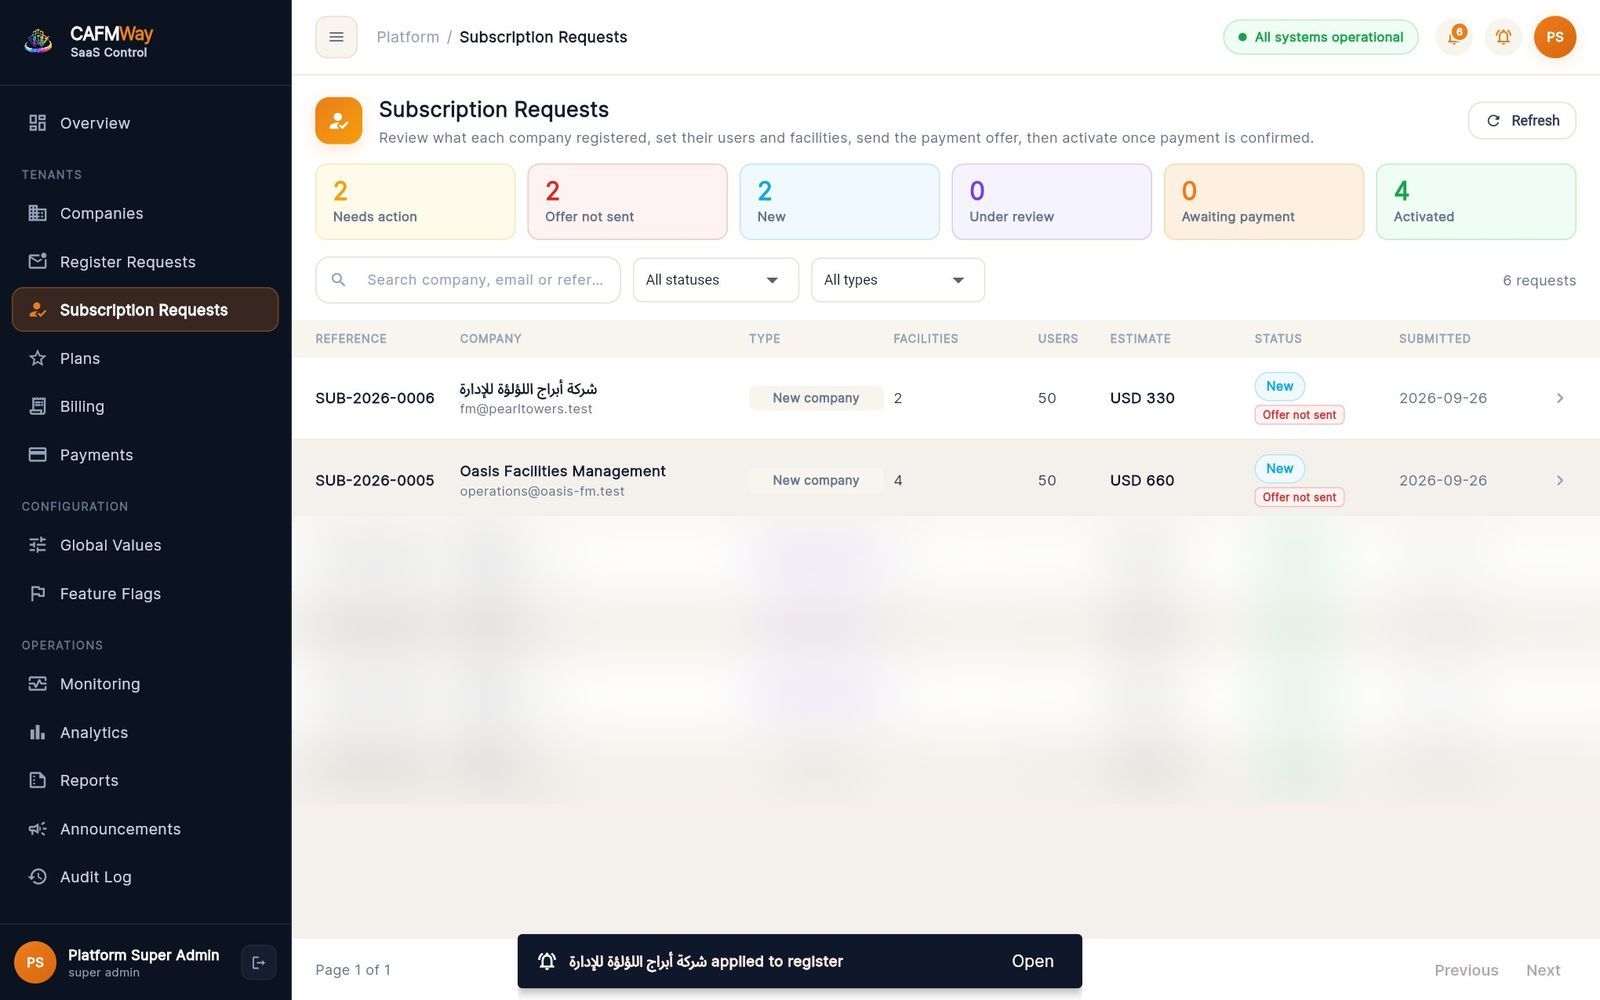
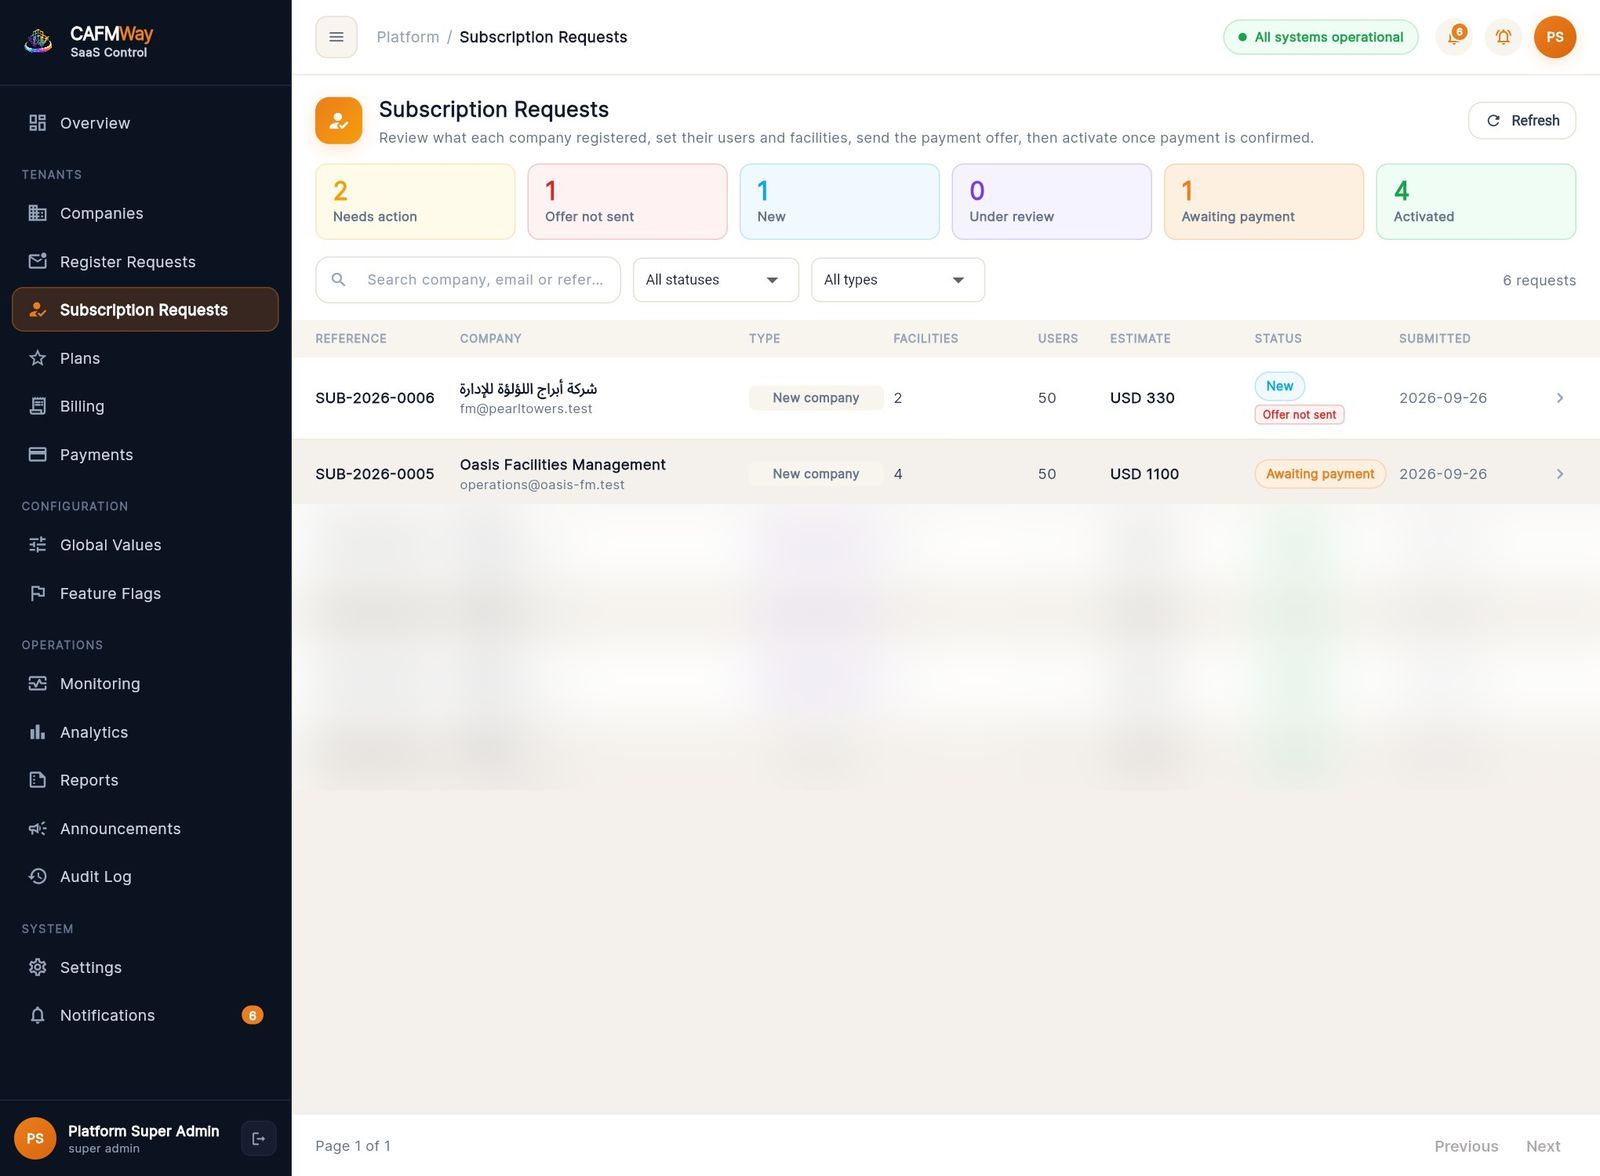
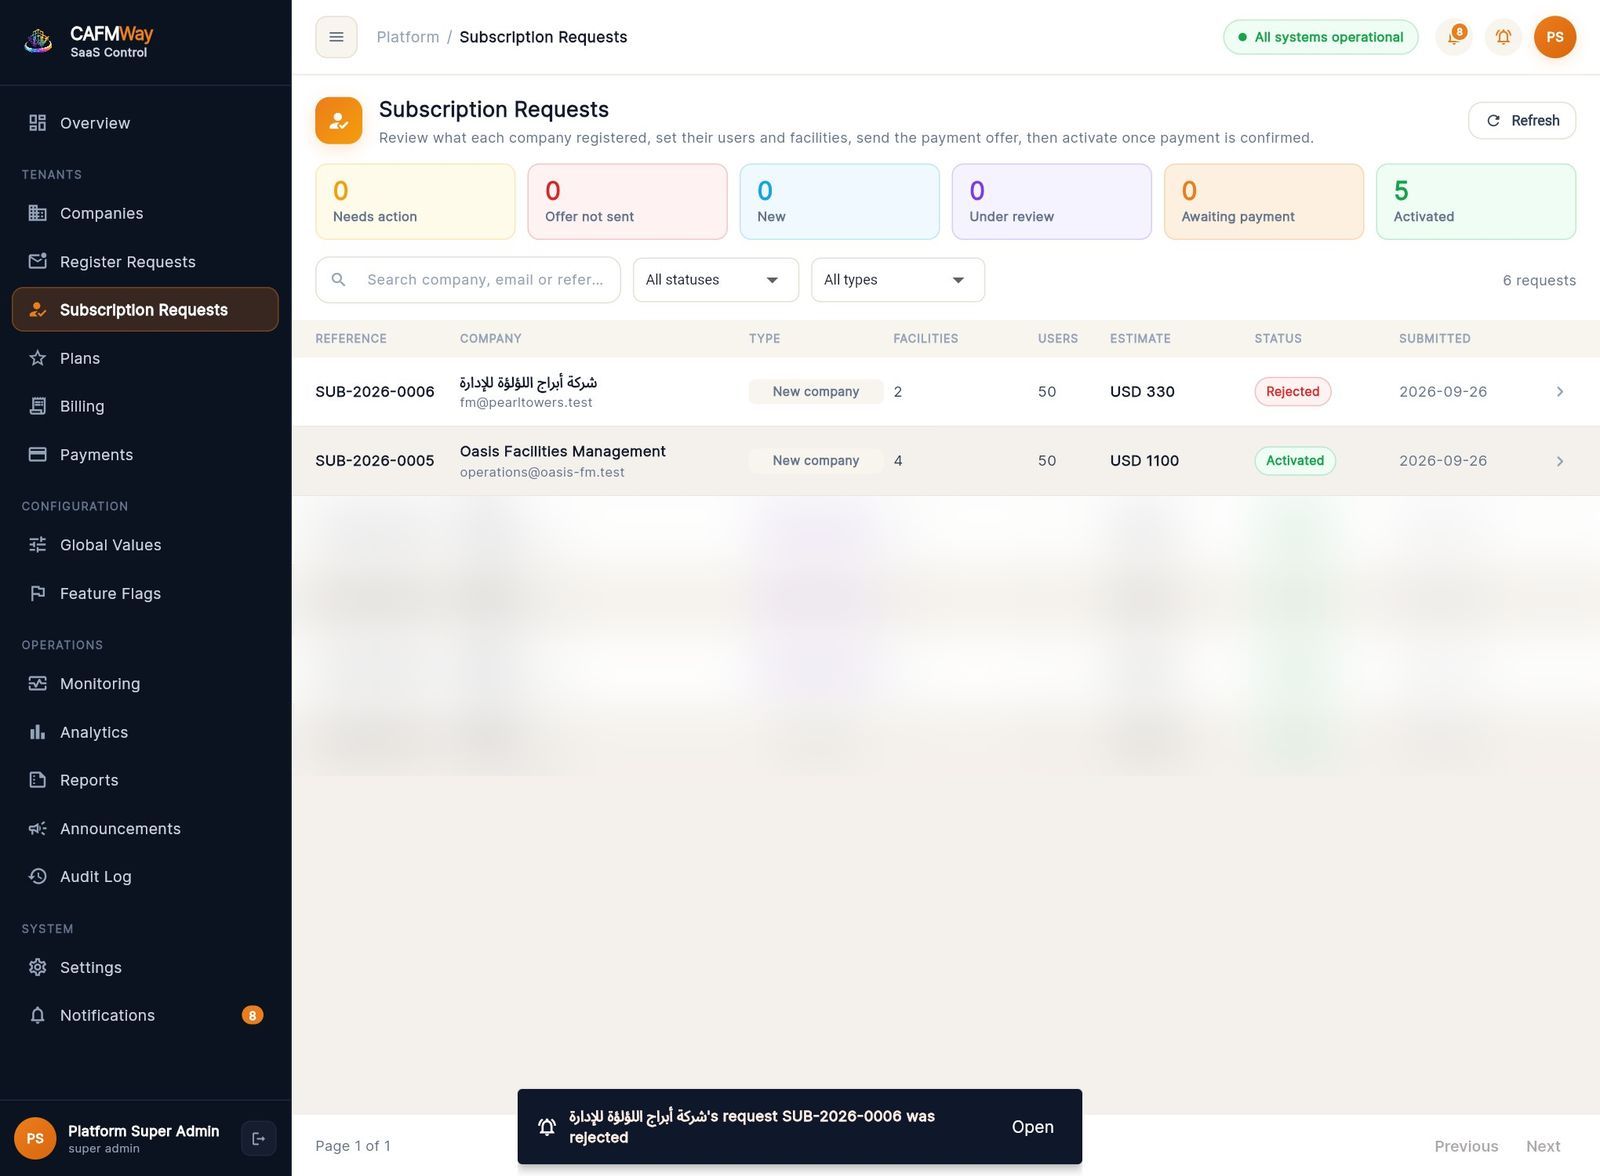
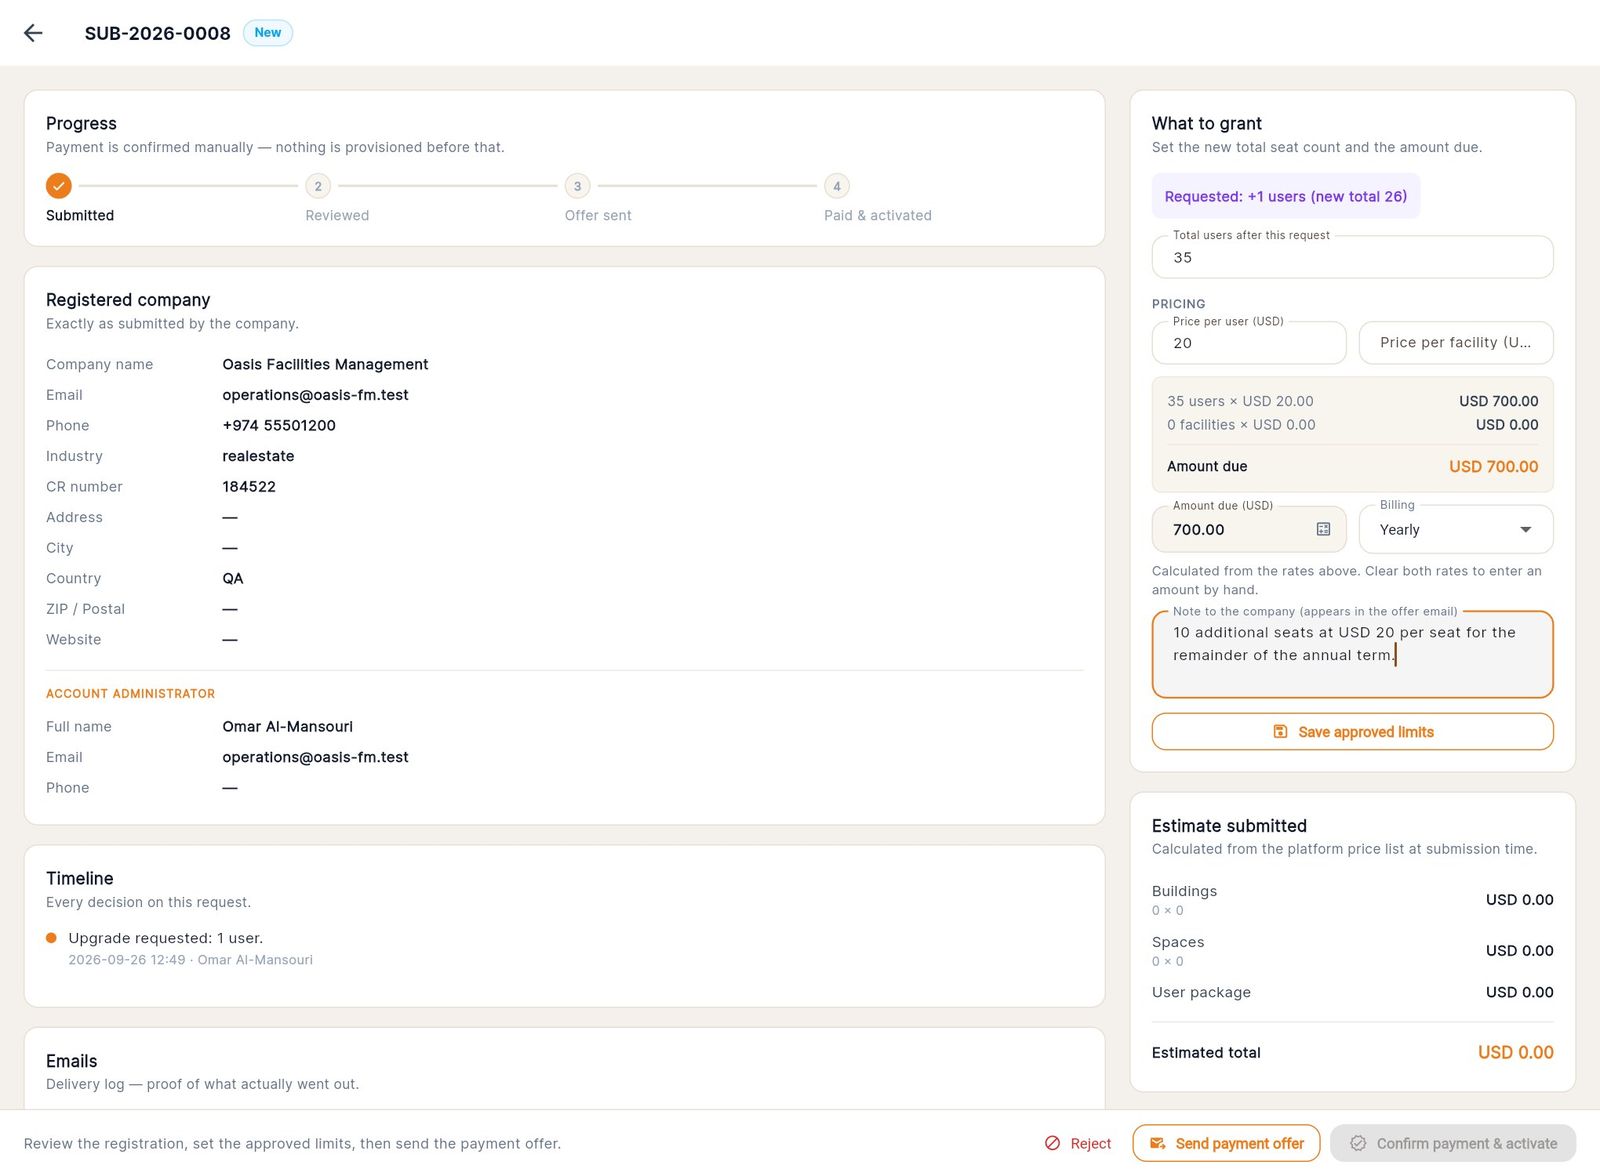
Subscription Requests is a single queue for new companies, extra users and extra facilities. The Offer not sent tag marks requests that still need a price.
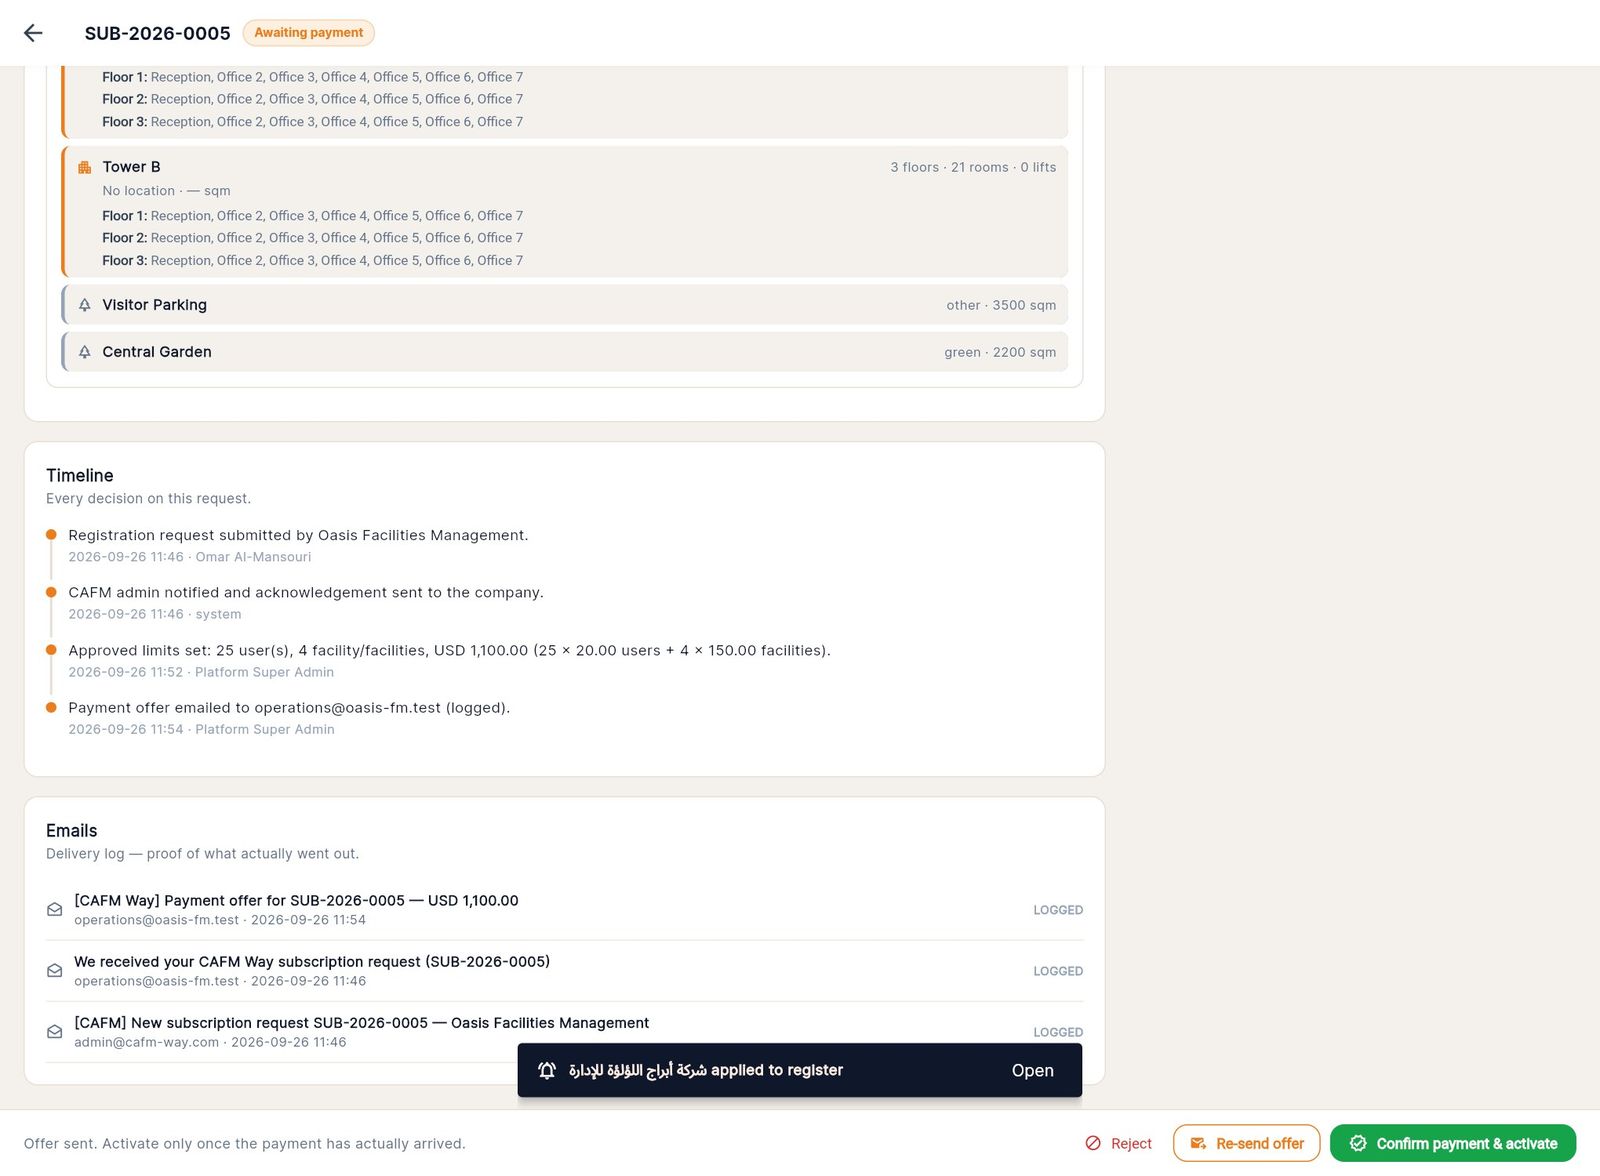
- Click the request to open it. The page shows:
- a Progress bar (Submitted → Reviewed → Offer sent → Paid & activated)
- the Registered company exactly as submitted
- the Responsible persons
- the full Facilities registered tree
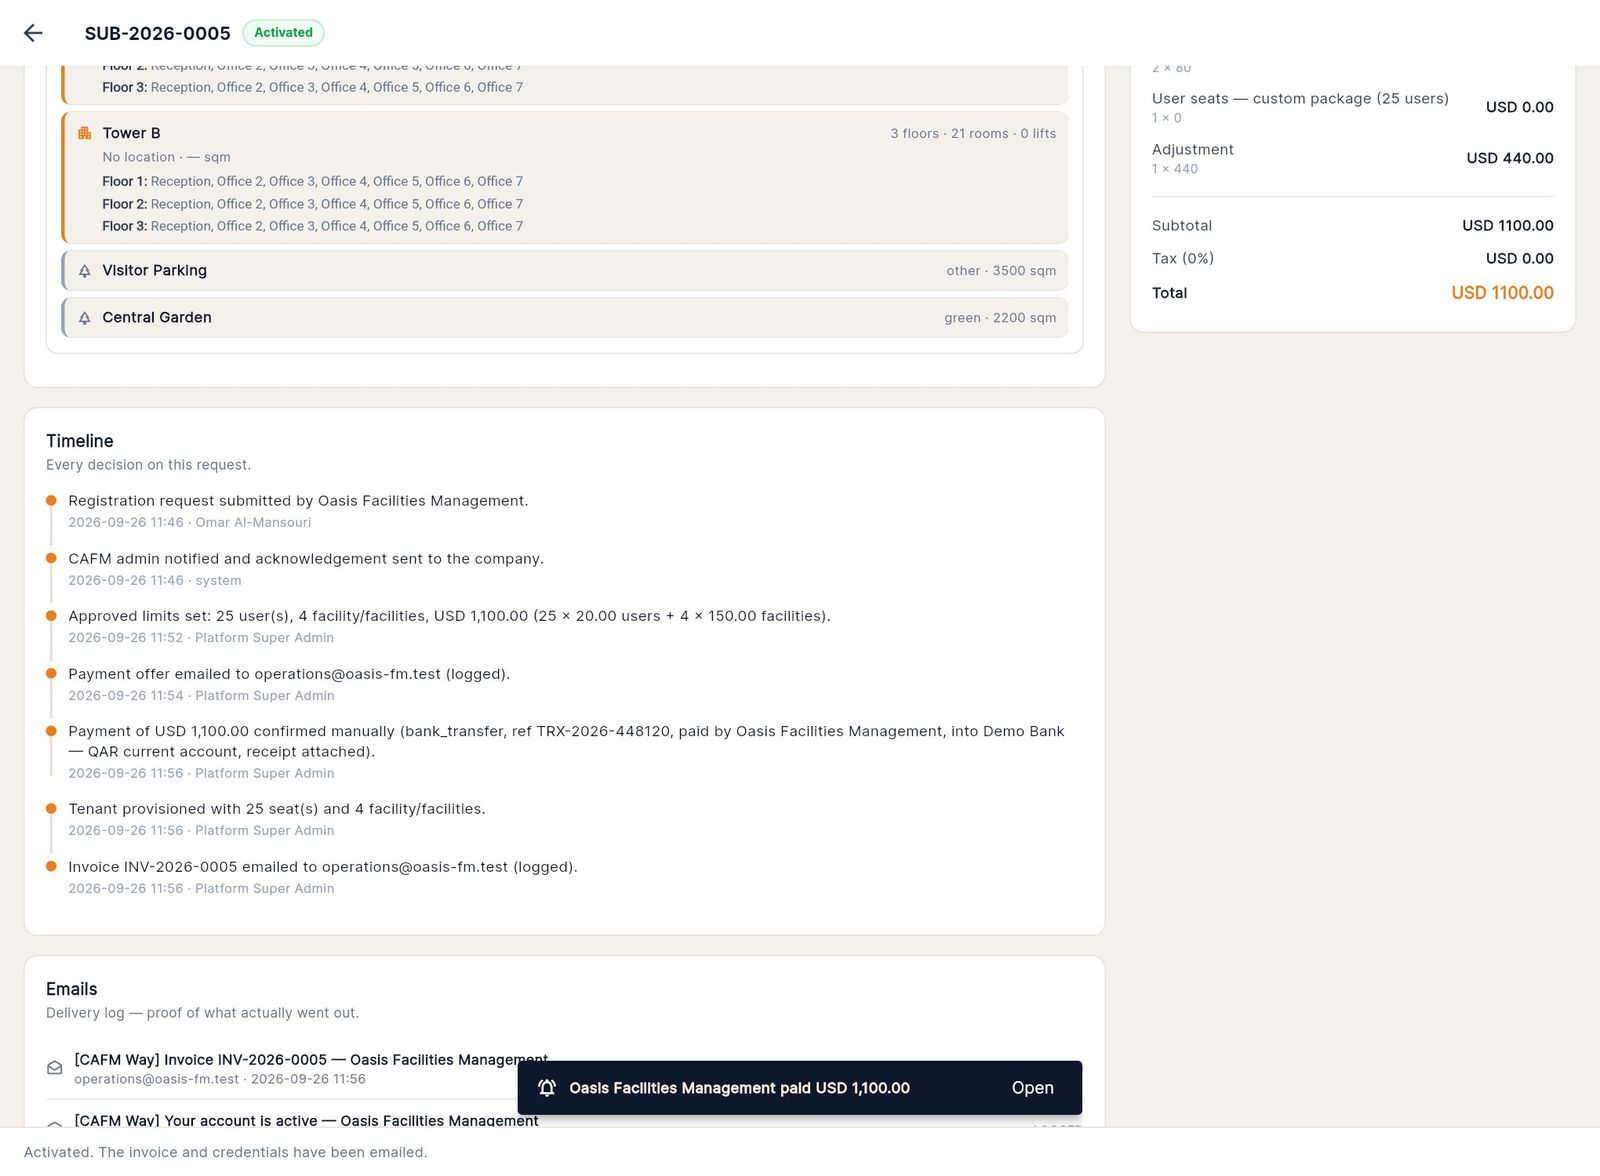
- a Timeline of every decision
- an Emails log
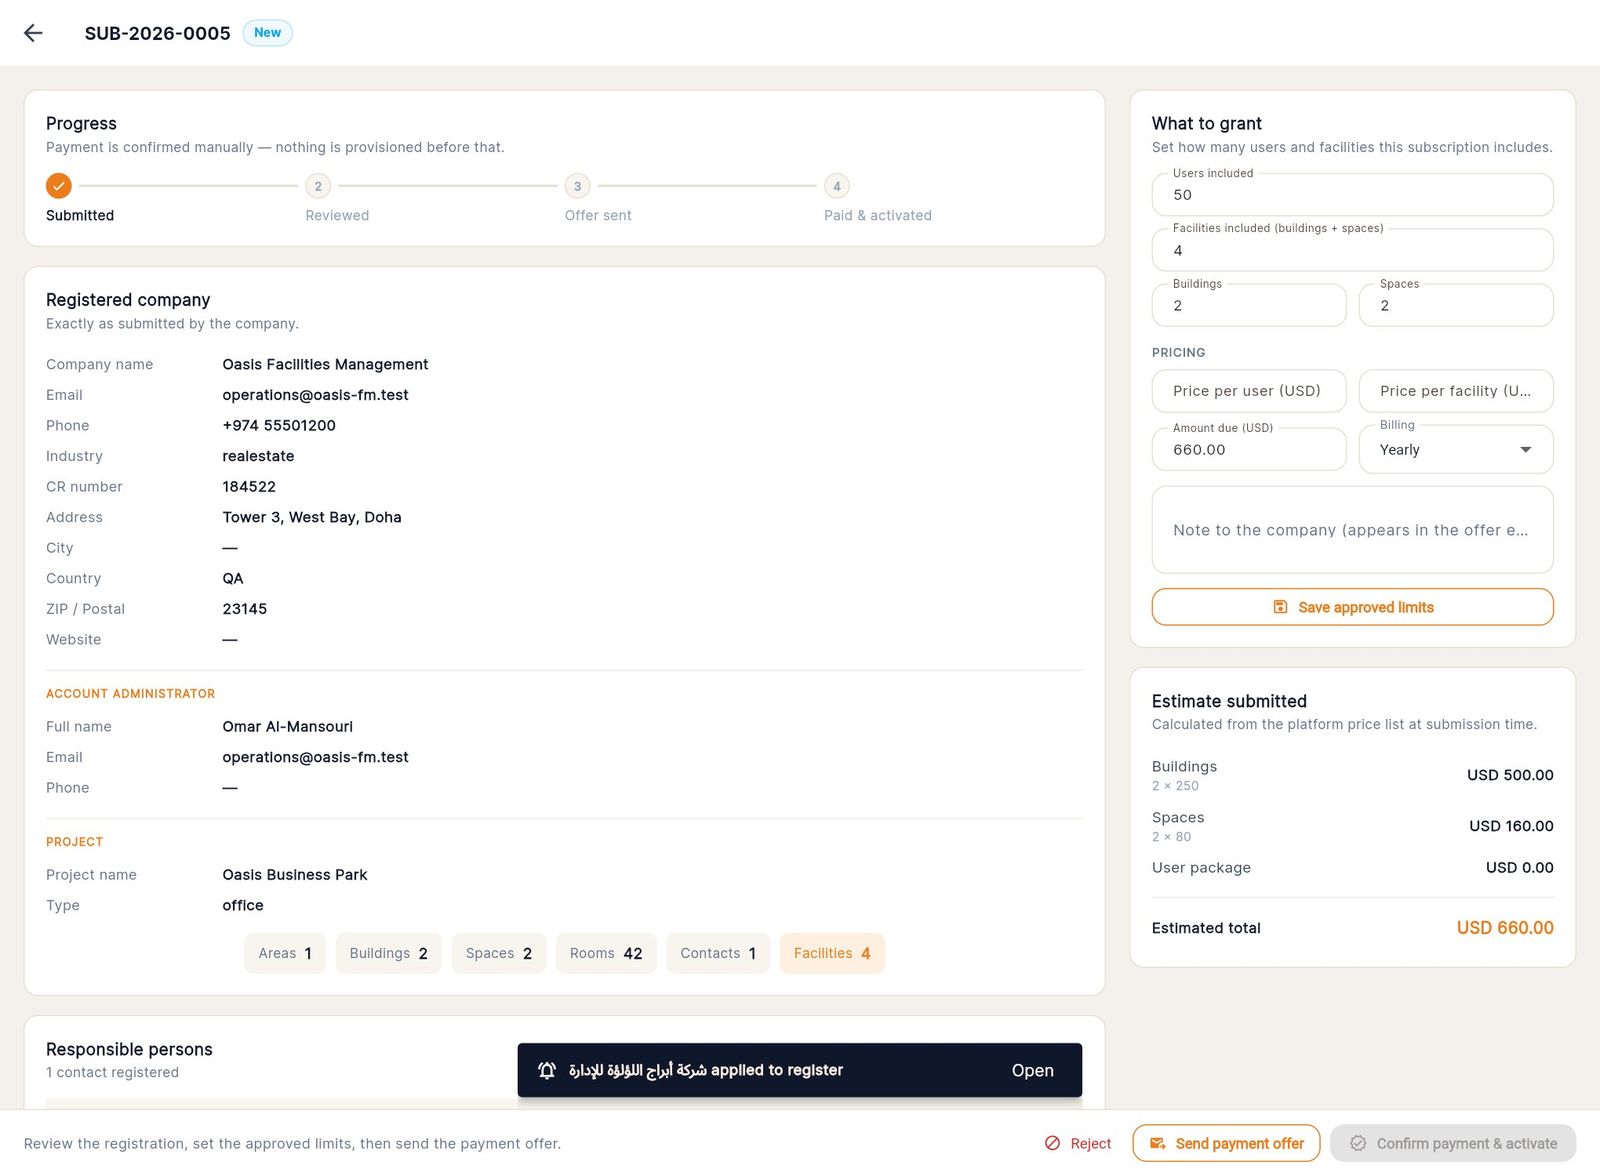
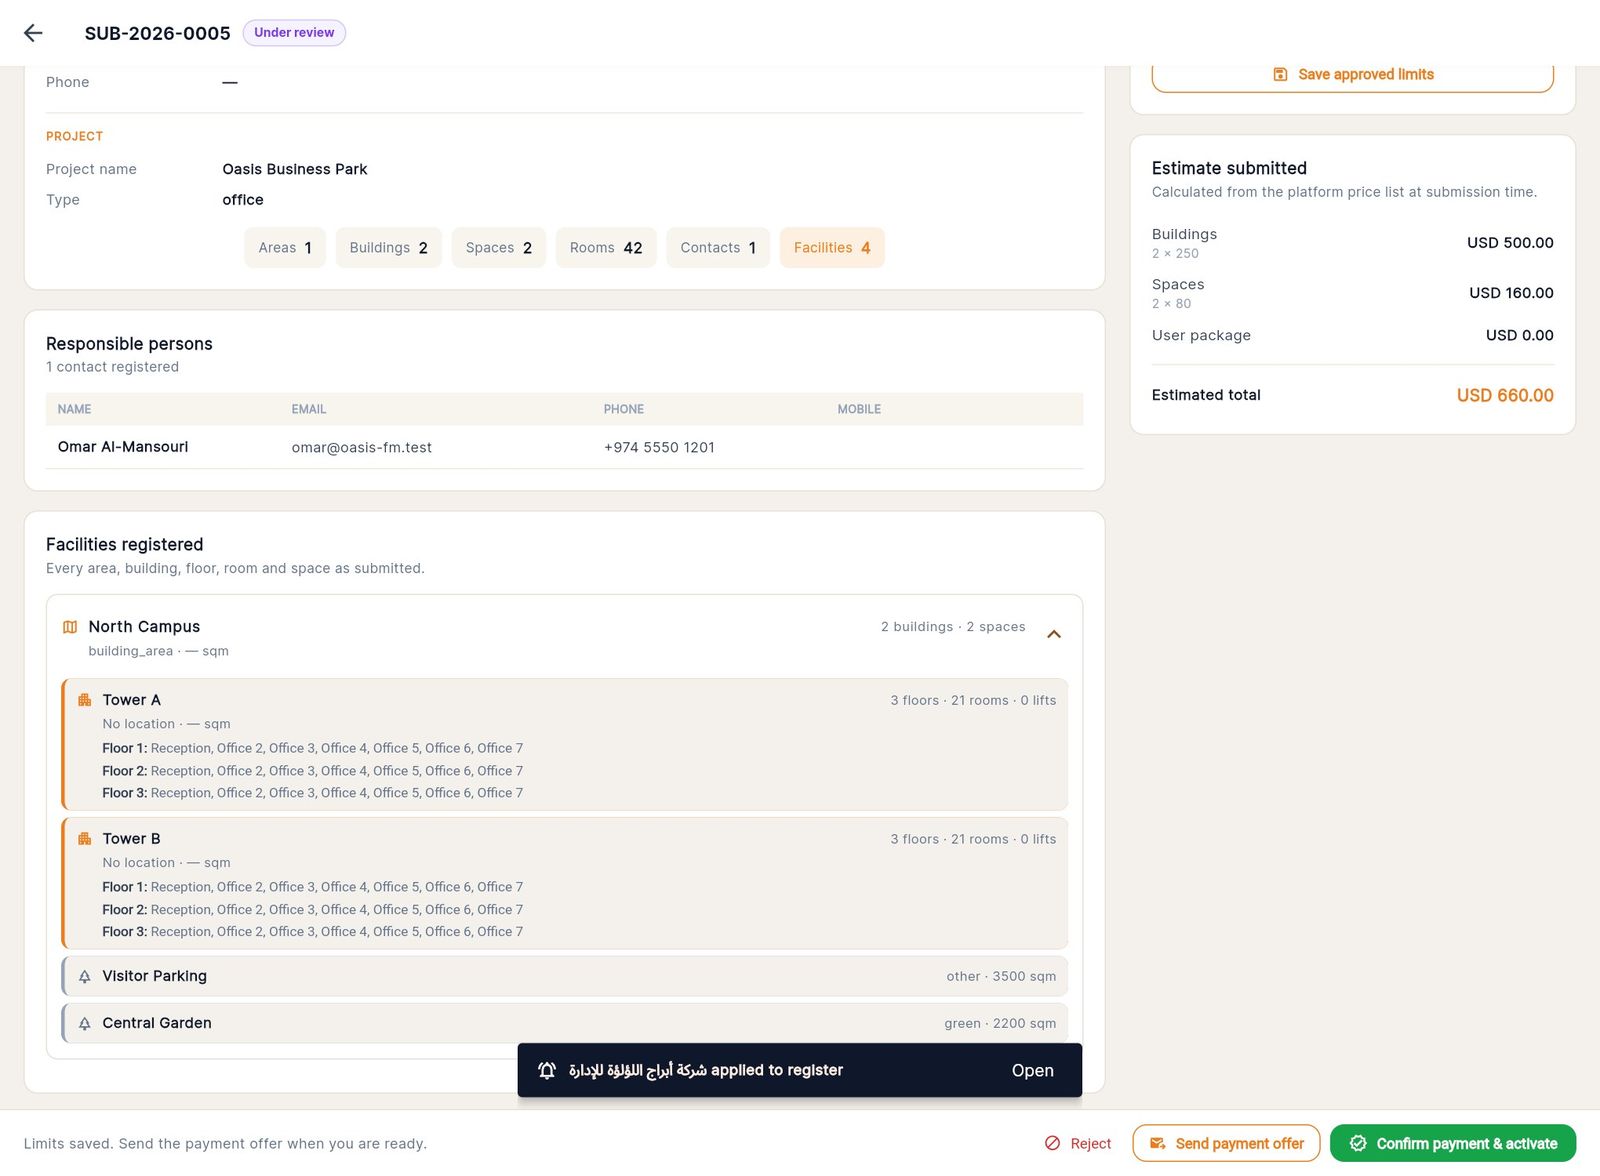
- In What to grant, set Users included and Facilities included, which default to what was registered.
- Under PRICING, enter Price per user and Price per facility. The Amount due is calculated for you. To type an amount by hand instead, clear both rates.
- Choose the Billing period (Yearly, Monthly or Quarterly) and optionally write a Note to the company, which appears in the offer email.
- Click Save approved limits.
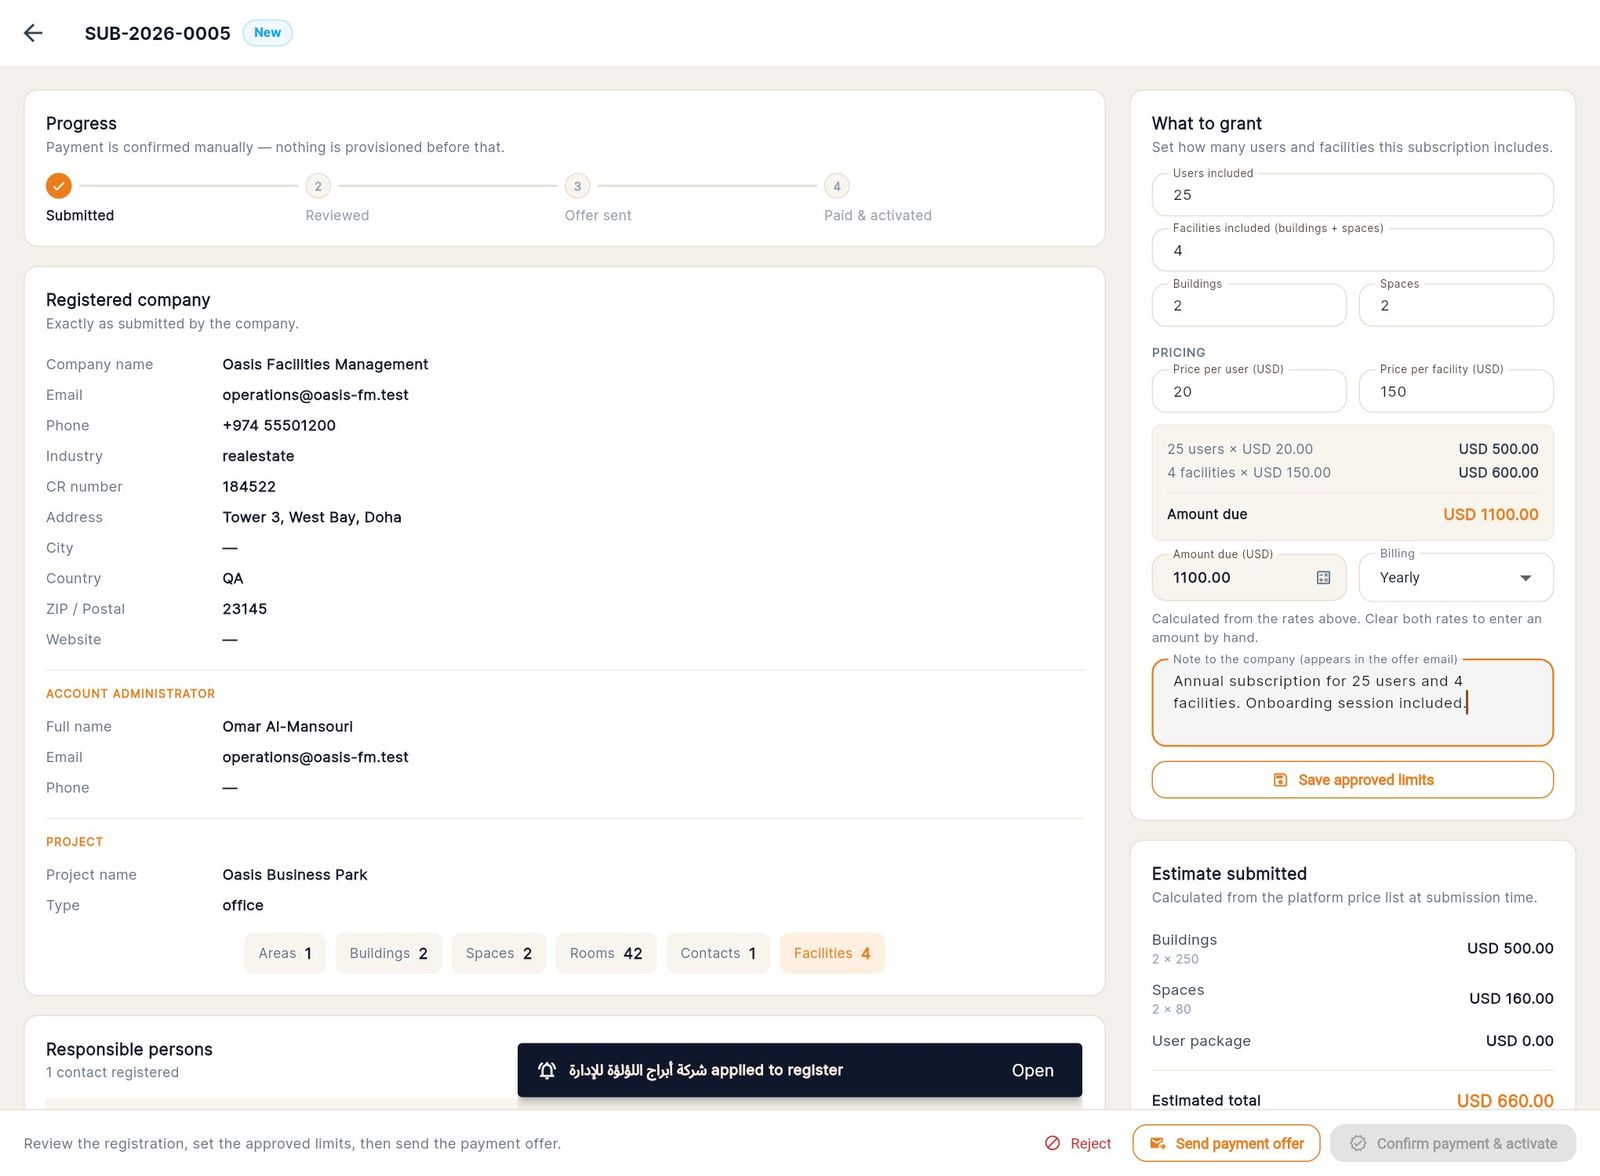
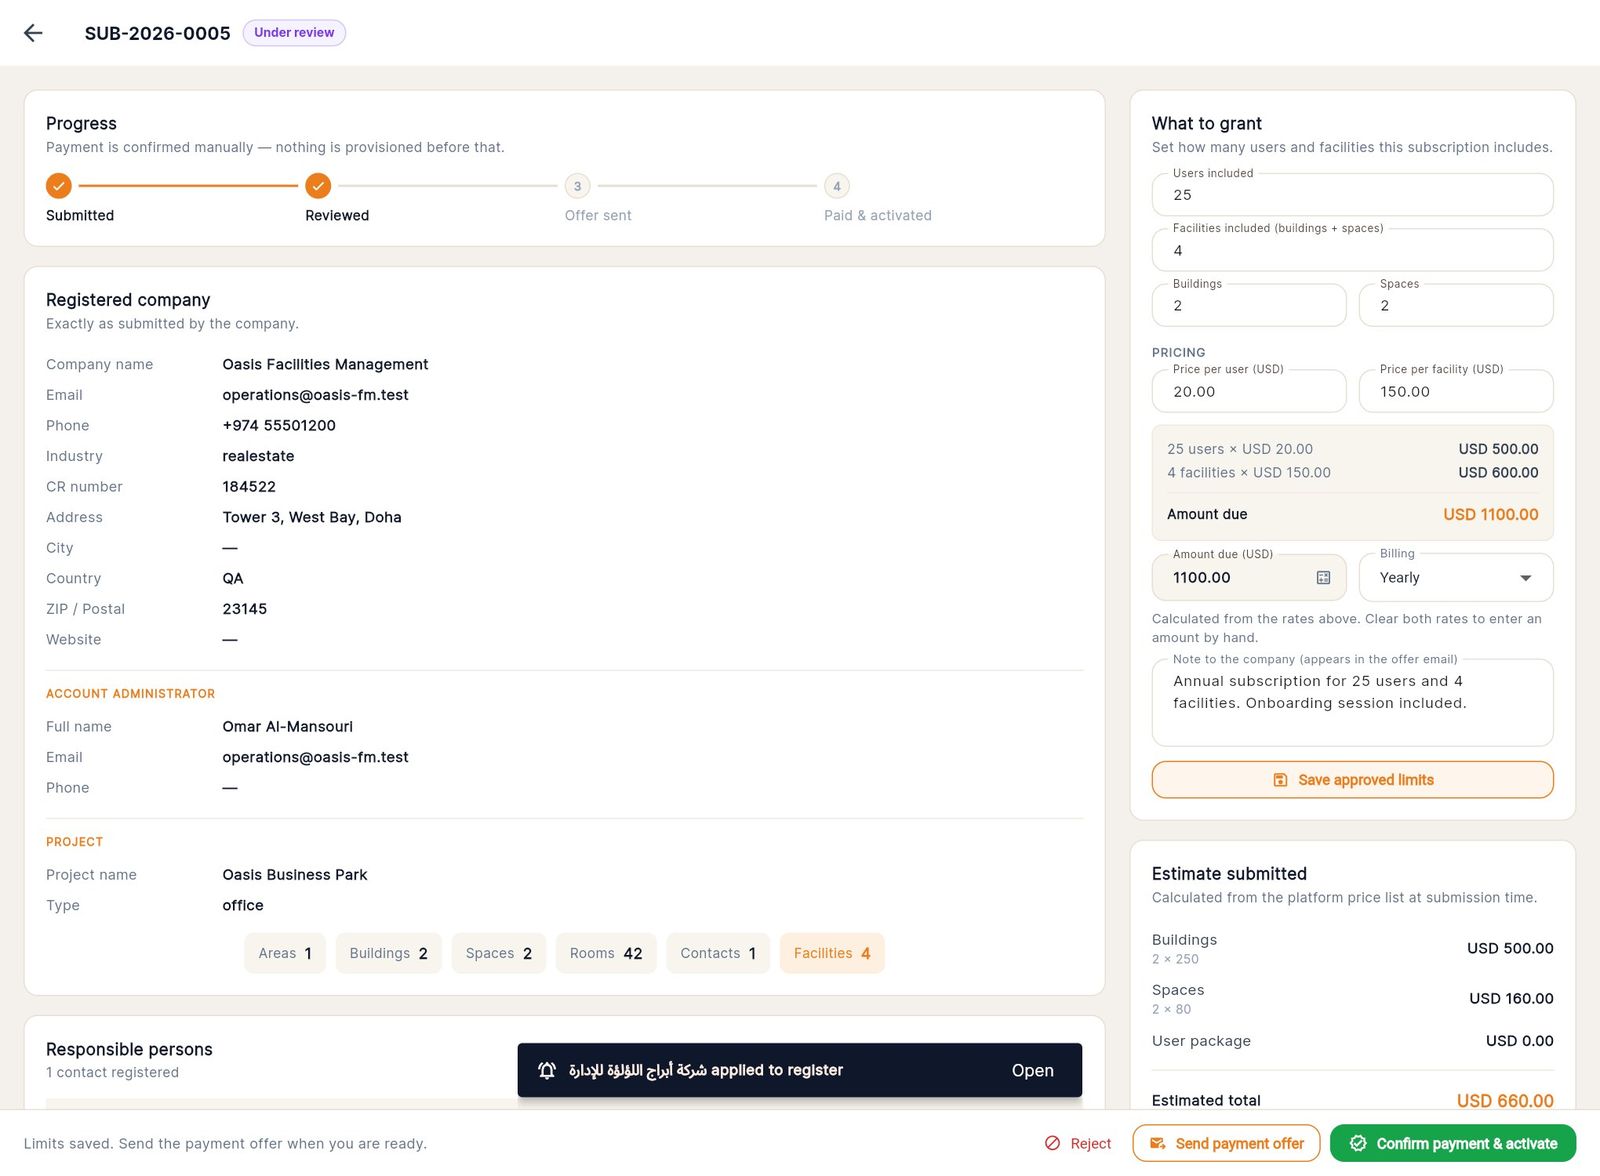
The request moves from New to Under review, and the change is written to the timeline and the audit log. The Estimate submitted card keeps the price the platform's price list suggested when the company applied, for comparison.
Step 6 — Send the payment offer
- At the bottom of the request, click Send payment offer.
- Confirm with Send offer.
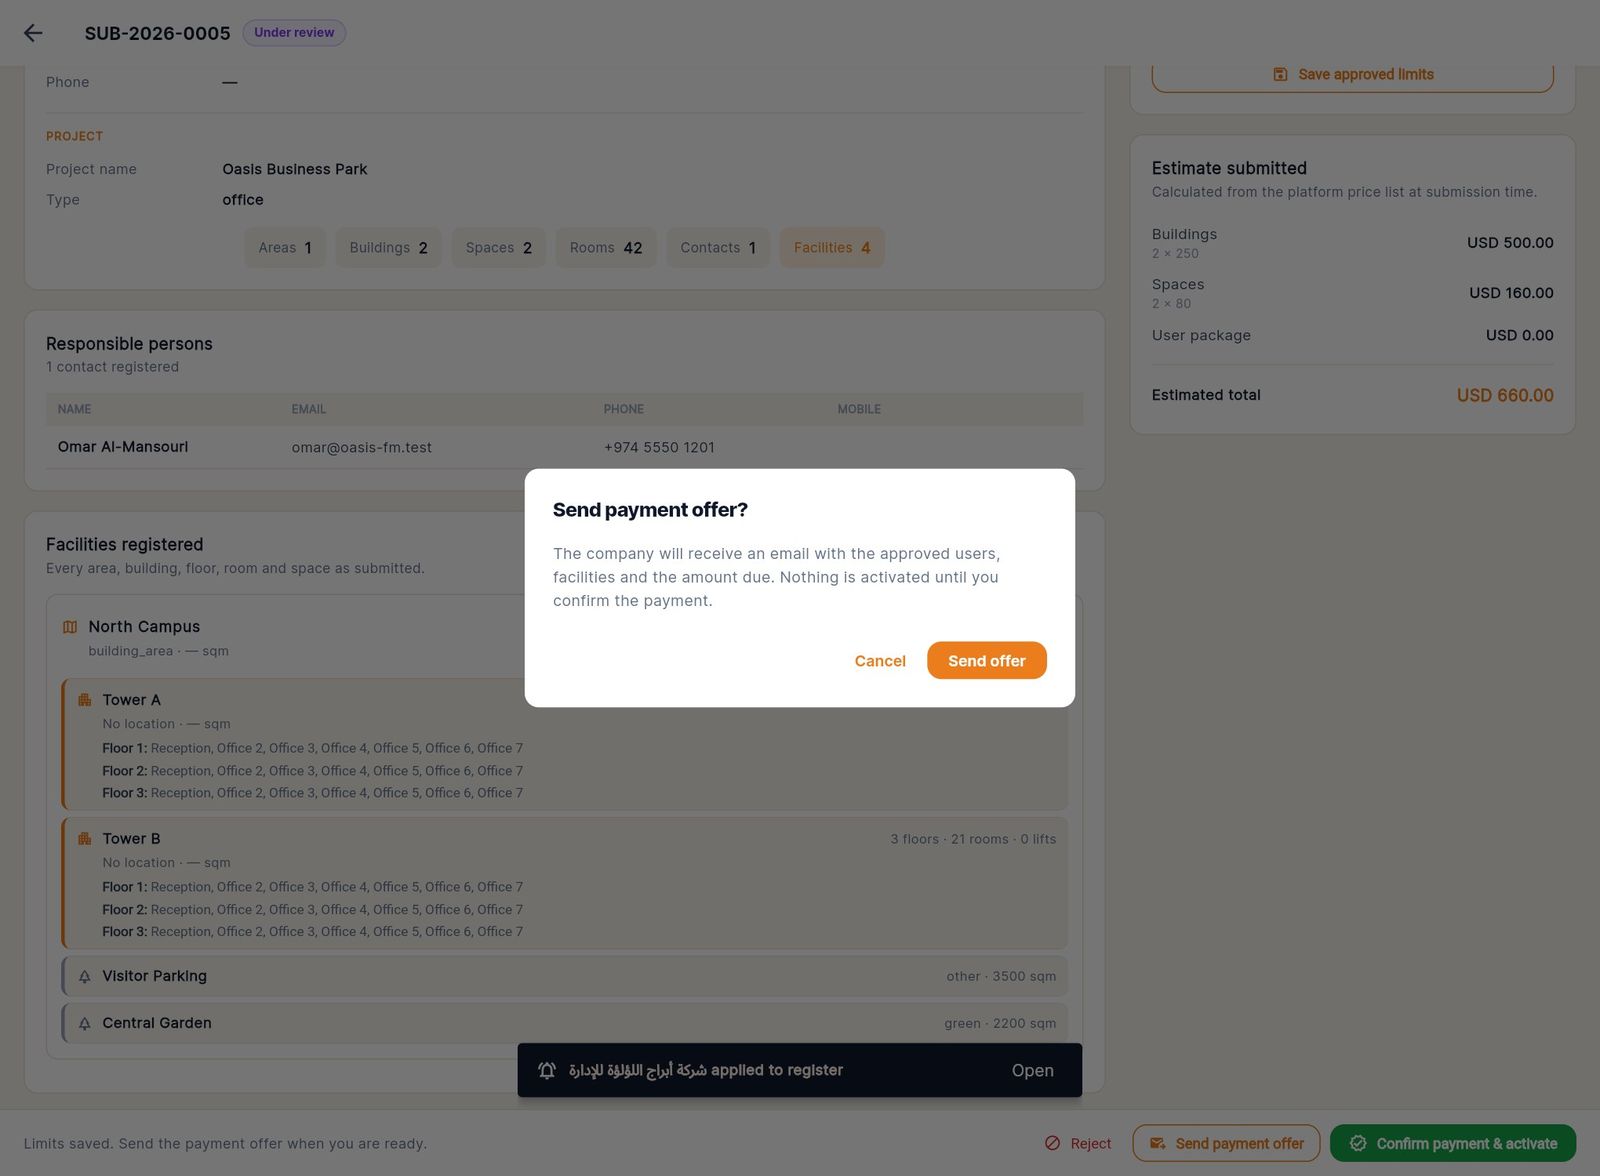
The company receives an email with the approved users, facilities, the amount due and CAFM's bank details. The request becomes Awaiting payment. The email appears in the request's Emails card.
Step 7 — Confirm payment and activate
Only activate once the money has actually arrived. This is the gate that creates the customer's account.
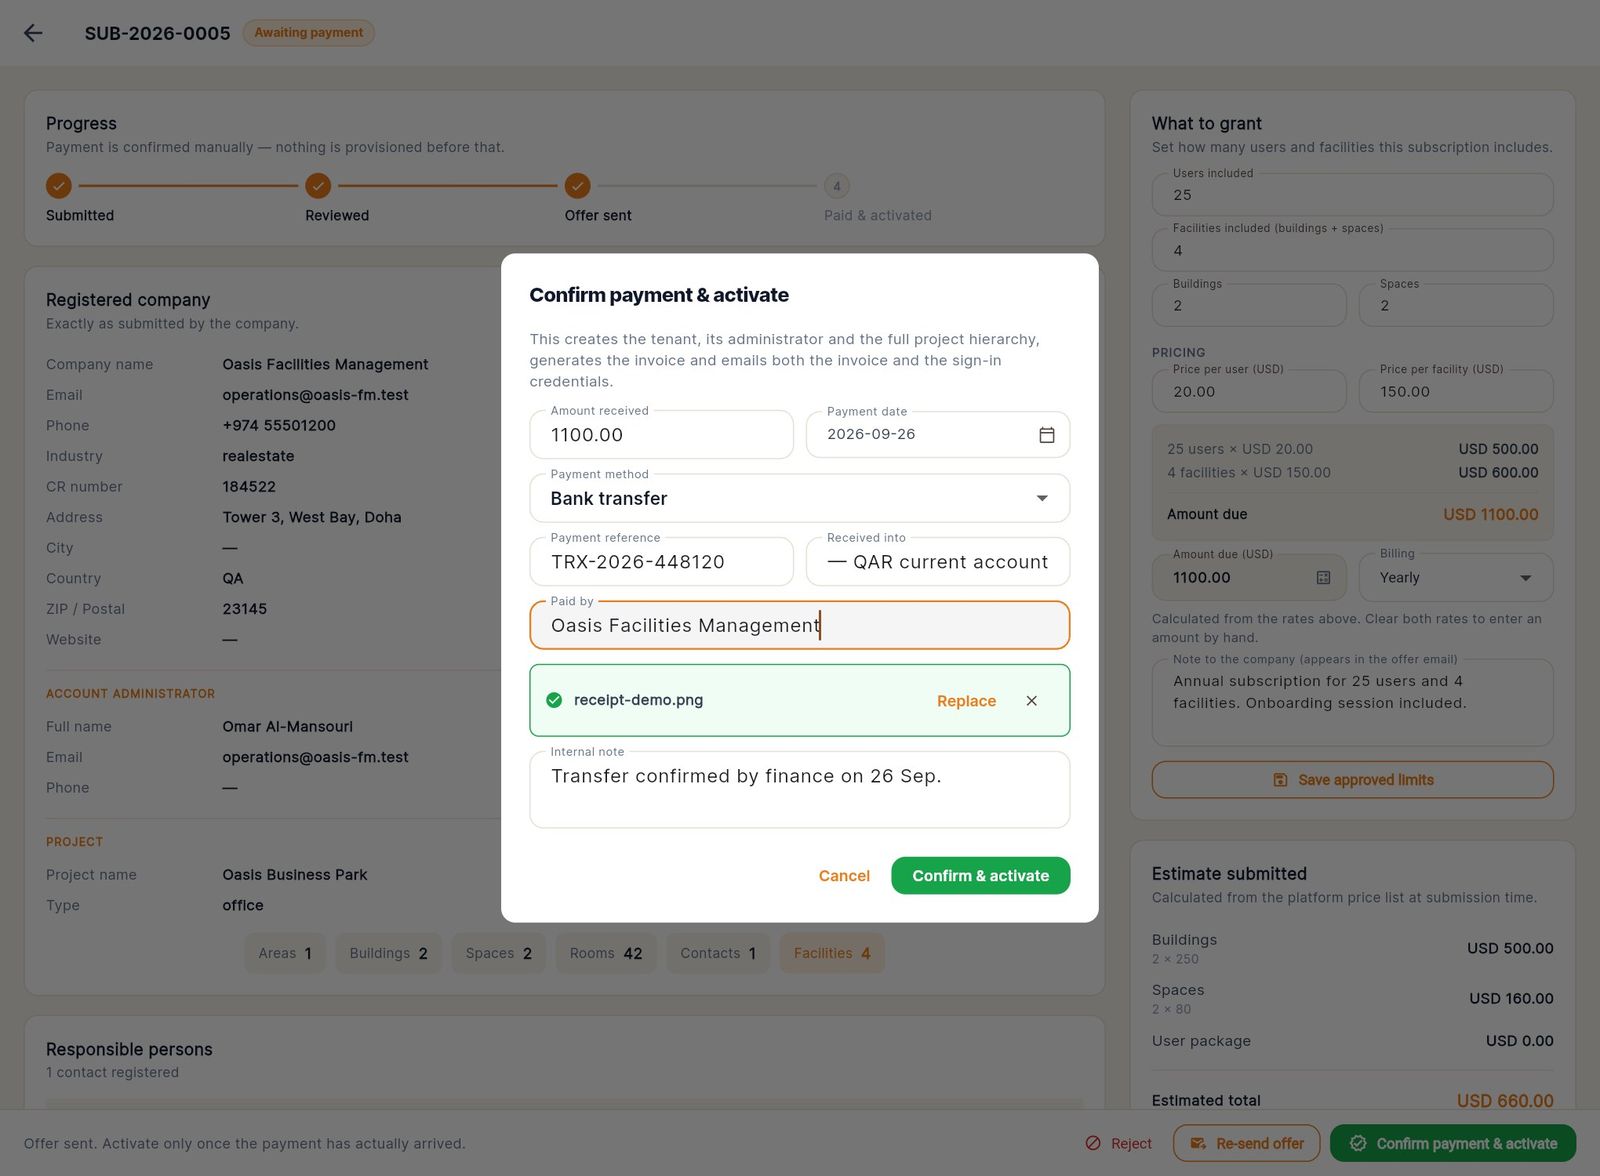
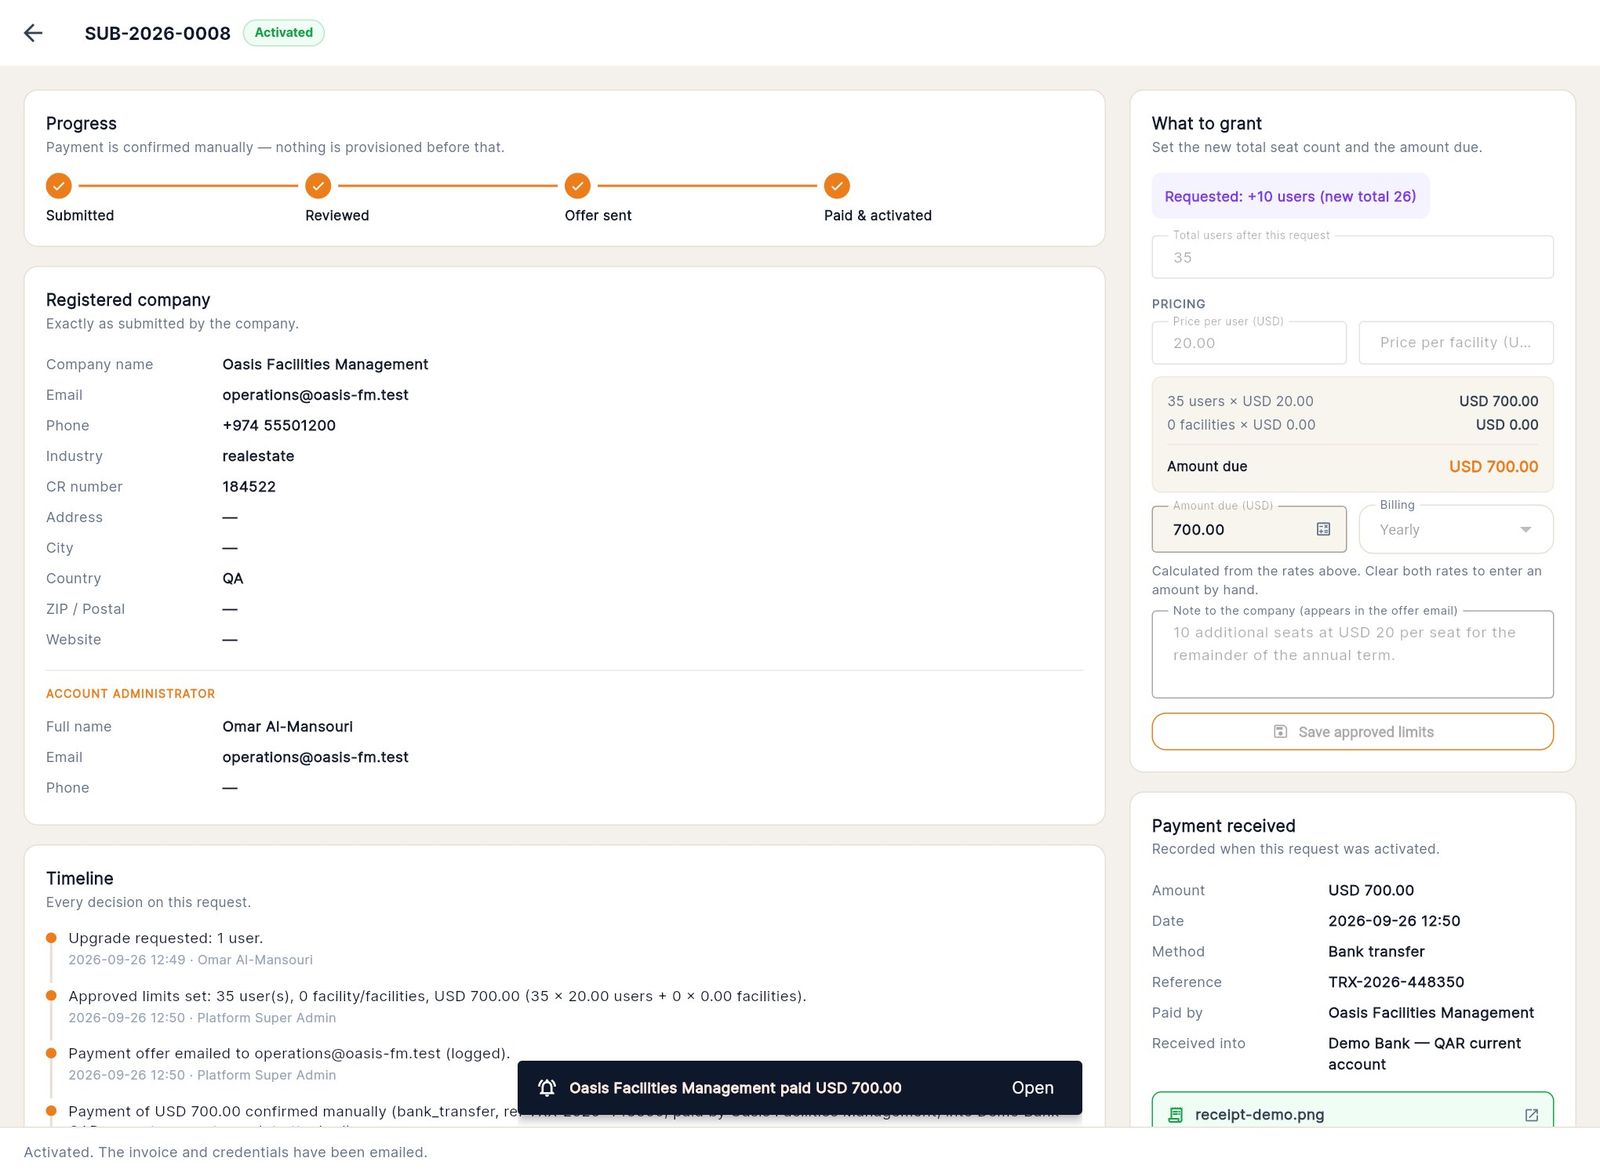
- Click Confirm payment & activate.
- Check Amount received and Payment date (the date cannot be in the future).
- Choose the Payment method: bank transfer, cheque, cash, card or other.
- Enter the Payment reference, the account the money was Received into, and who it was Paid by.
- Click Attach proof of payment and choose the receipt (PDF, JPG or PNG, up to 10 MB).
- Add an Internal note if needed. The company never sees it.
- Click Confirm & activate.
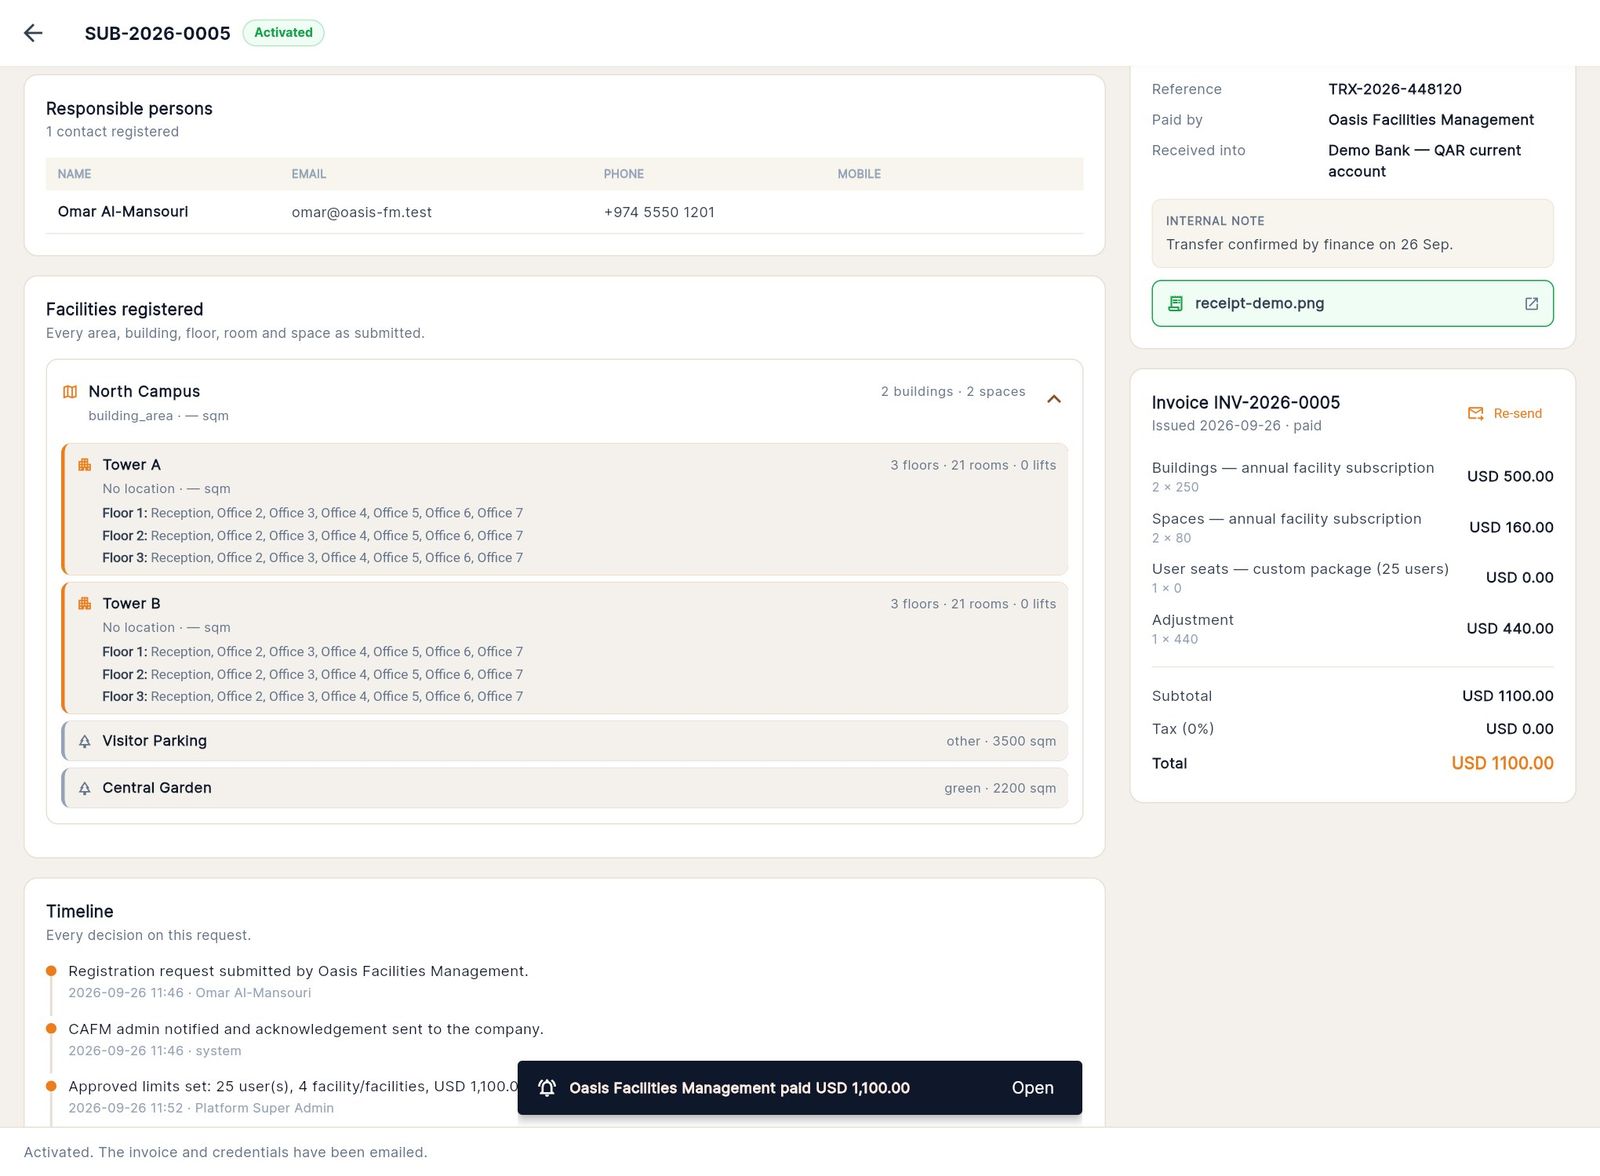
In one step the platform:
- issues an invoice (for example
INV-2026-0005) - creates the company with its limits and subscription dates
- creates the company administrator
- builds the full hierarchy the company registered
- emails the invoice and the sign-in details, including a temporary password
Step 8 — Reject a subscription request
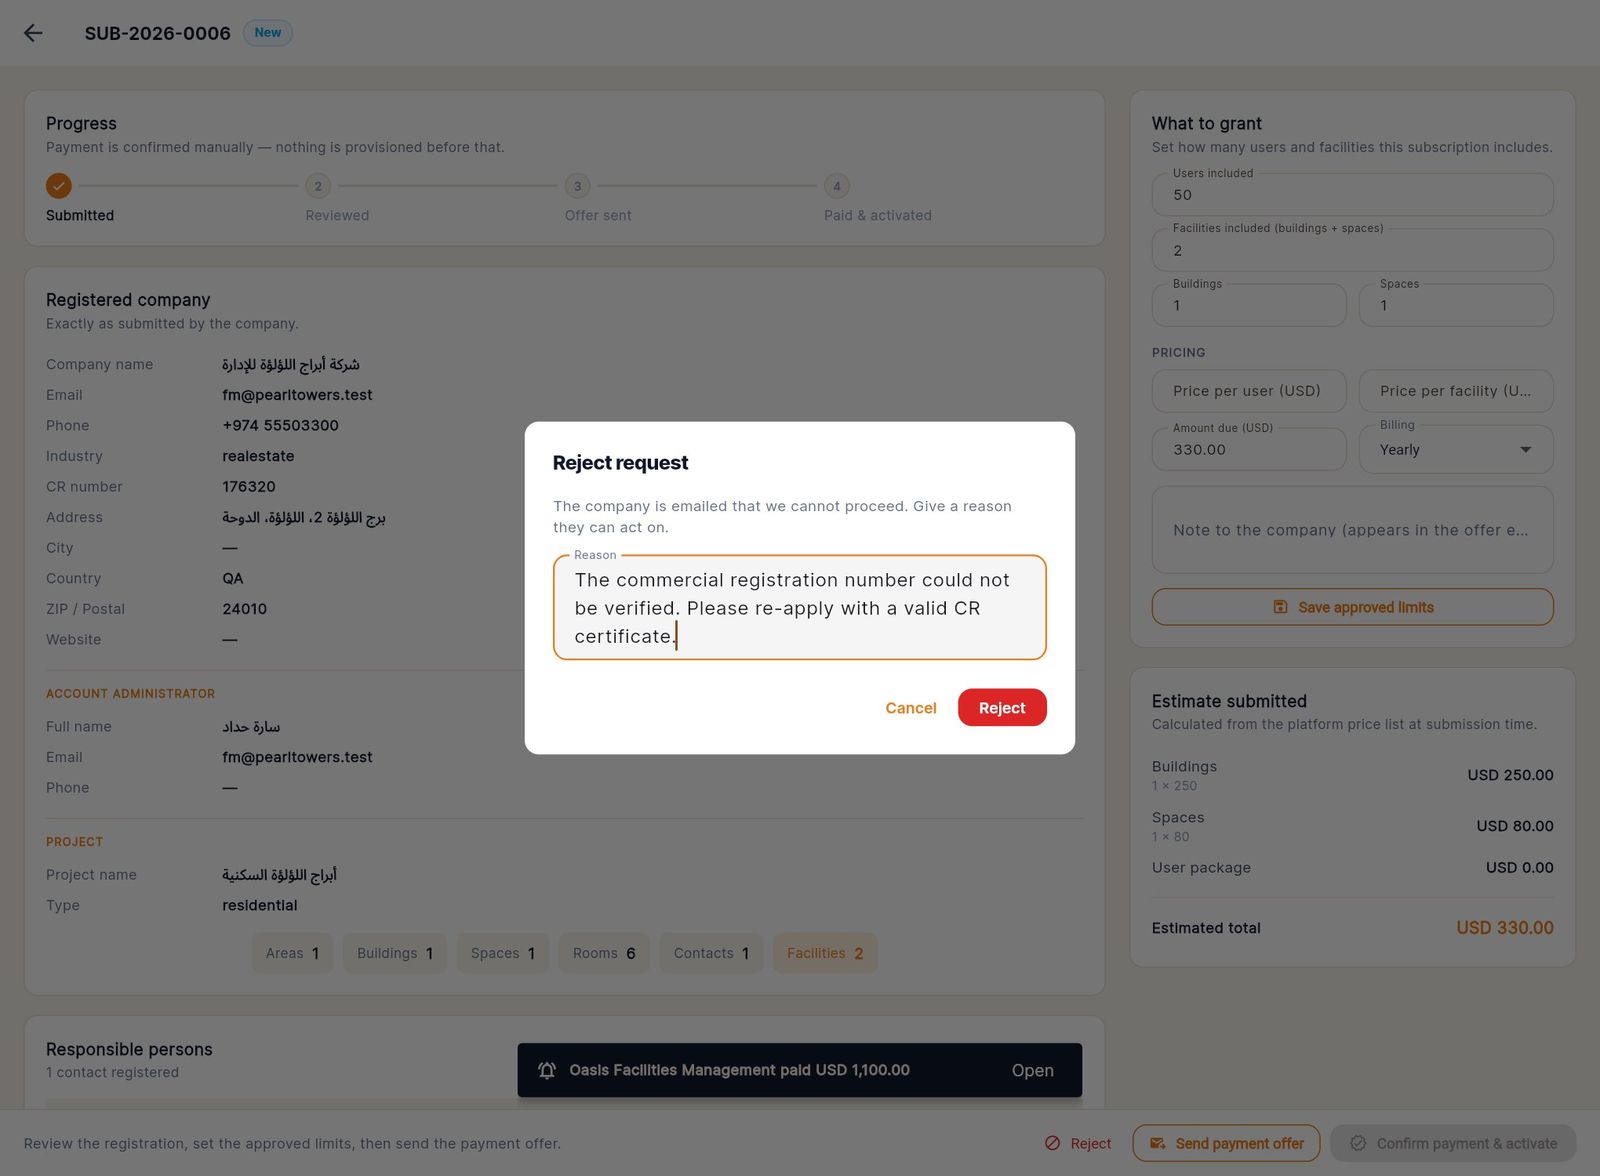
- Open the request and click Reject.
- Give a Reason the company can act on. It is included in the email.
- Click Reject.
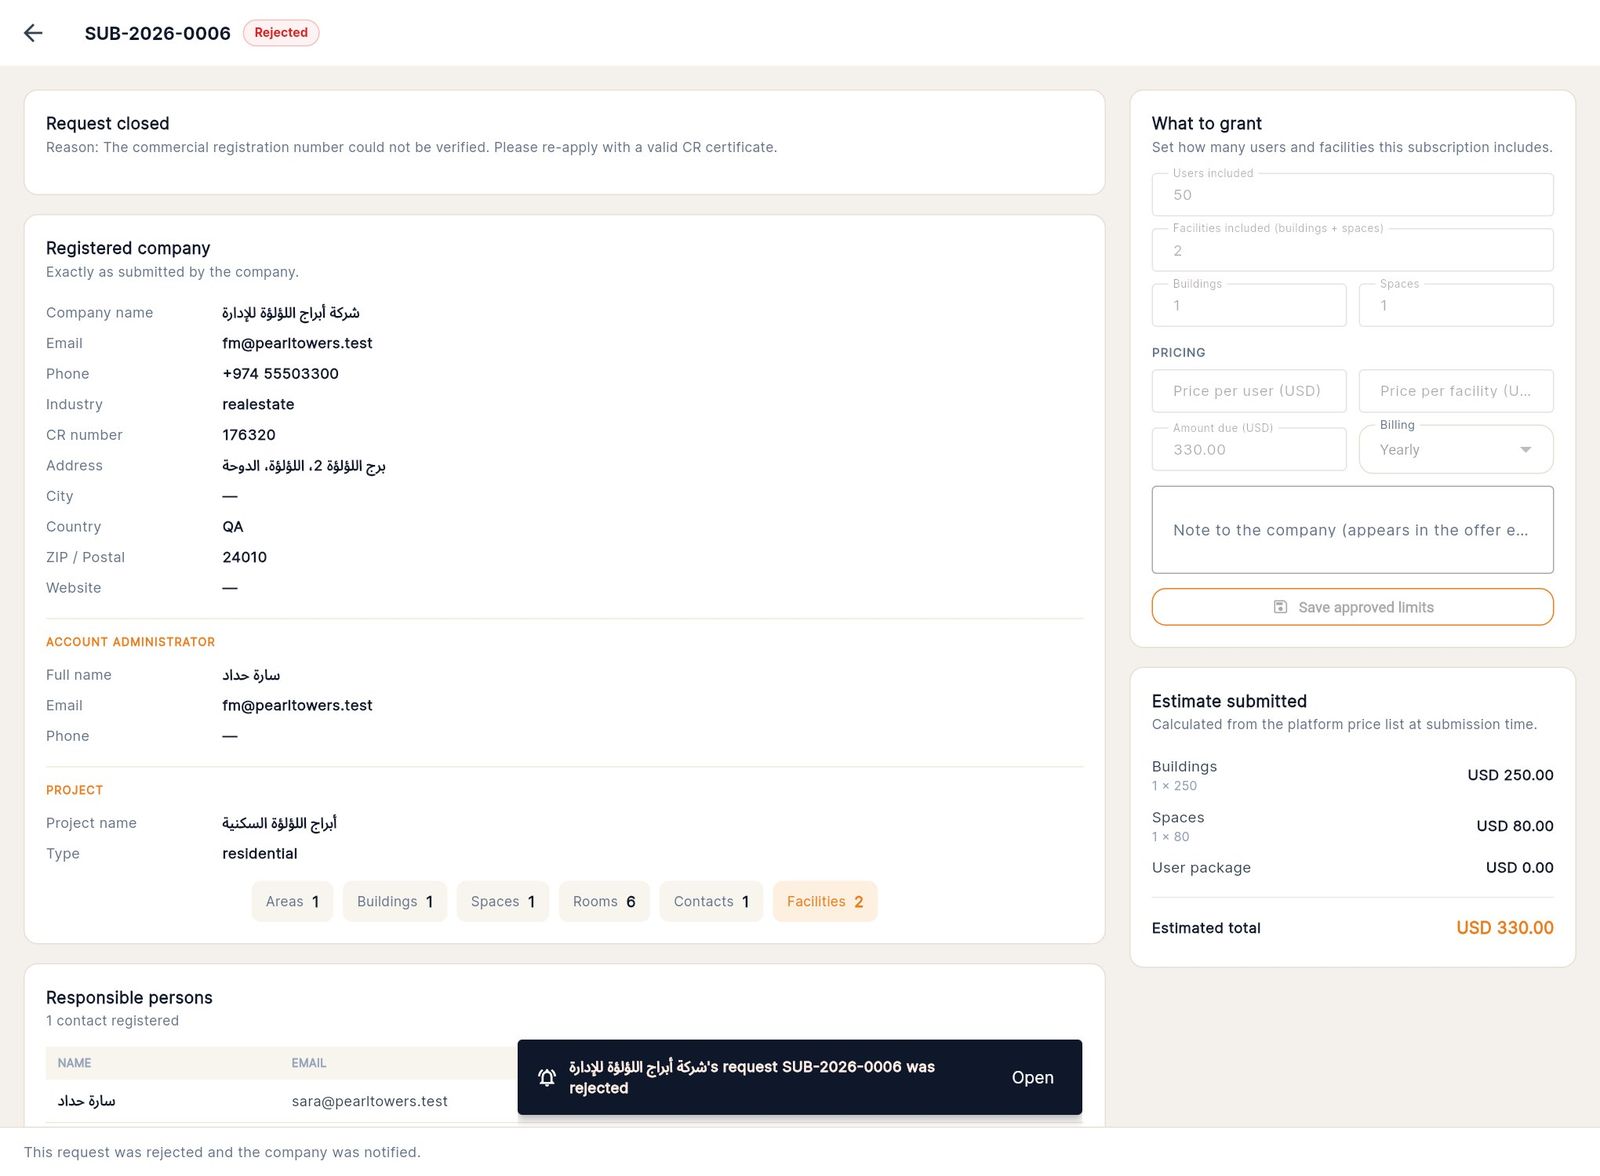
Unlike rejecting a registration enquiry, this sends the company an email. An activated request cannot be rejected.
Requests for extra users or facilities
Existing customers can ask for more capacity from the Subscription page of their own app:
- Additional users: the customer asks how many more people need to sign in. In the console, the request shows a banner such as Requested: +10 users, and you set Total users after this request.
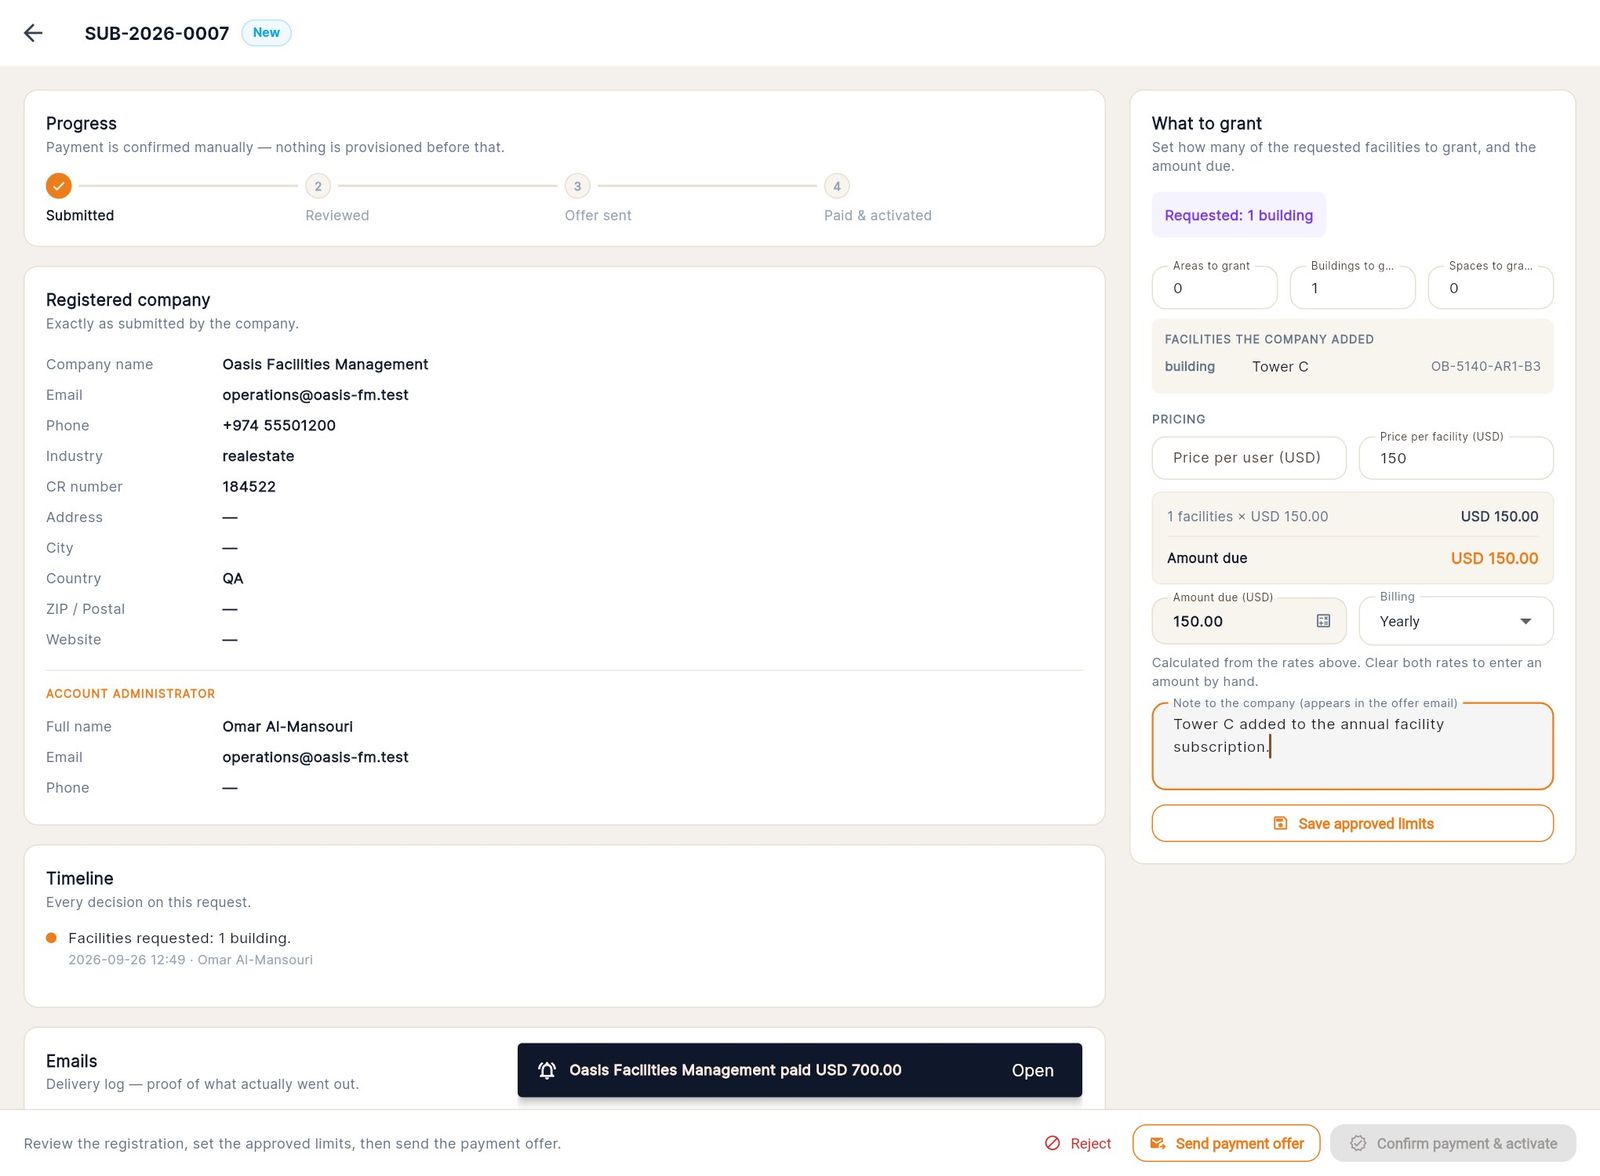
- Additional facilities: the customer builds new areas, buildings or spaces as drafts, then sends them to CAFM. The console lists FACILITIES THE COMPANY ADDED, and you set how many to grant.
Both follow the same path as a new company: review and price, Send payment offer, then Confirm payment & activate. On activation, the seat limit is raised or the draft facilities become active, and an invoice is issued. If you reject a facilities request, the facilities go back to the customer as drafts.
Managing companies
The companies list
- Screen: Companies
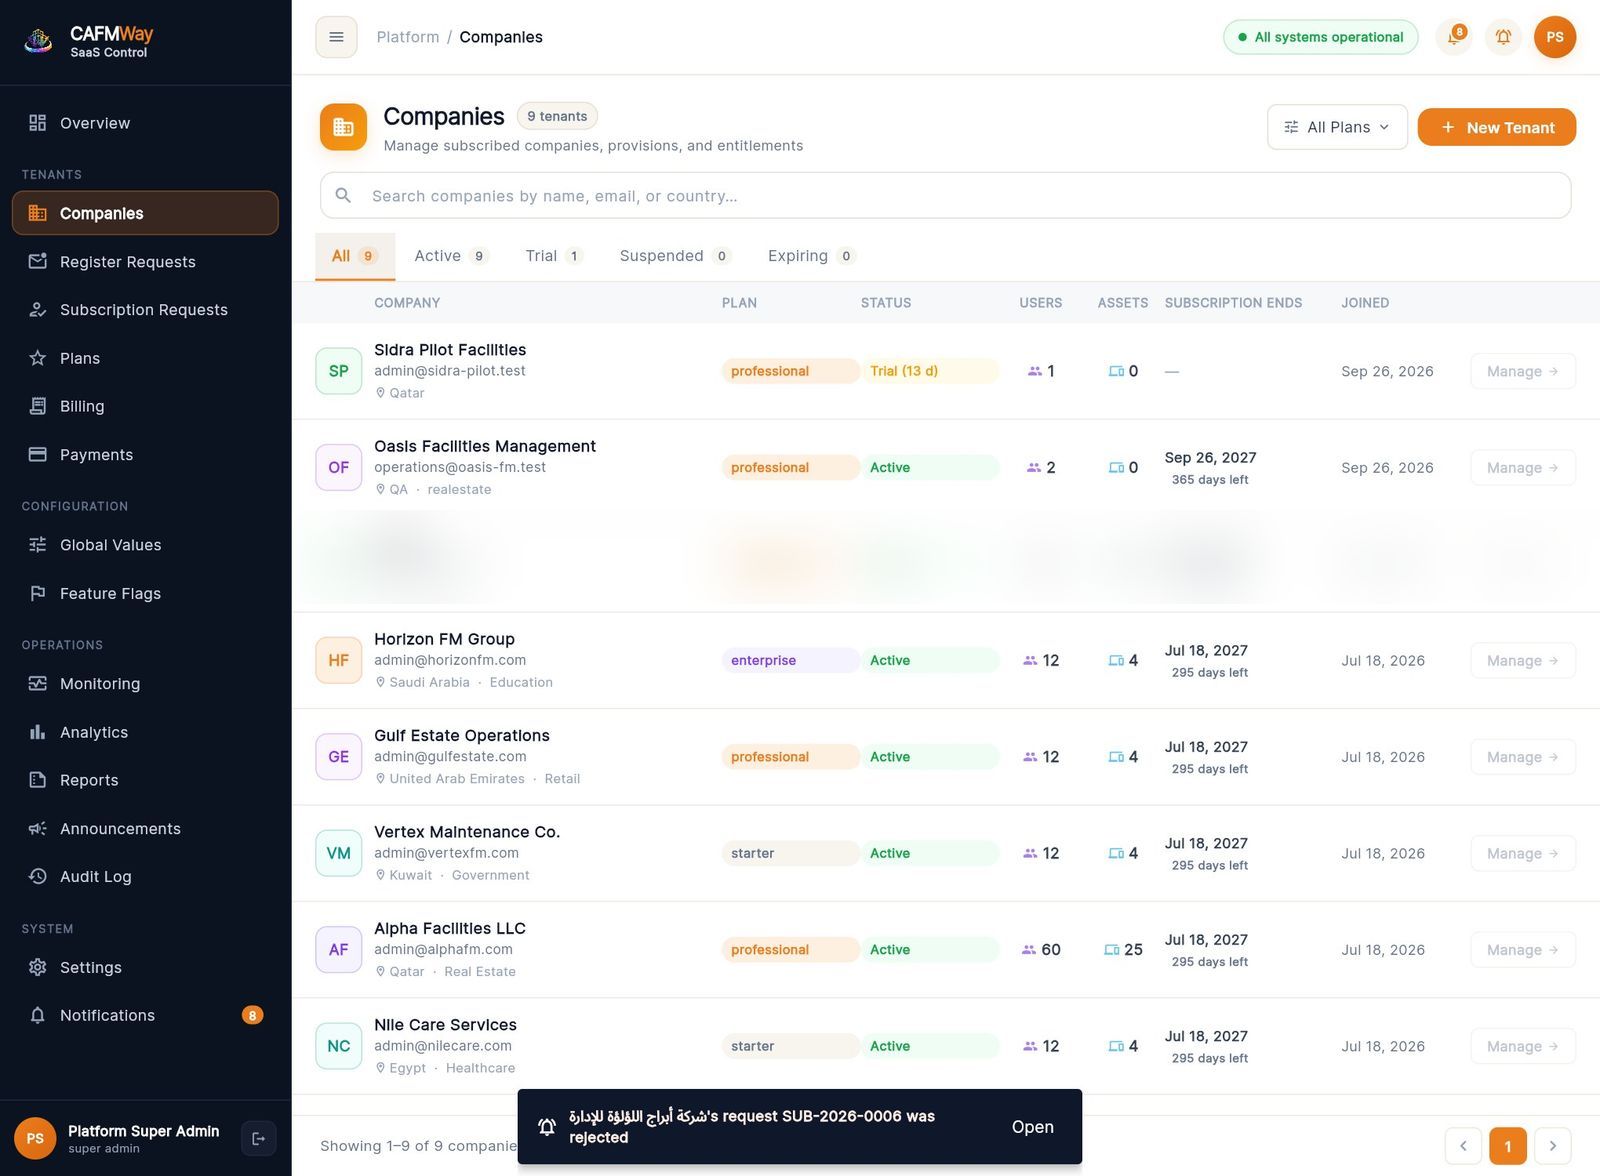
The list shows every customer company with its plan, status, users, assets, subscription end date and join date.
- The tabs filter by All, Active, Trial, Suspended and Expiring (trials ending within 7 days).
- All Plans filters by tier.
- The search box matches a company's name or email.
When subscriptions end within 60 days, a renewal banner lists them with a countdown. Click a company to open it.
Create a company directly
For a pilot or a demo you can create a company without the request path:
- On Overview, click New Tenant.
- Fill Company Name, Admin Email, Plan and Trial Days.
- Click Provision Tenant.
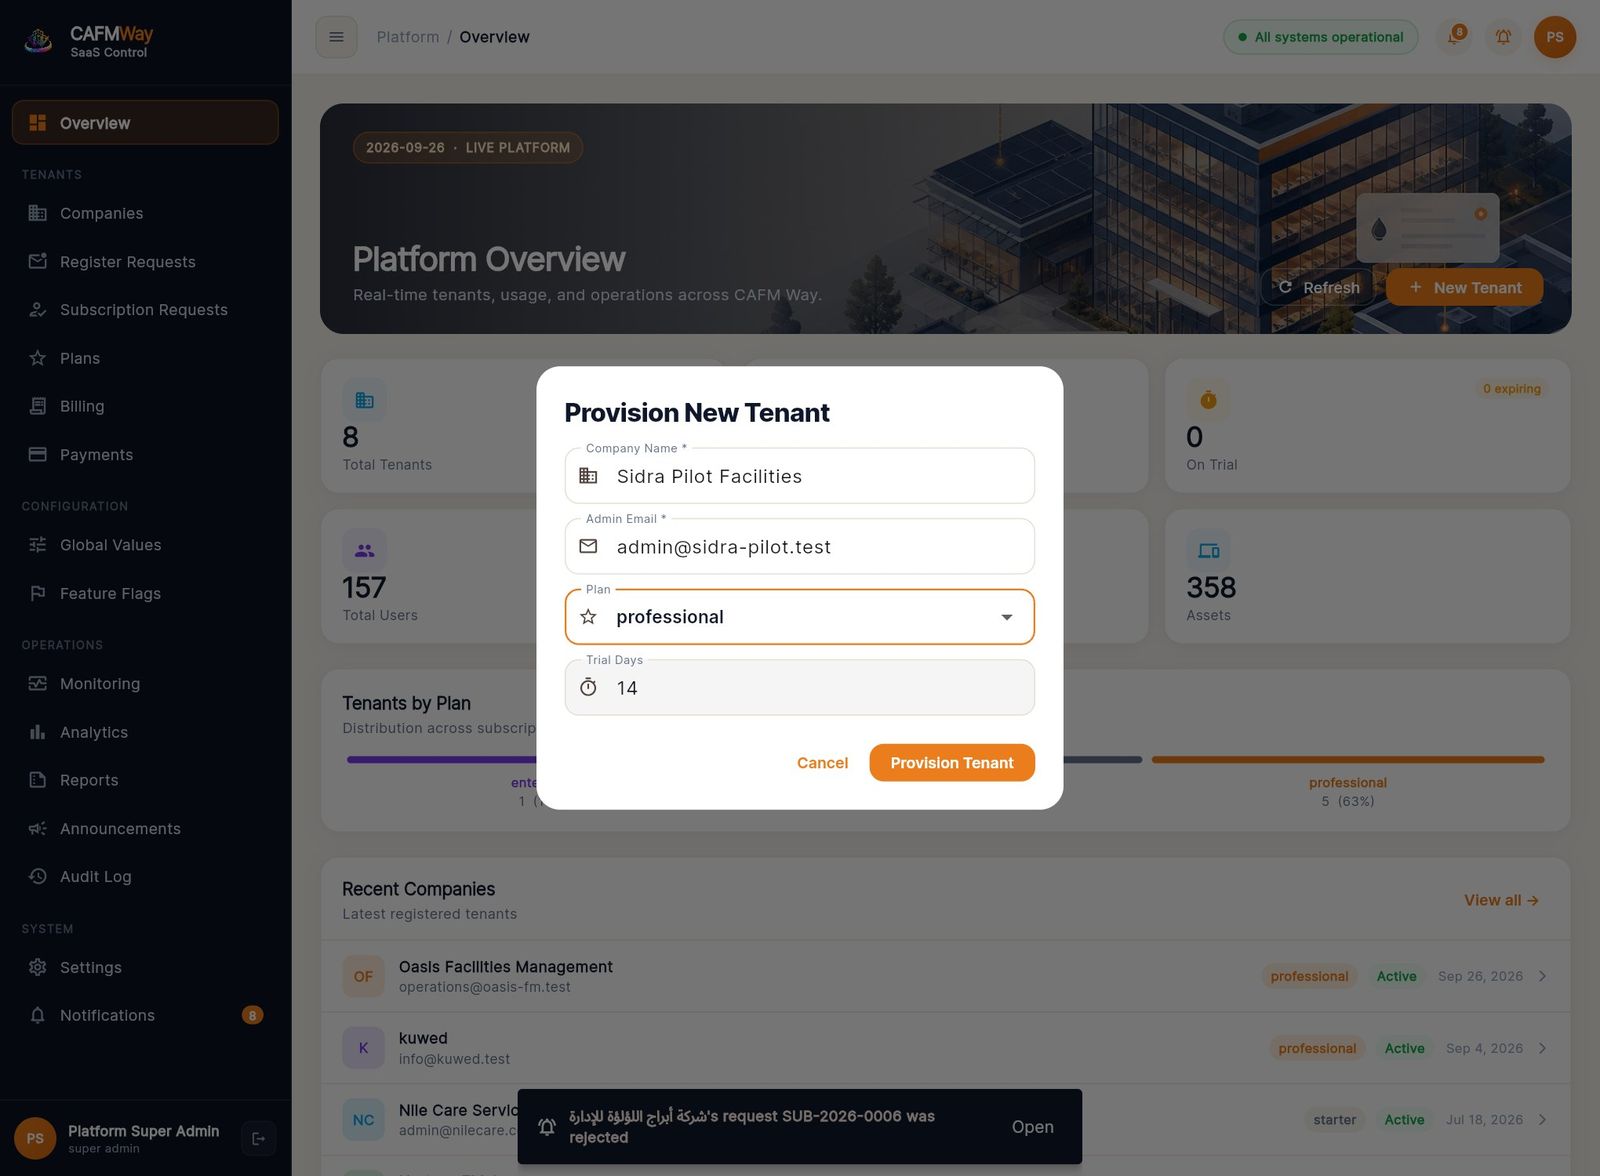
The company is created with a default administrator and default SLA settings. No invoice is issued and no email is sent, so give the administrator their sign-in details yourself.
Company details
Open a company from the list. The page has five tabs:
| Tab | Shows |
|---|---|
| Overview | Company profile, subscription status, usage snapshot |
| Subscription | Limits, recurring amount, billing period and dates, modules, and the Subscription End Date |
| Limits & Features | Per-company overrides of plan limits and features |
| Admins | The company's administrators and their last sign-in |
| Usage | Active users, assets, open and total work orders, requests, PPM plans, inventory, locations |
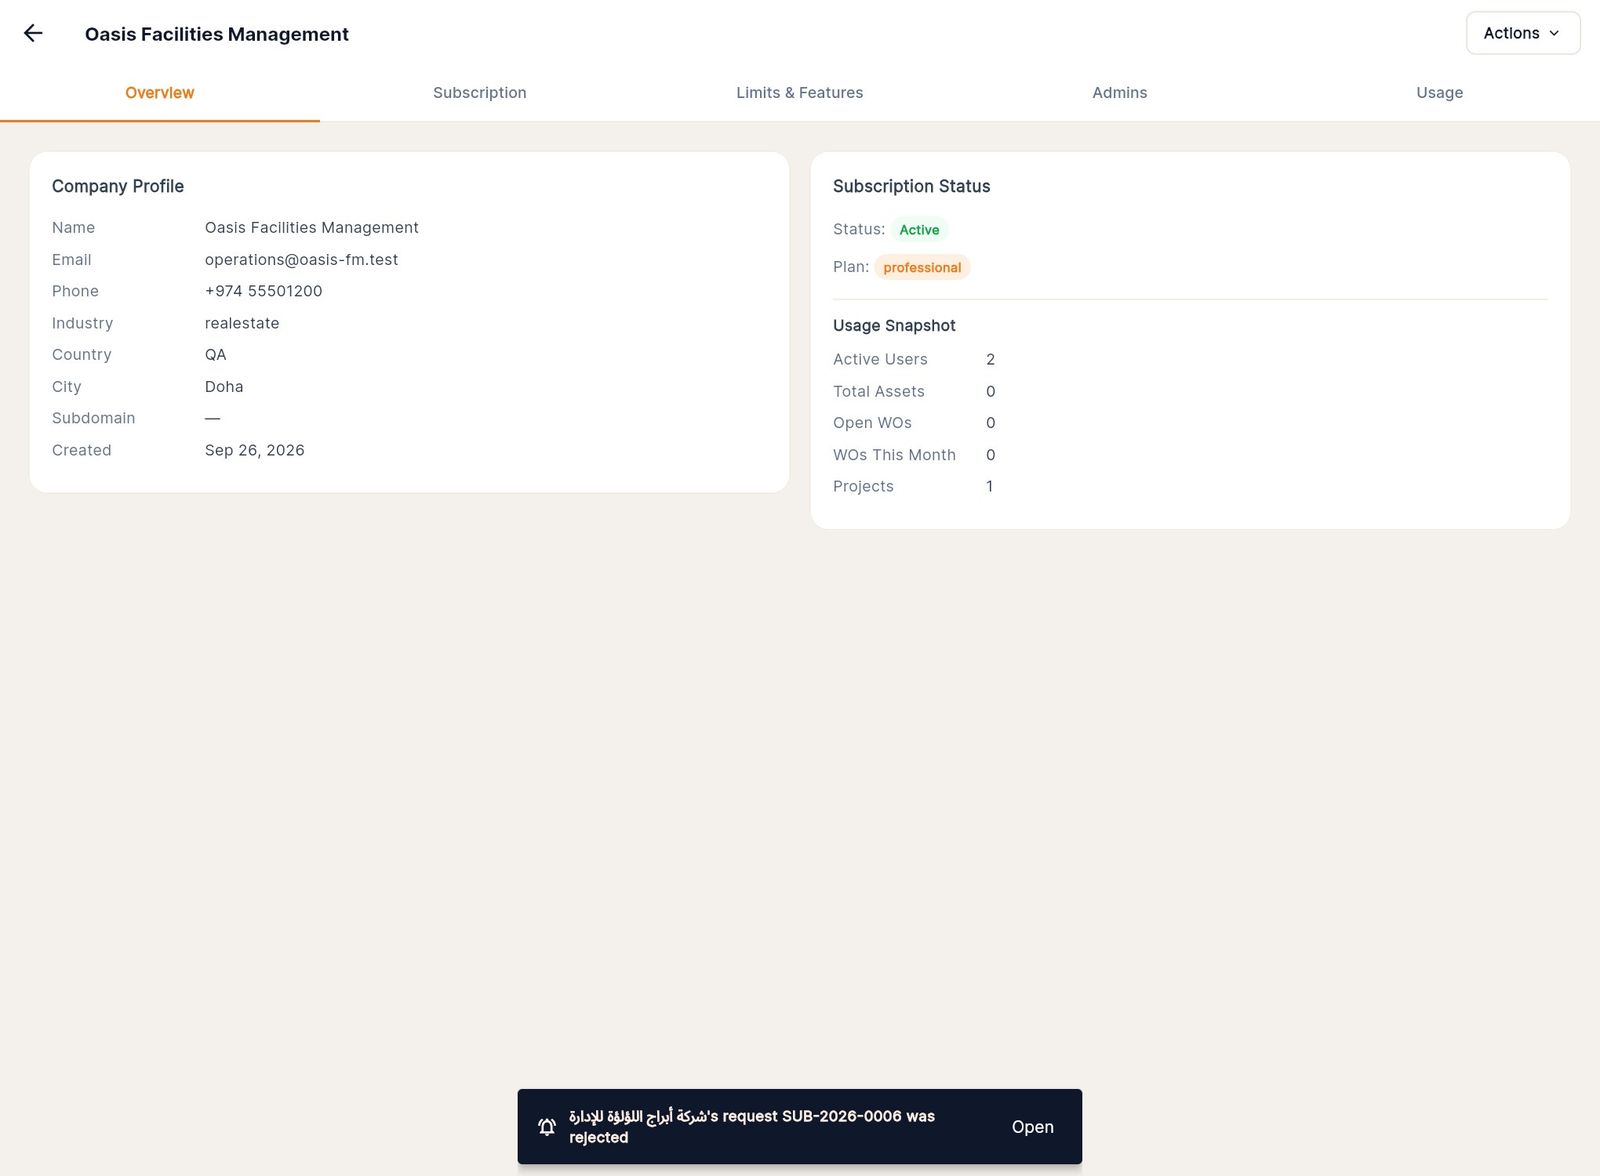
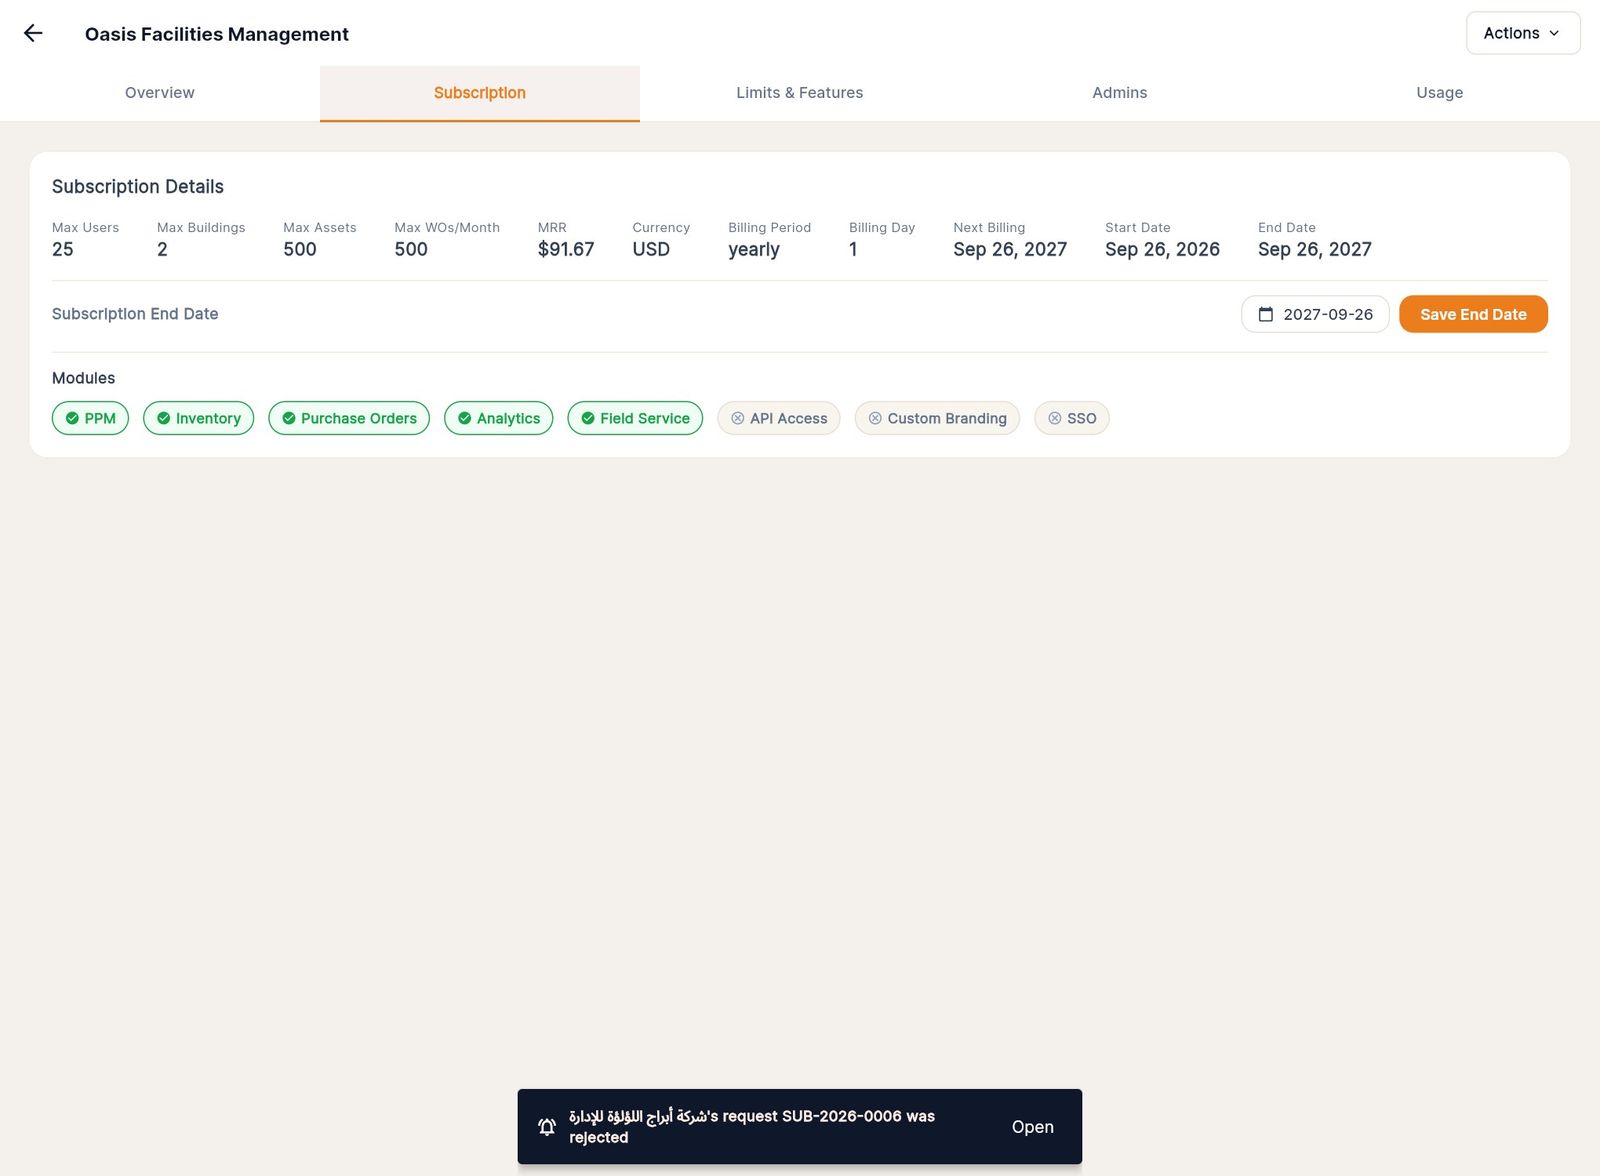
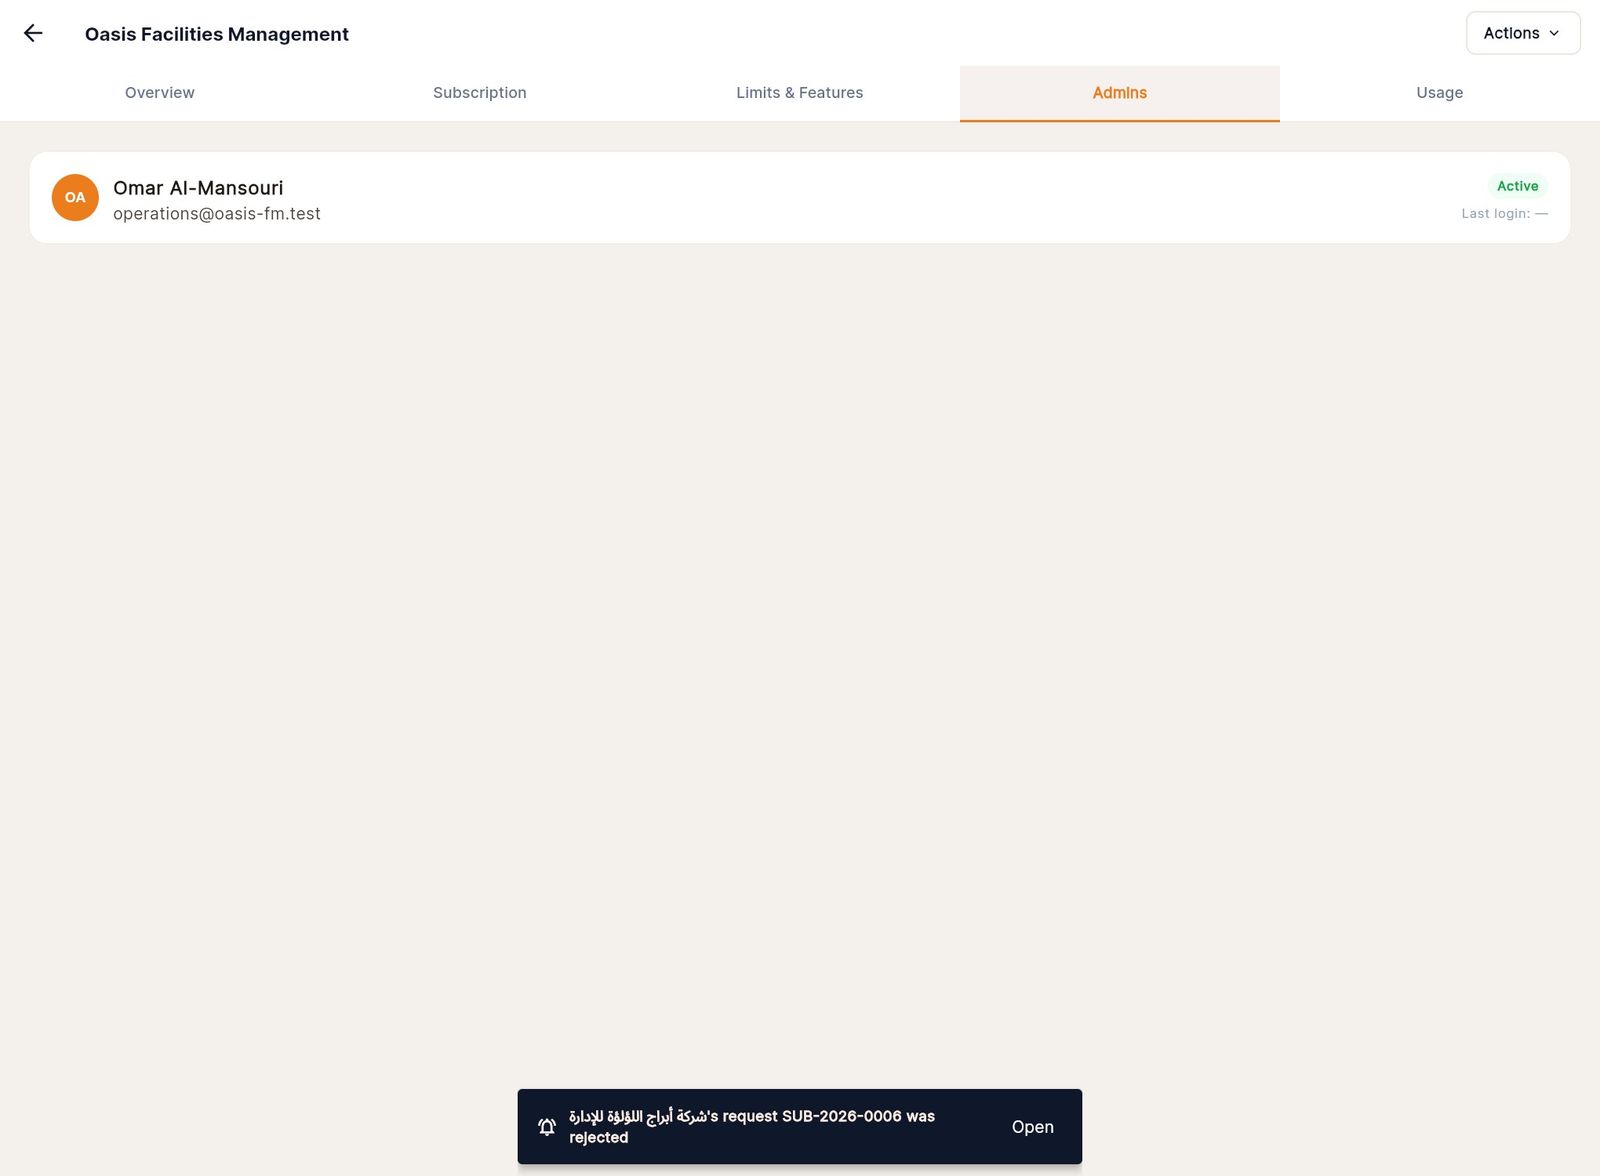
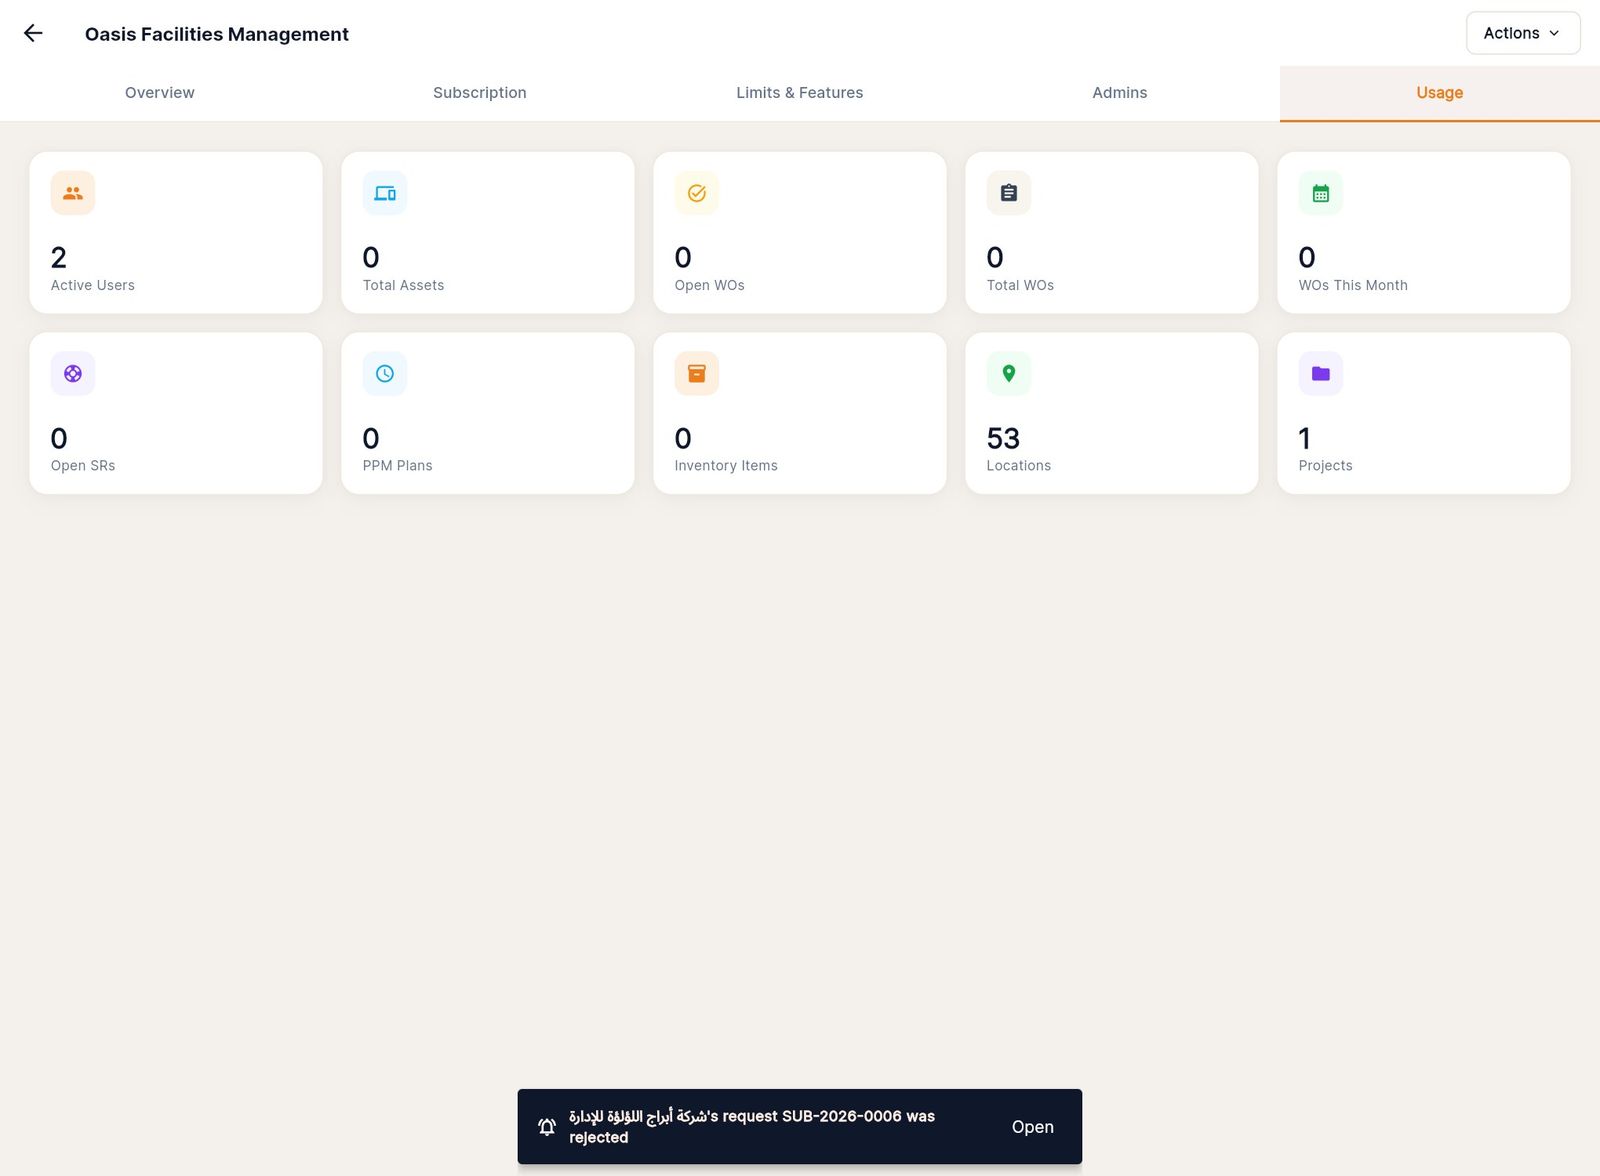
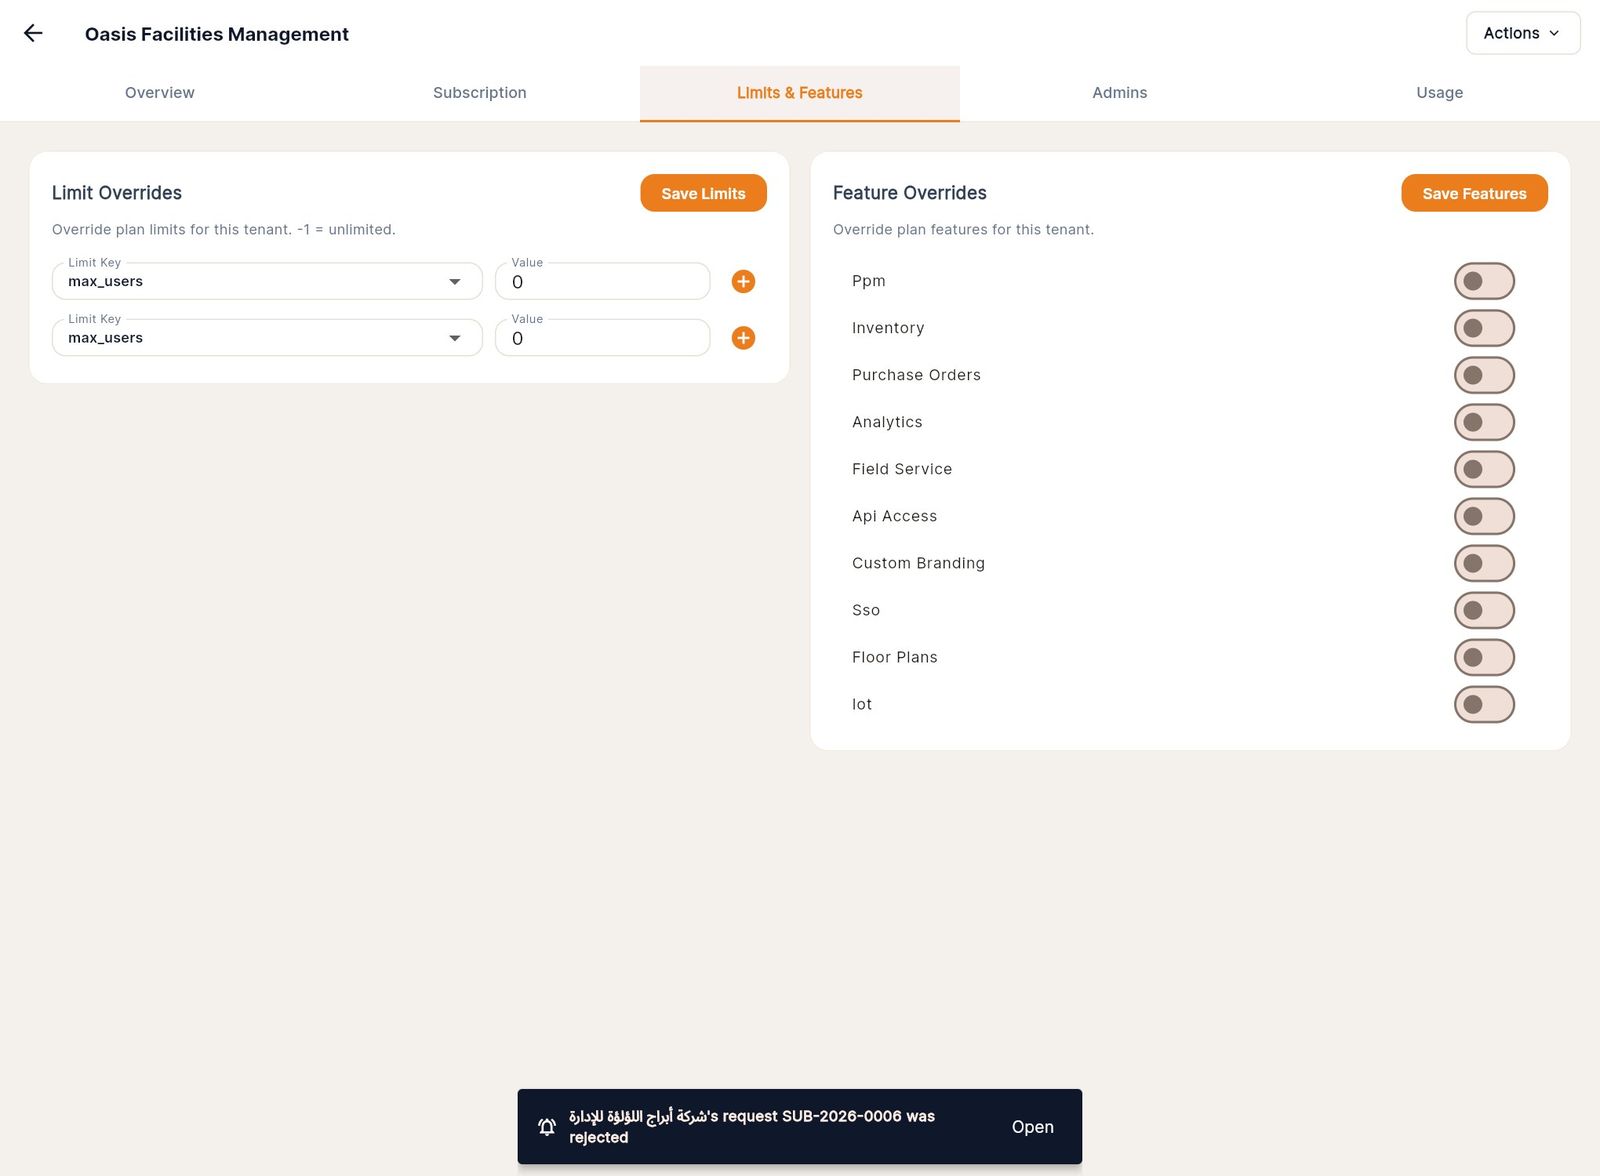
Change the subscription end date. On the Subscription tab, pick a date under Subscription End Date and click Save End Date. The renewal reminders (see Automatic reminders) count down to this date.
Suspend, extend a trial, change plan, reset a password
All four are in the Actions menu on a company's page.
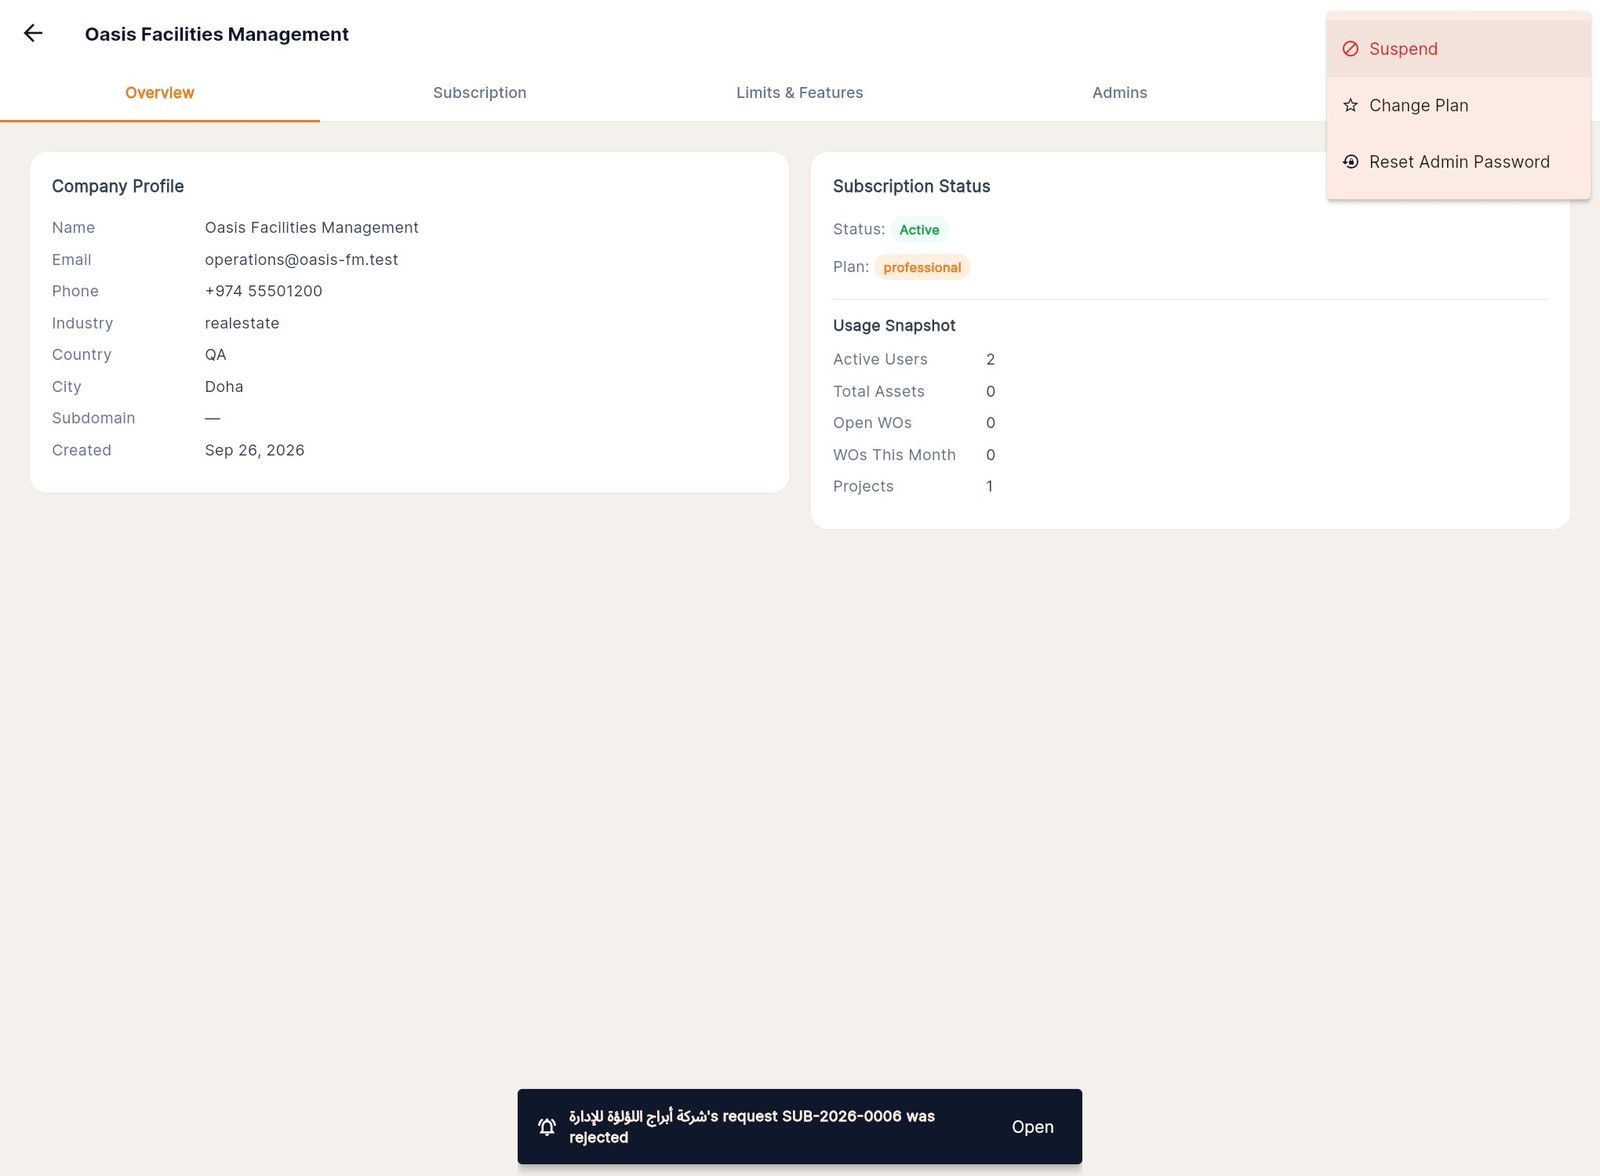
Extend Trial (shown only while a company is on trial): enter Days to add (1–365) and click Extend. Extending also re-activates a suspended company.
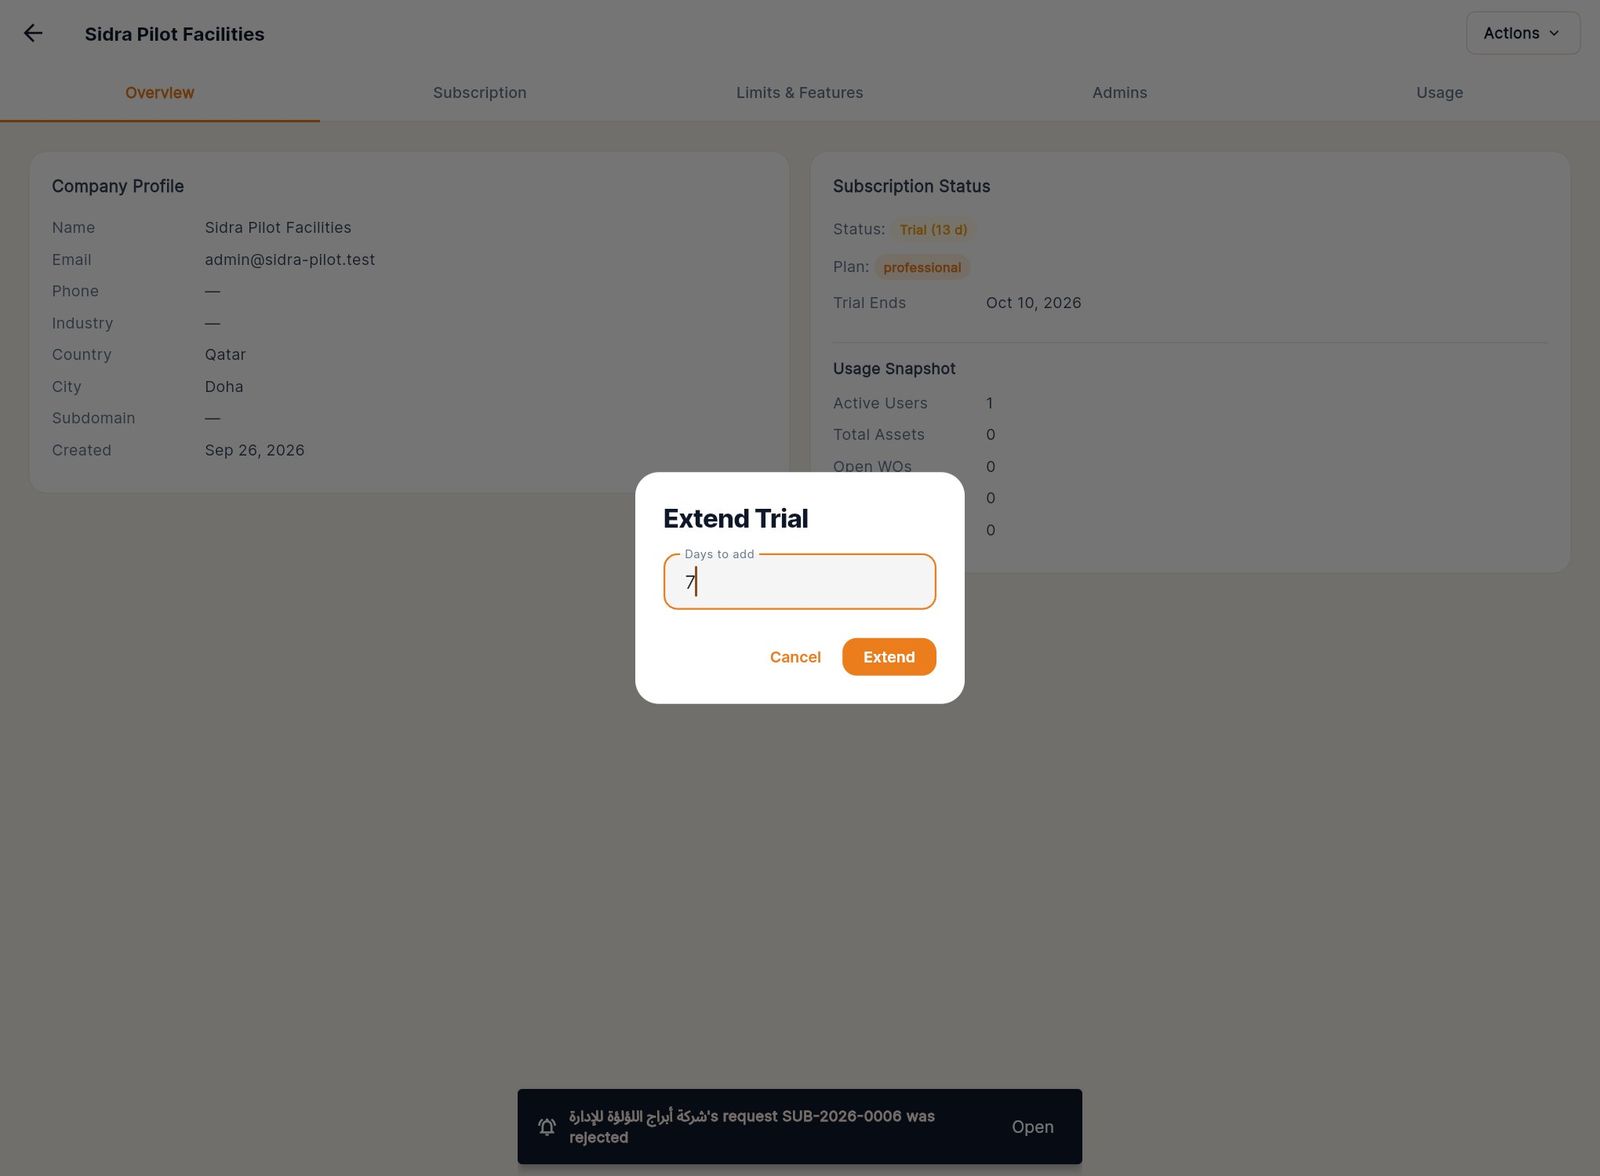
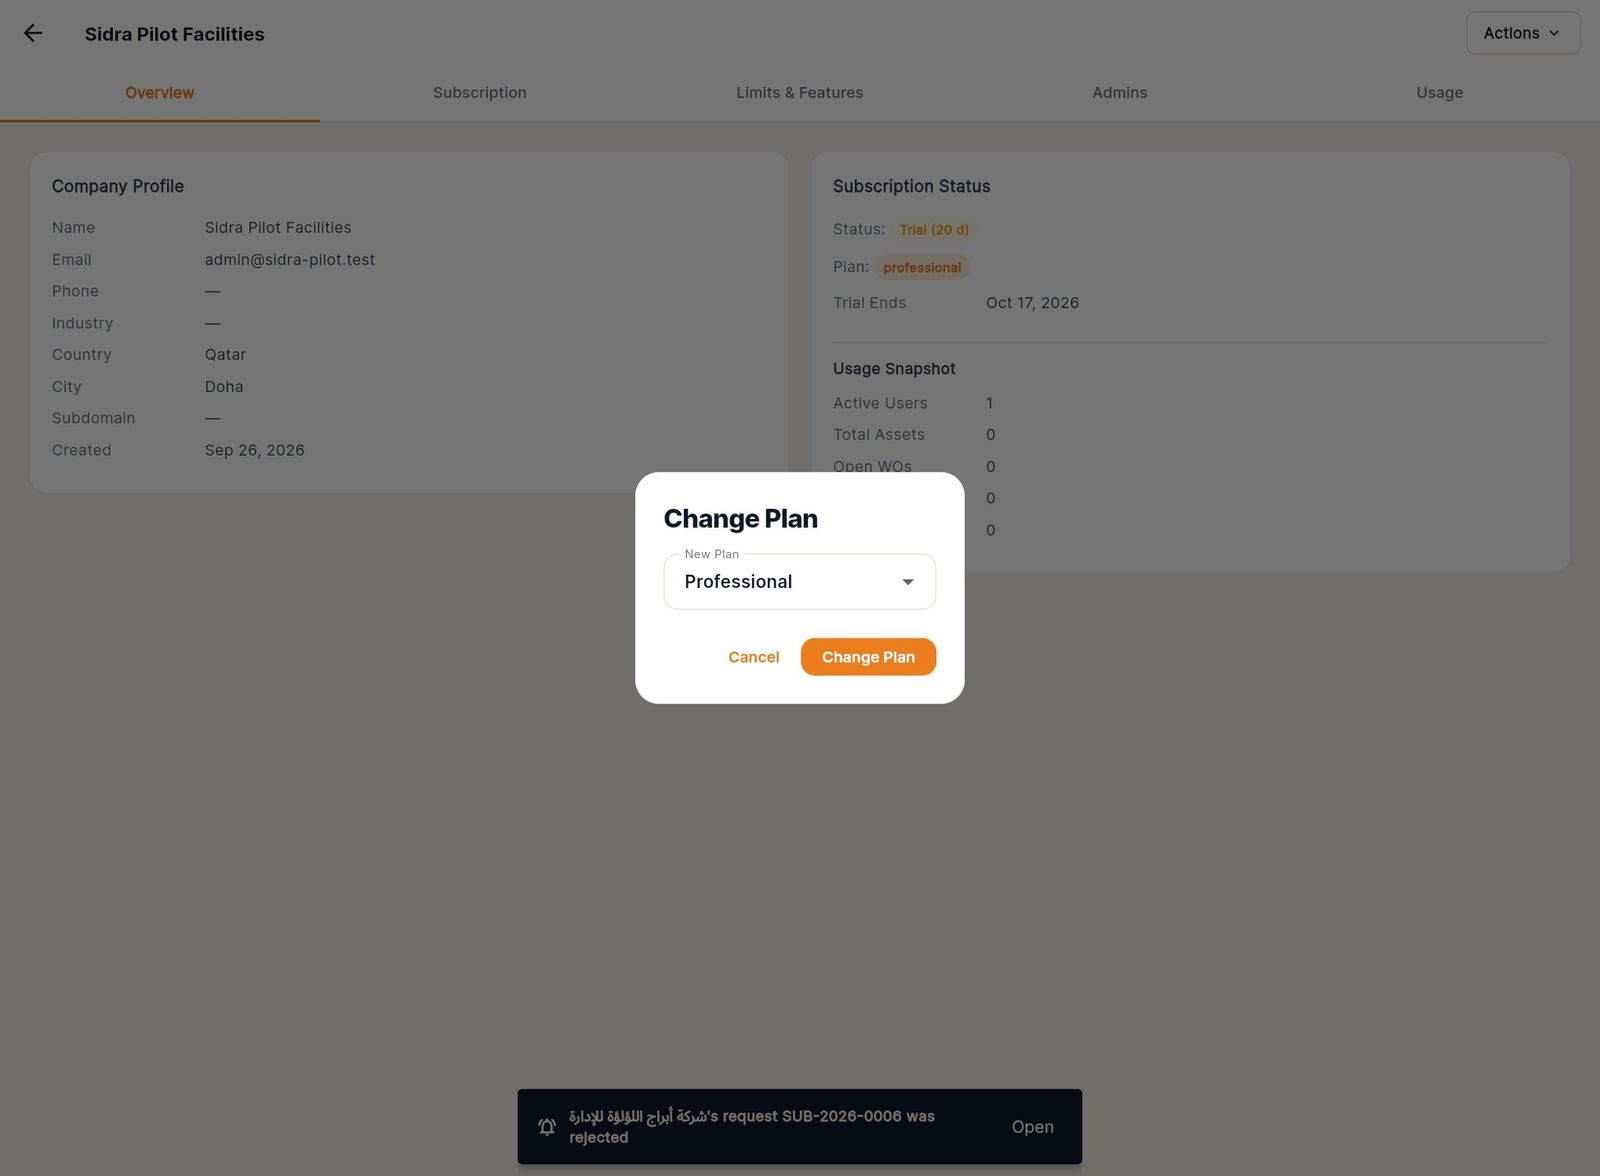
Change Plan: choose the New Plan and click Change Plan.
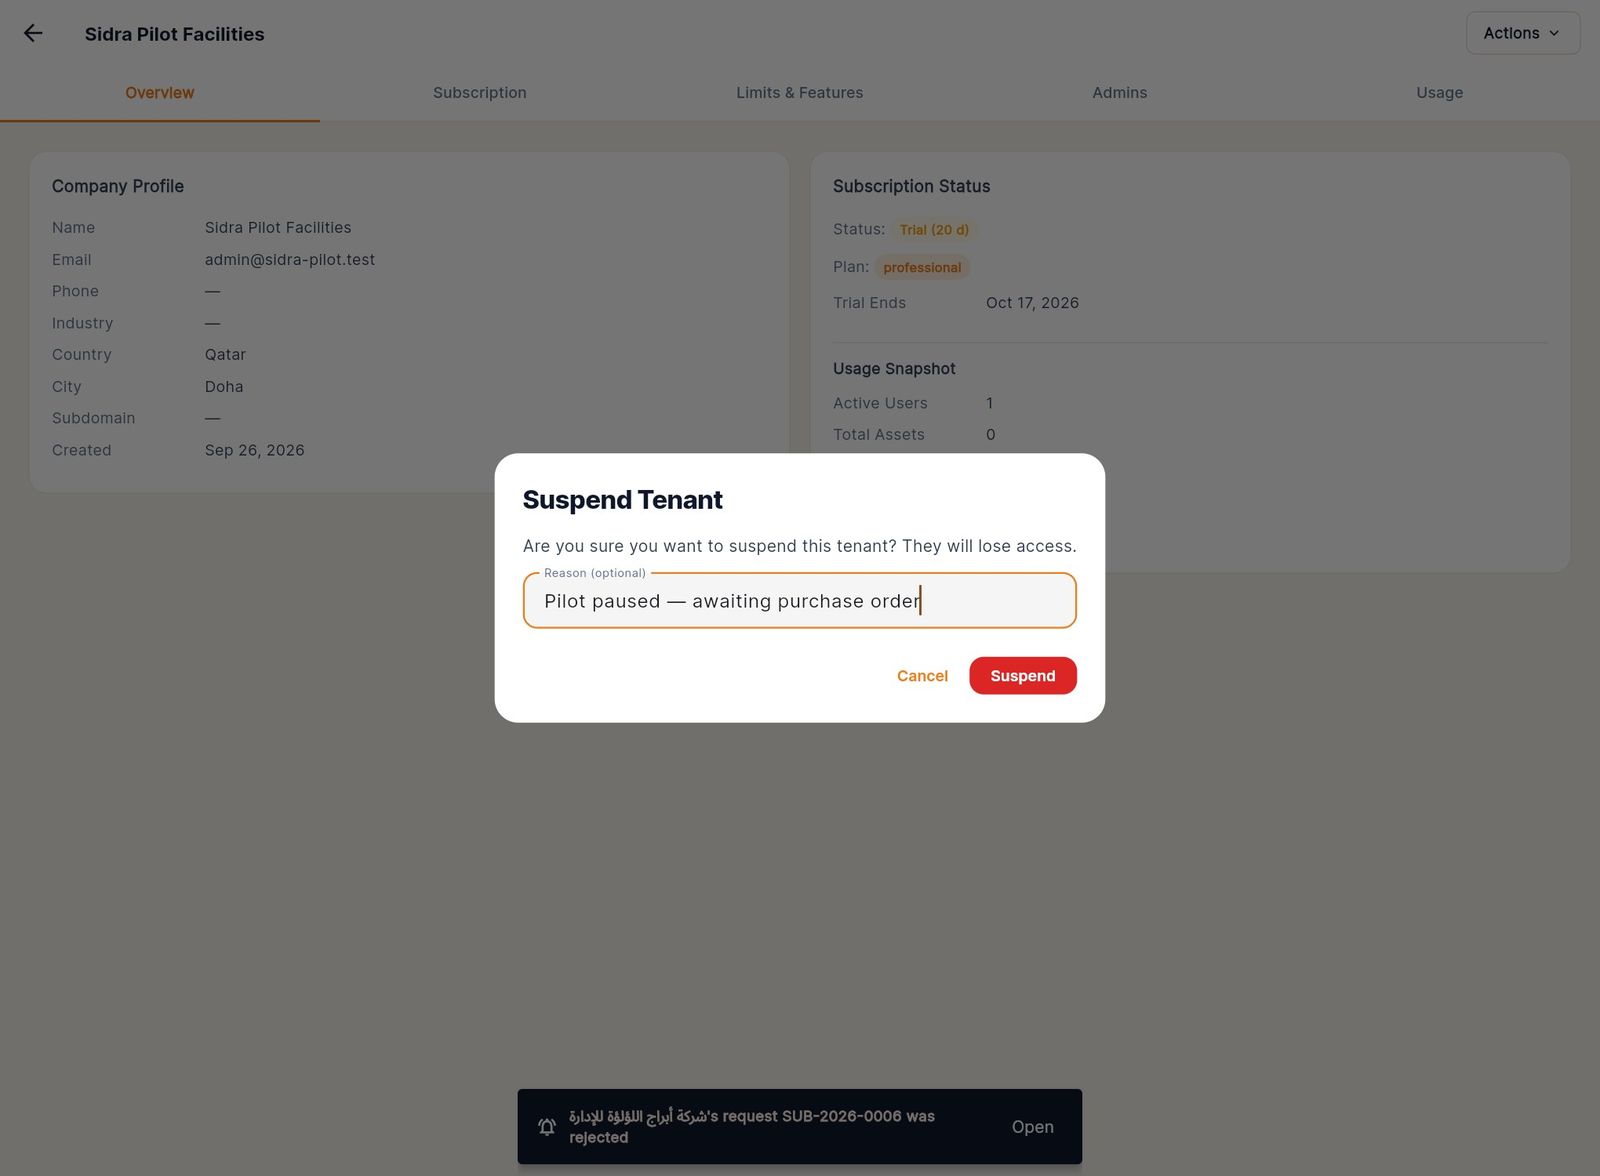
Suspend: enter an optional reason and click Suspend. The company's users lose access immediately. To restore it, choose Activate from the same menu.
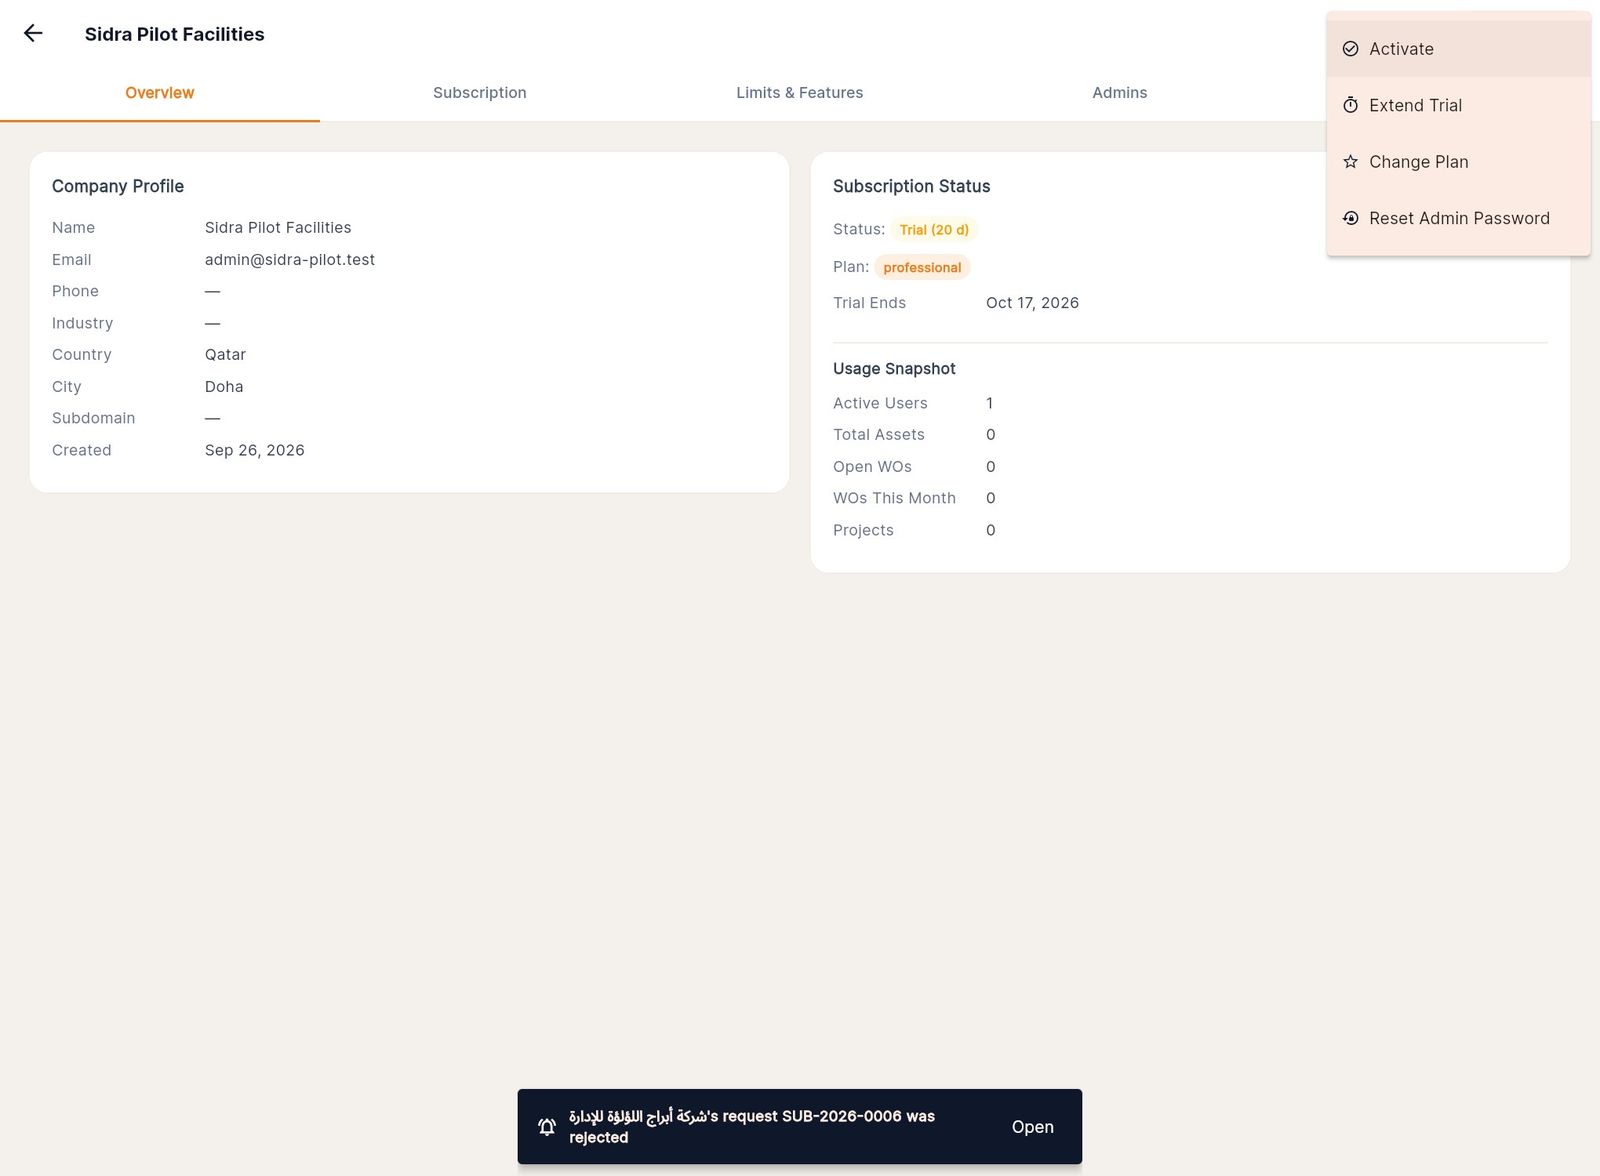
Reset Admin Password: enter a New Password (at least 6 characters) and click Reset. It applies to the company's first administrator. No email is sent, so pass the password on yourself.
Money
Payments and billing terms
- Screen: Payments
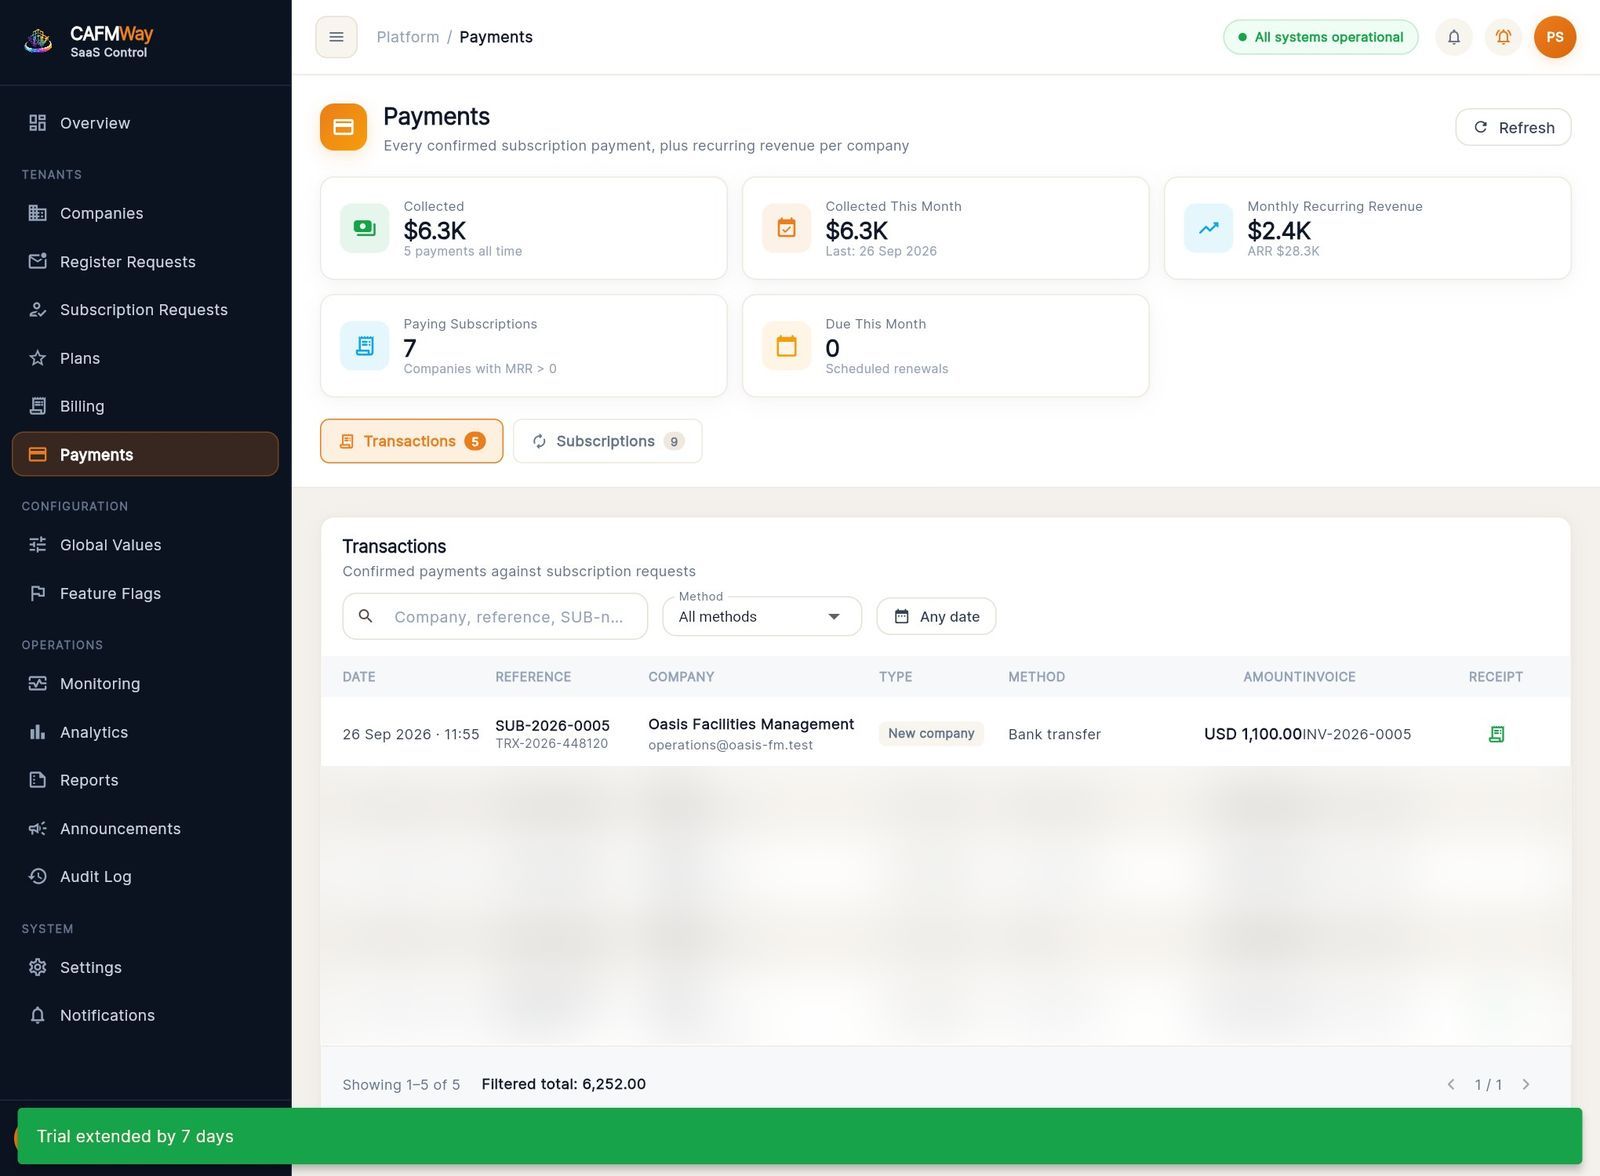
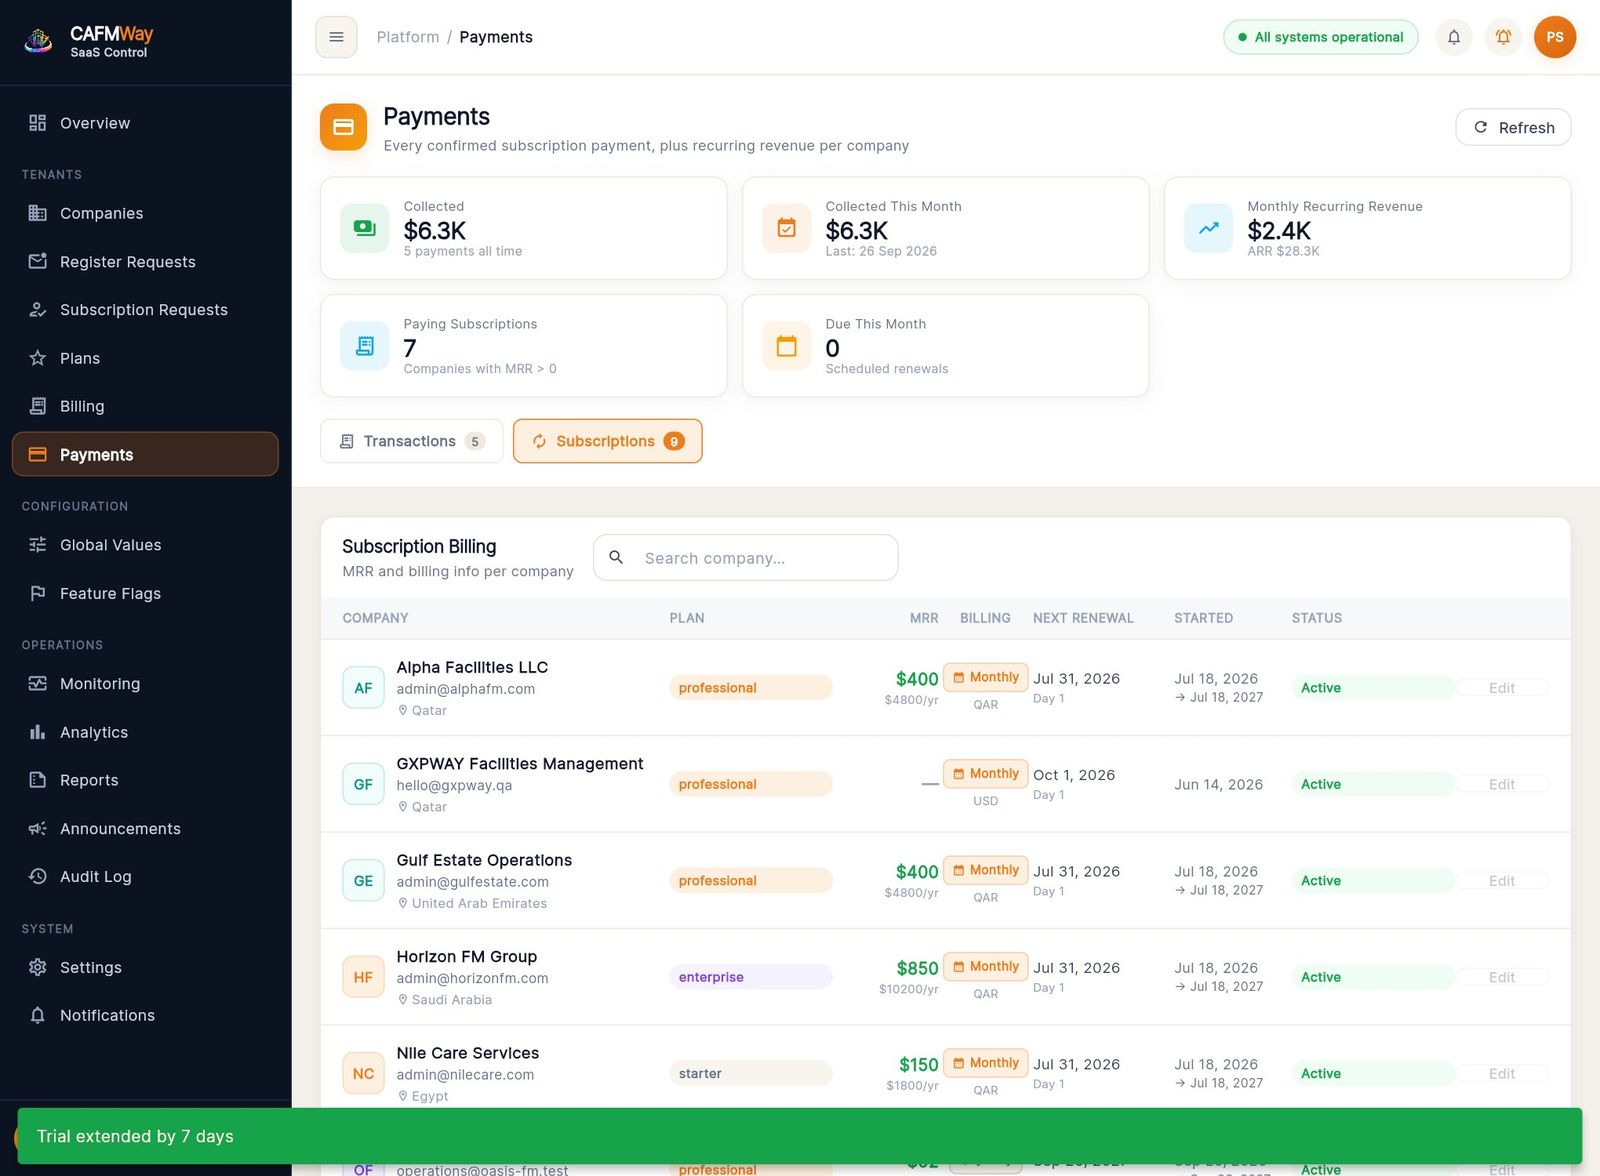
The top tiles show what has been collected in total and this month, the monthly recurring revenue, how many subscriptions are paying, and how many renewals are due this month.
Transactions lists every confirmed payment: date, request reference, company, type, method, amount, invoice and receipt. Filter by method or date range. The filtered total appears at the bottom. Click the receipt icon to open the uploaded proof.
Subscriptions lists each company's billing terms: plan, monthly amount, billing period, next renewal and status.
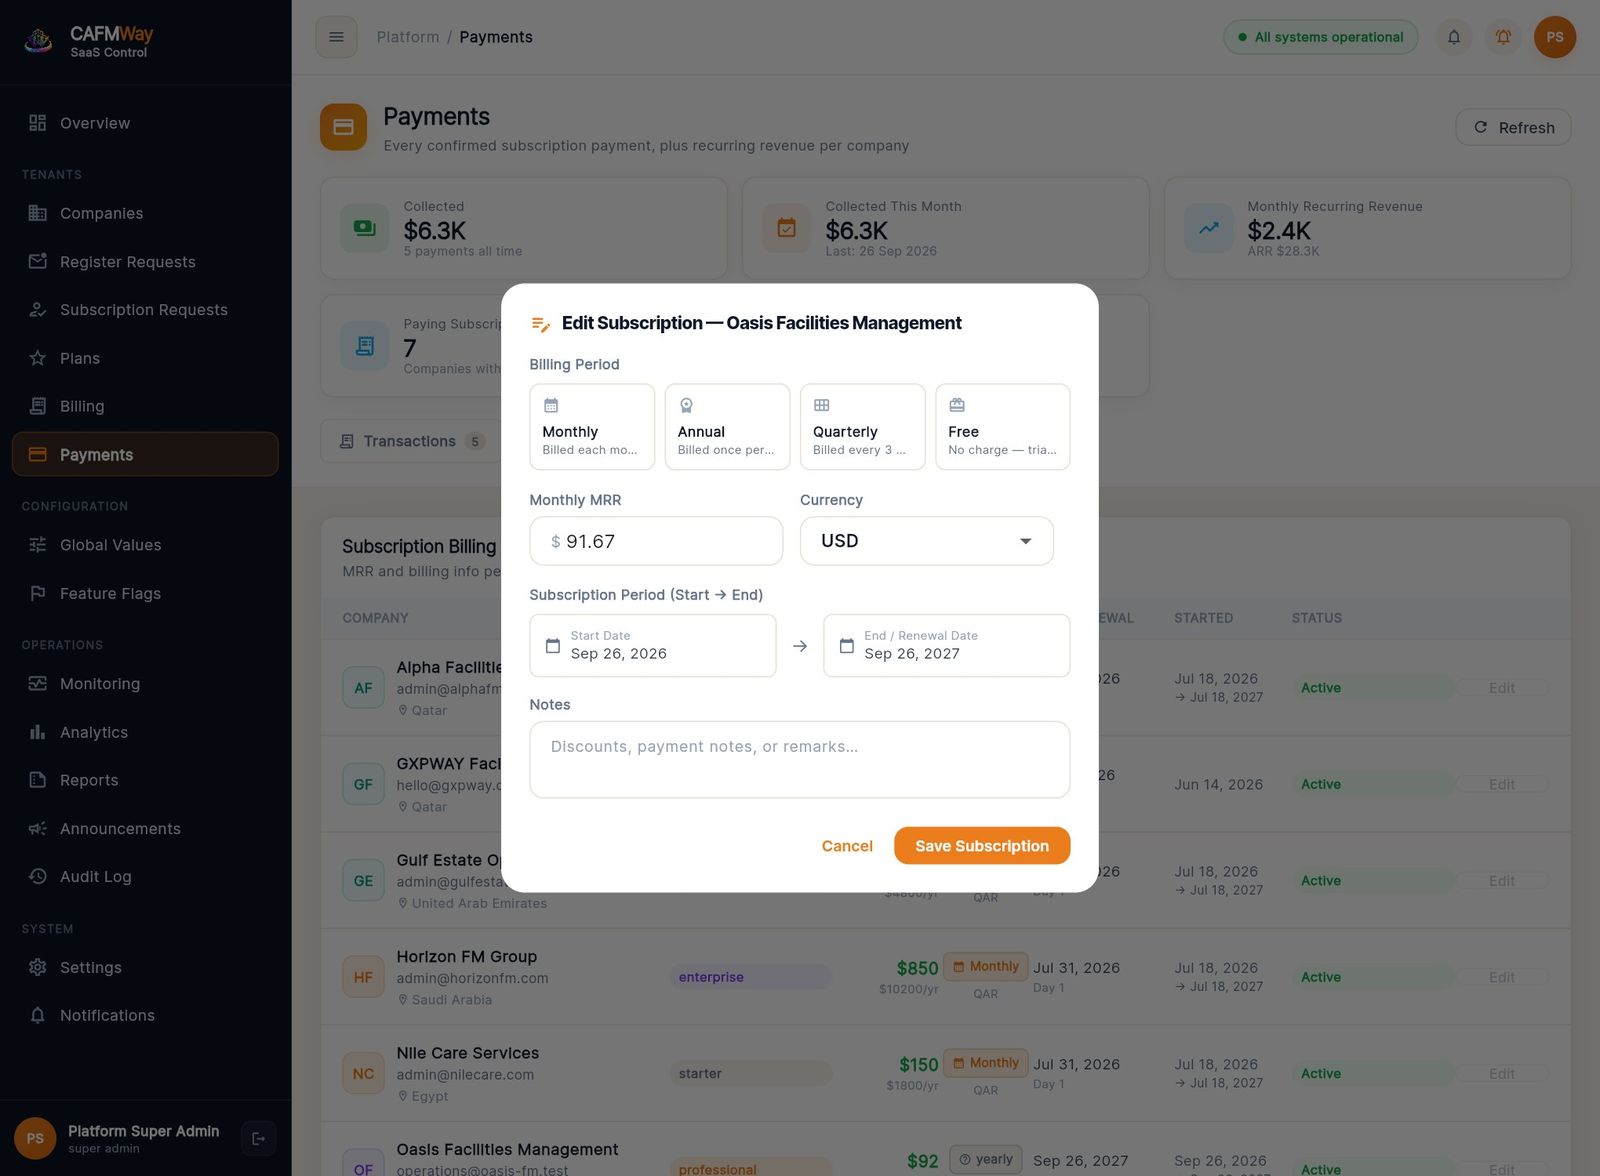
Click Edit on a row to change the billing period, price, currency, billing day, start and end dates, and notes. Then click Save Subscription.
Billing overview
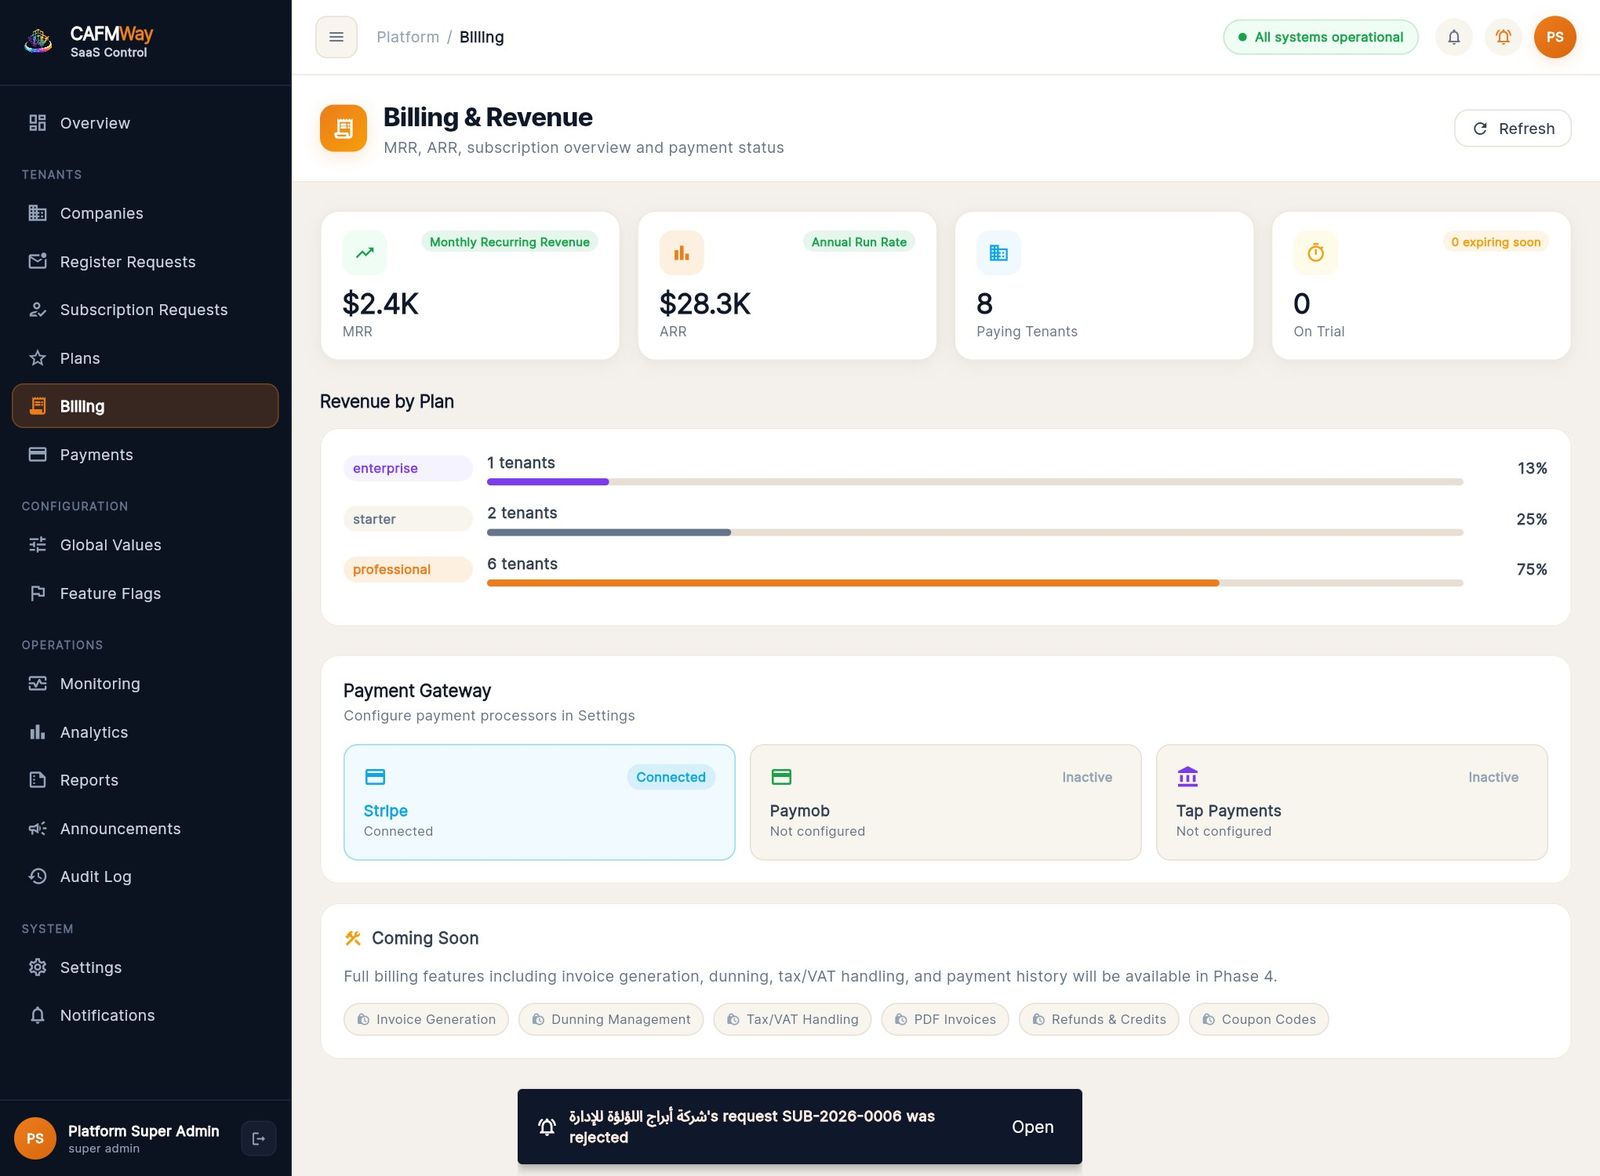
Billing shows monthly and annual recurring revenue, paying companies, trials and revenue by plan.
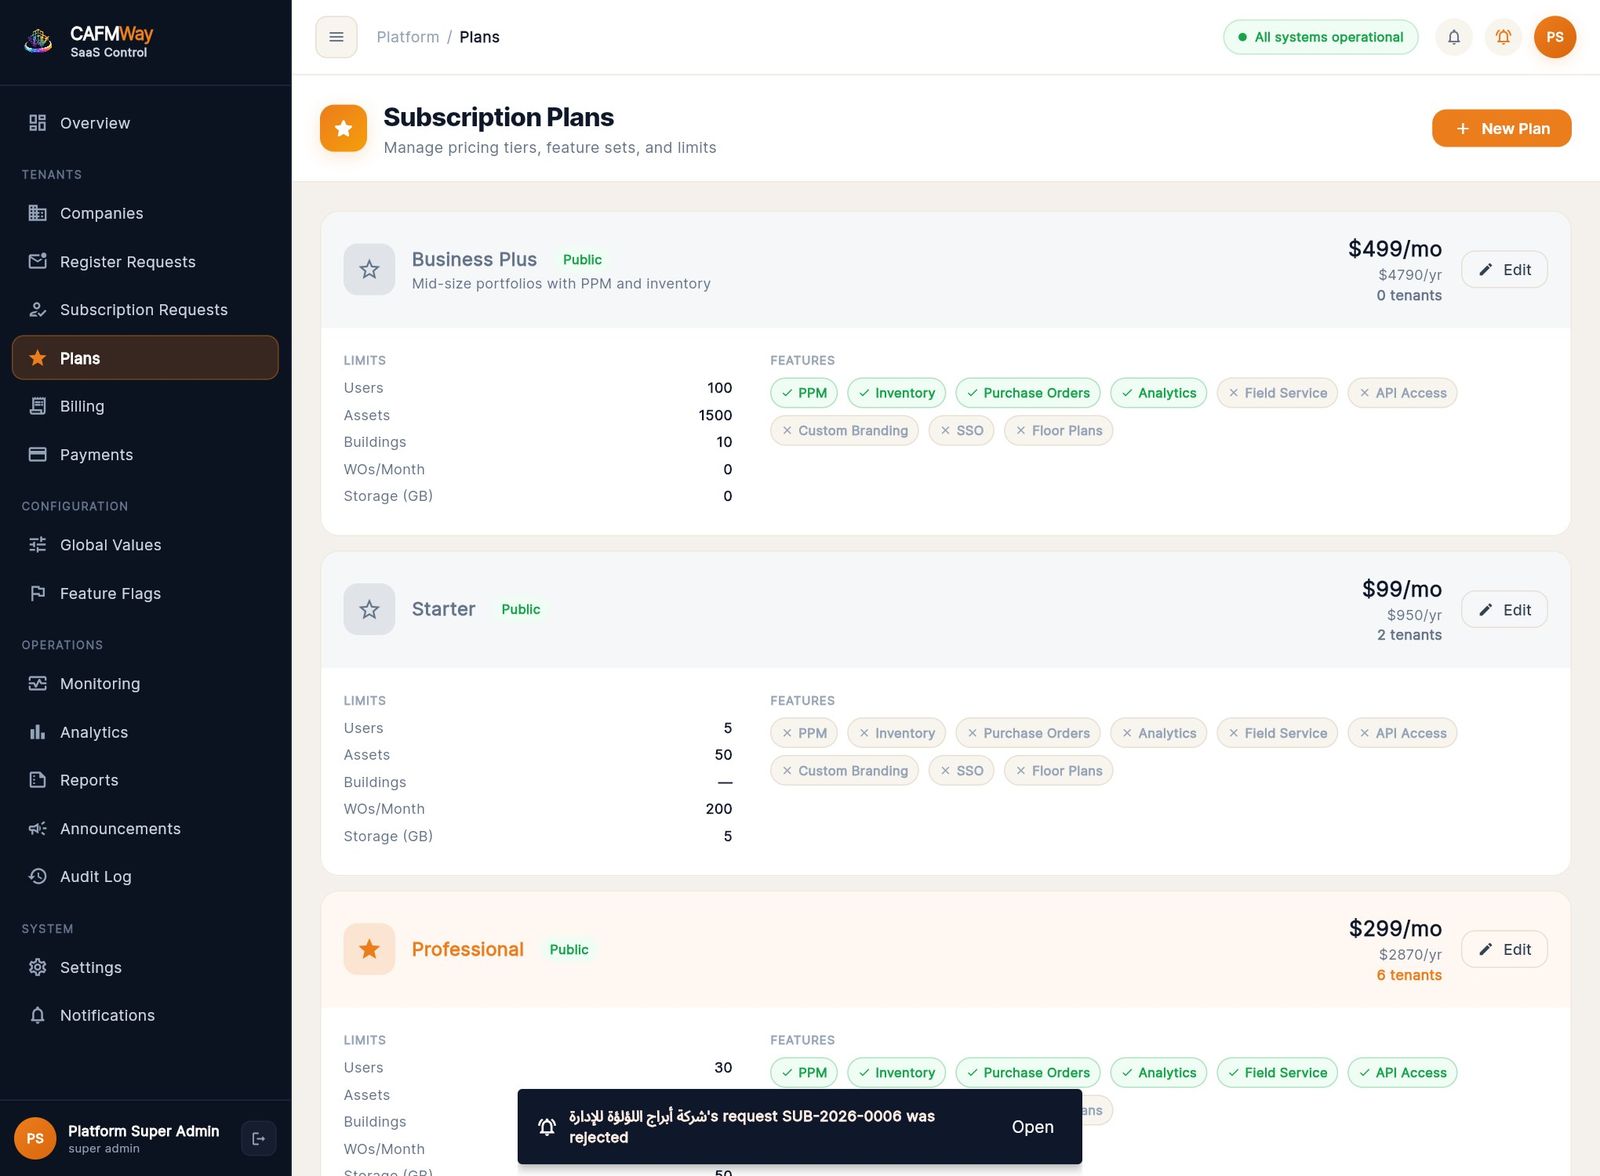
Plans
- Screen: Plans
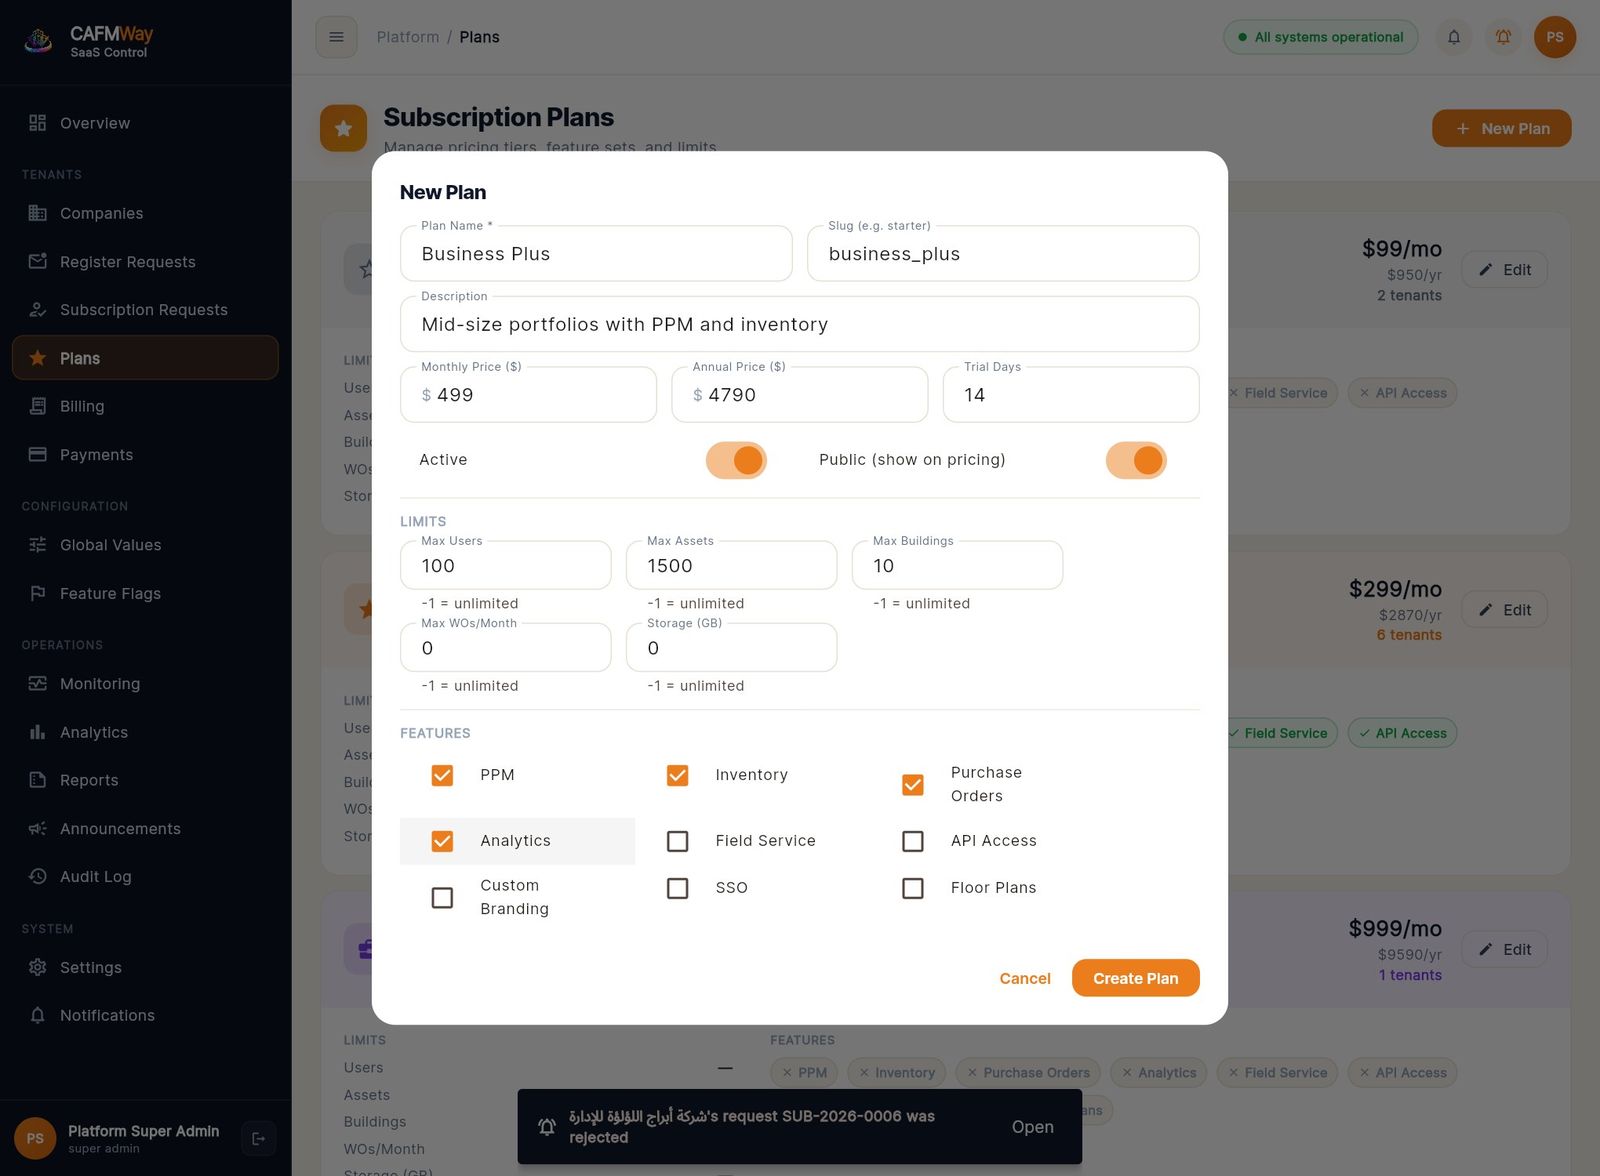
Each card shows a tier's monthly and annual price, its limits and features, and how many companies use it.
- Click New Plan.
- Enter the Plan Name, a Slug (a short unique code), Description, Monthly Price, Annual Price and Trial Days.
- Set the limits (−1 means unlimited) and tick the included features.
- Click Create Plan. To change an existing plan, click Edit.
Platform configuration
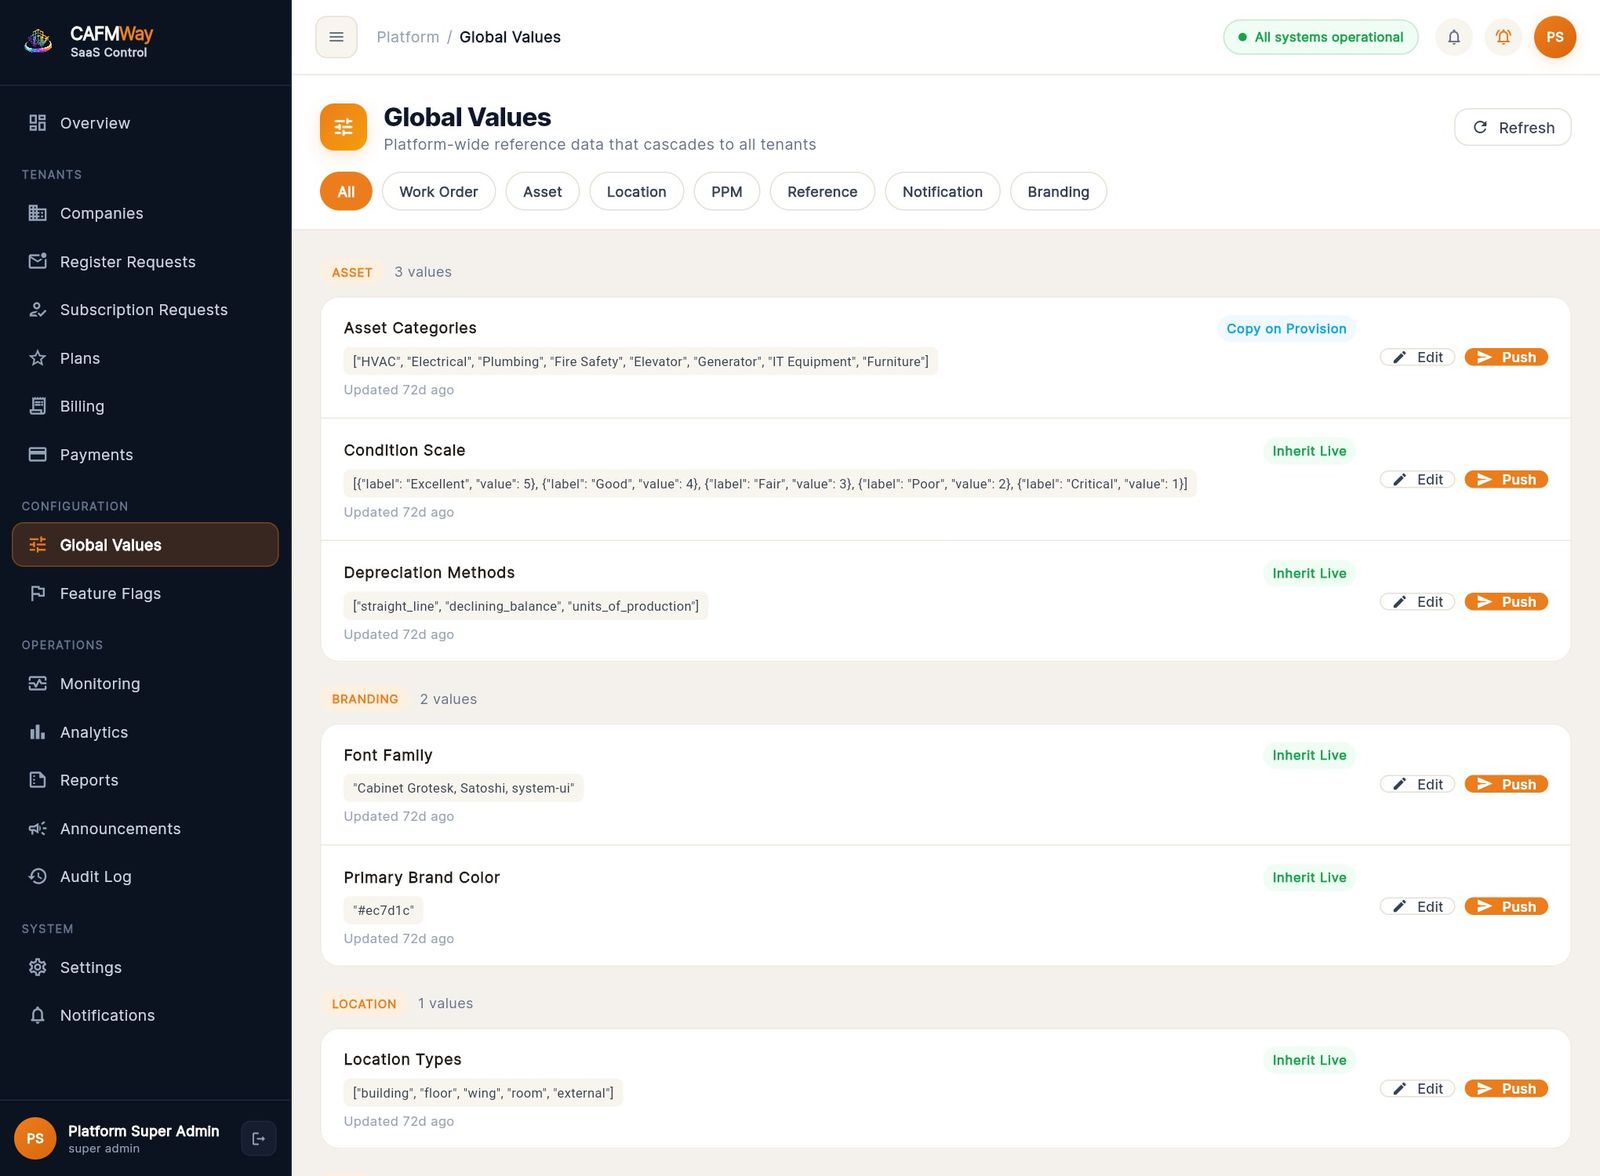
Global values
- Screen: Global Values
These are platform-wide reference lists, such as priority levels, work order categories, asset categories, currencies and time zones. Filter them by category.
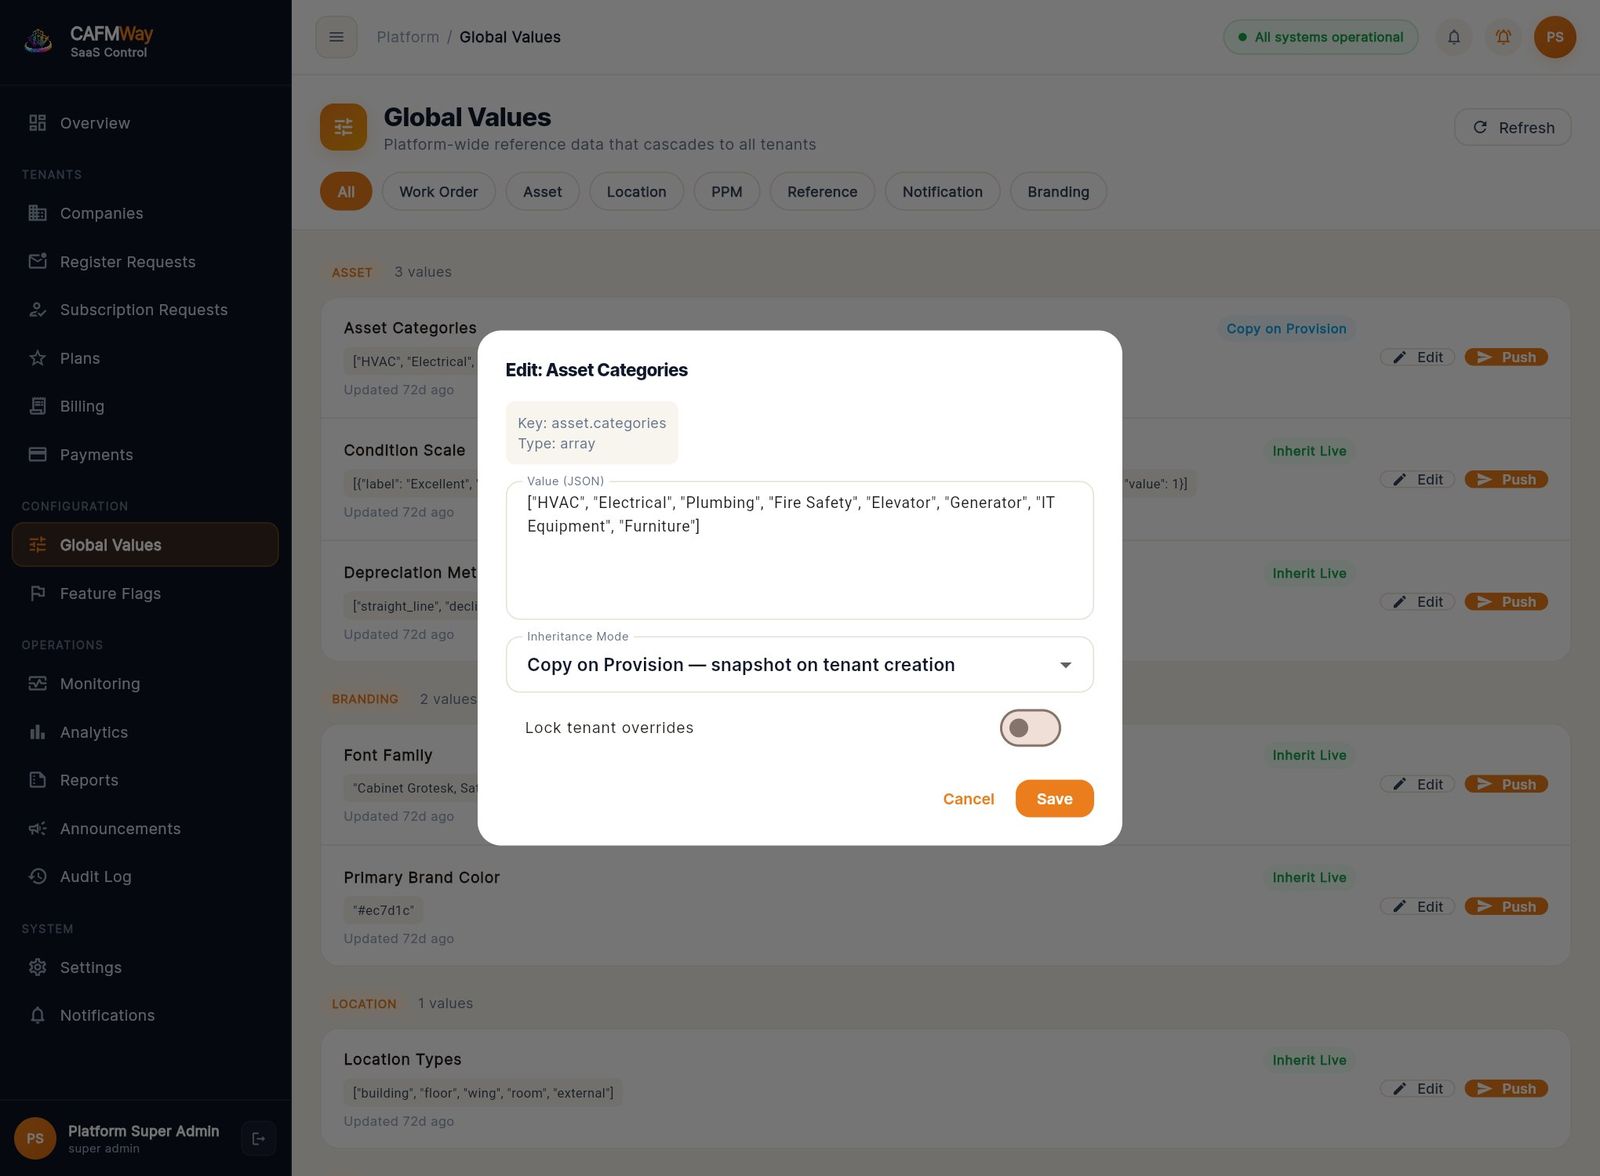
- Click Edit on a value.
- Change the JSON value and choose an Inheritance Mode:
- Inherit Live: tenants always read the platform value.
- Copy on Provision: new tenants get a snapshot when they are created.
- Force Push: the value replaces every tenant's own value now.
- Optionally tick Lock tenant overrides, then click Save.
Push sends a value to all tenants. It first shows a dry run with the number of tenants affected.
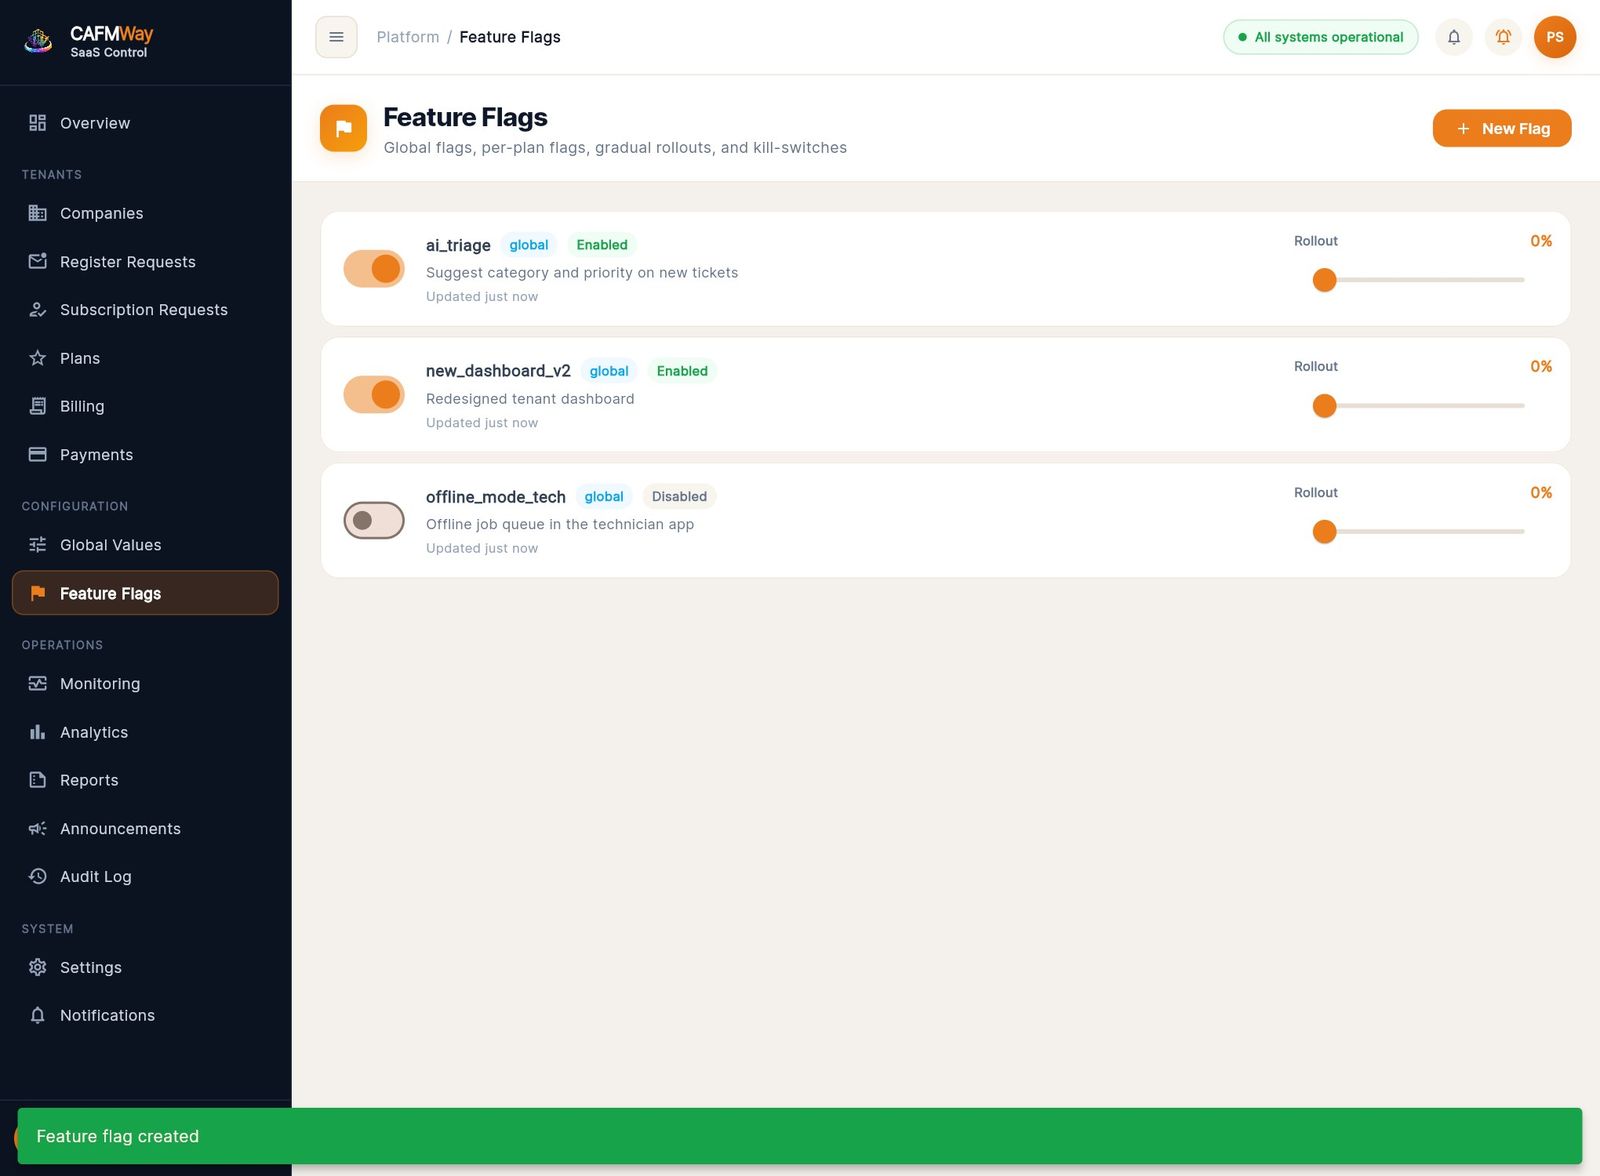
Feature flags
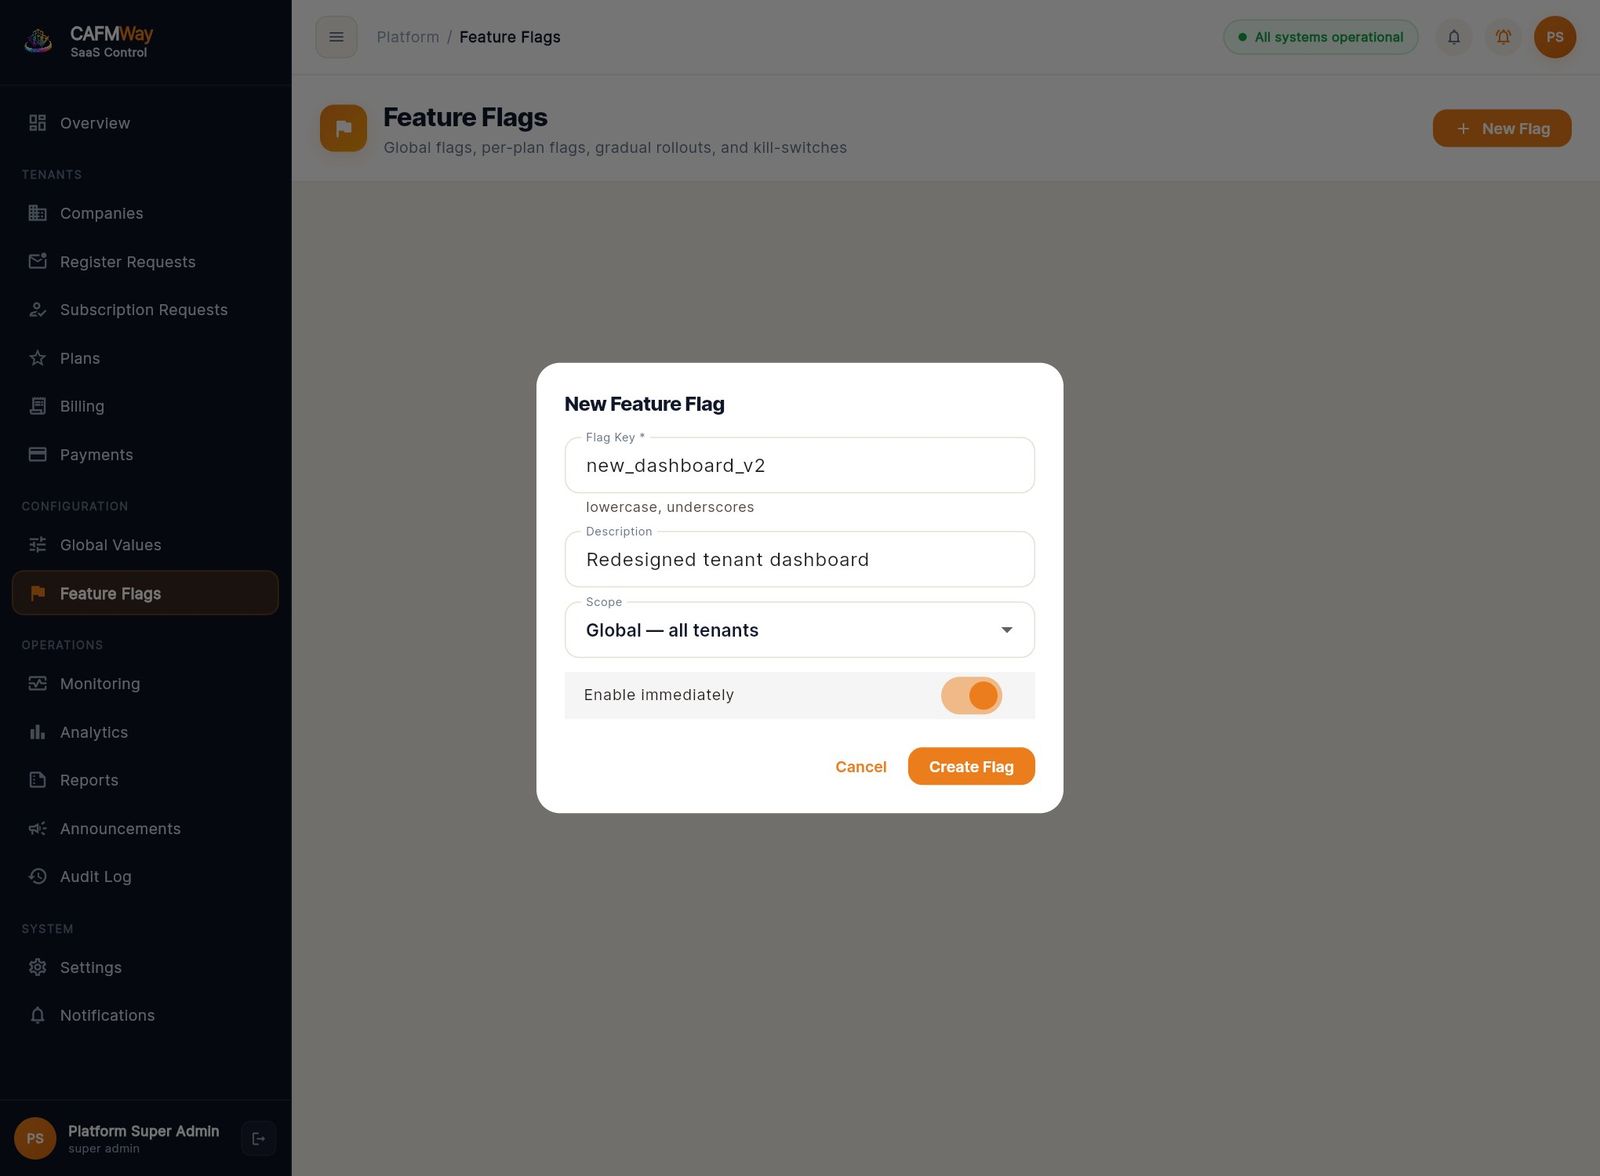
- Click New Flag.
- Enter a Flag Key in lowercase with underscores, a Description and the Scope.
- Tick Enable immediately if the flag should start on, then click Create Flag.
Use the switch on each flag to turn it on or off, and the Rollout slider to set a percentage.
Announcements
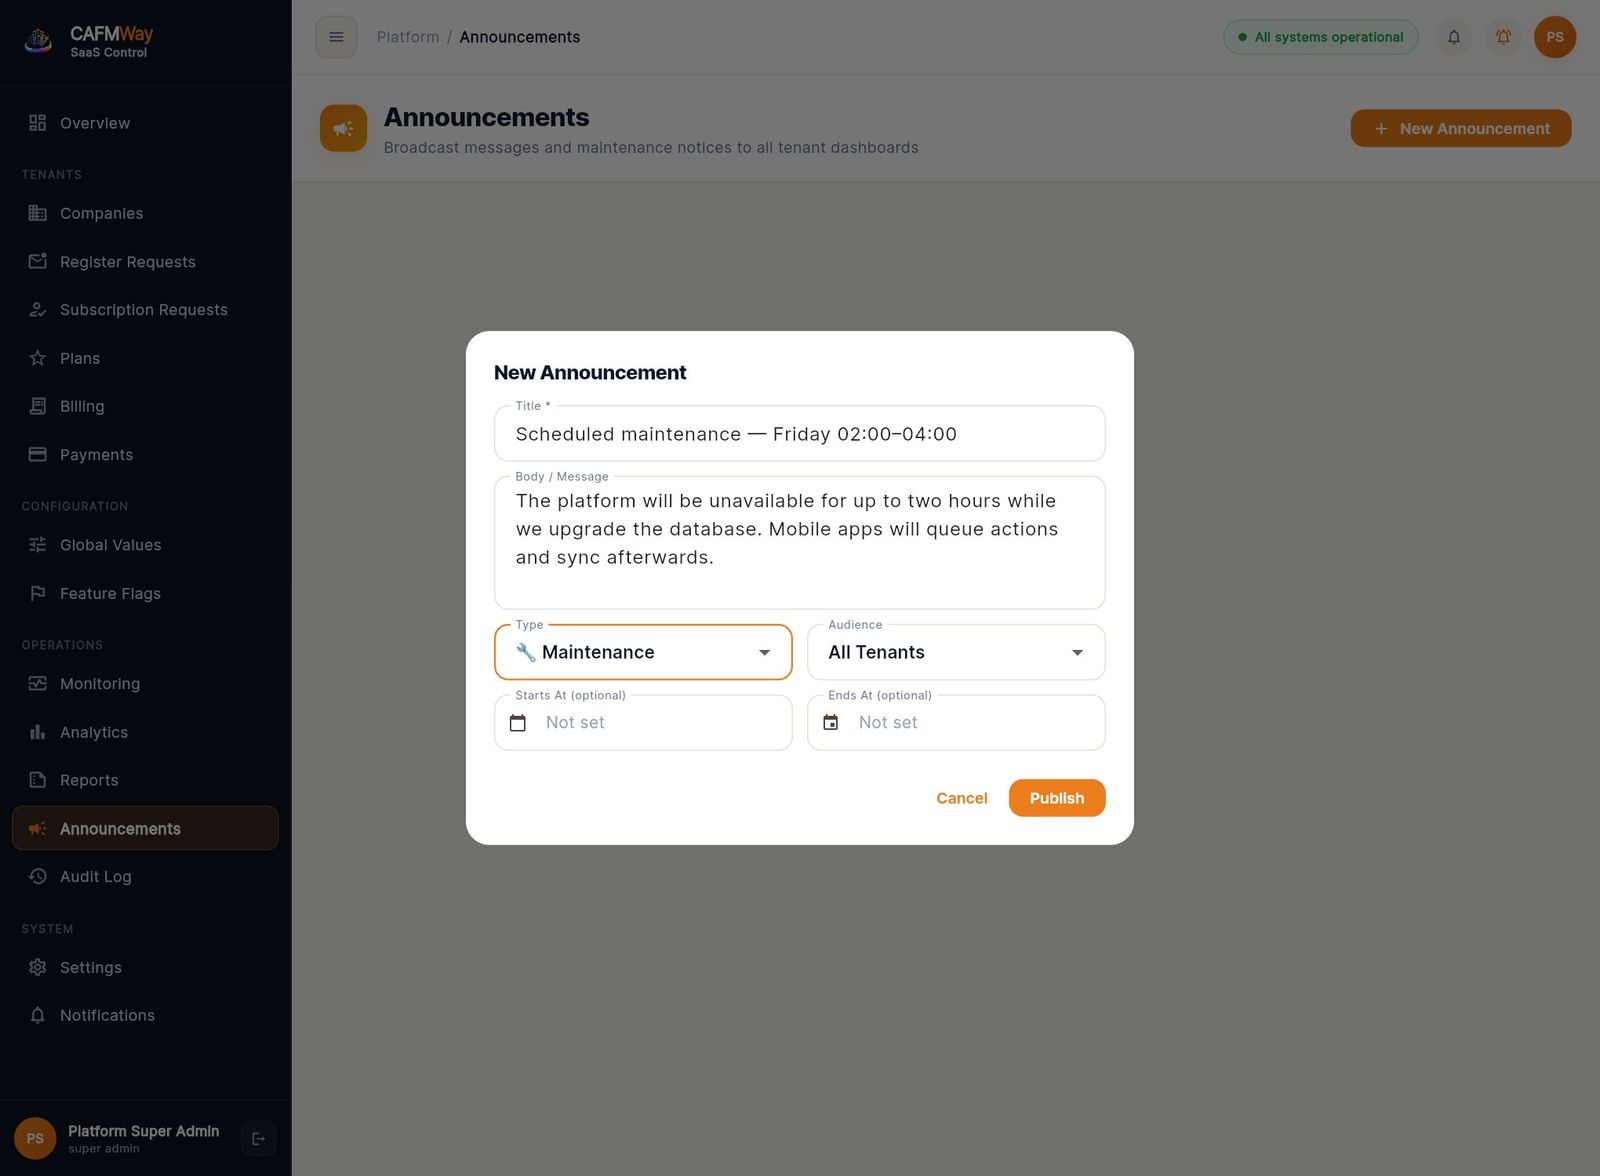
- Click New Announcement.
- Enter a Title and the message.
- Choose the Type (Info, Warning, Maintenance or Release Note) and the Audience (all tenants or one plan).
- Optionally set Starts At and Ends At, then click Publish.
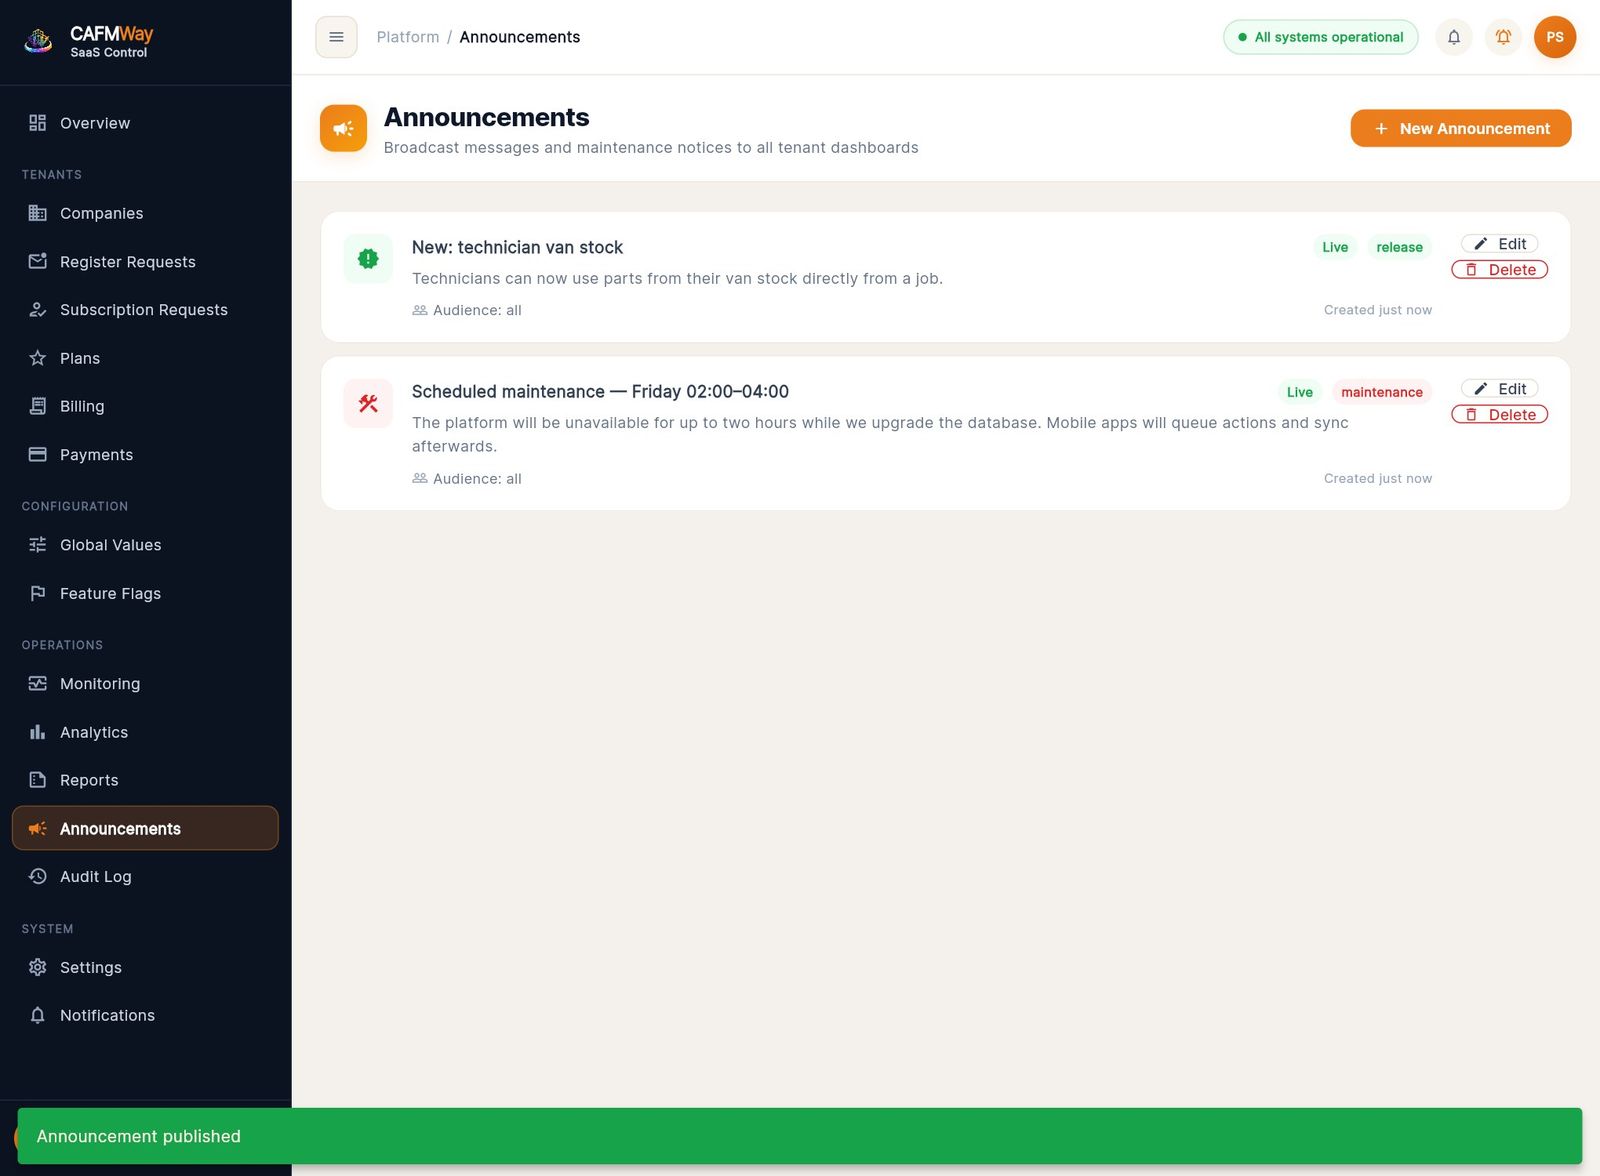
Each announcement shows as Live, Scheduled or Inactive. Edit and Delete are on every card.
Monitoring and reporting
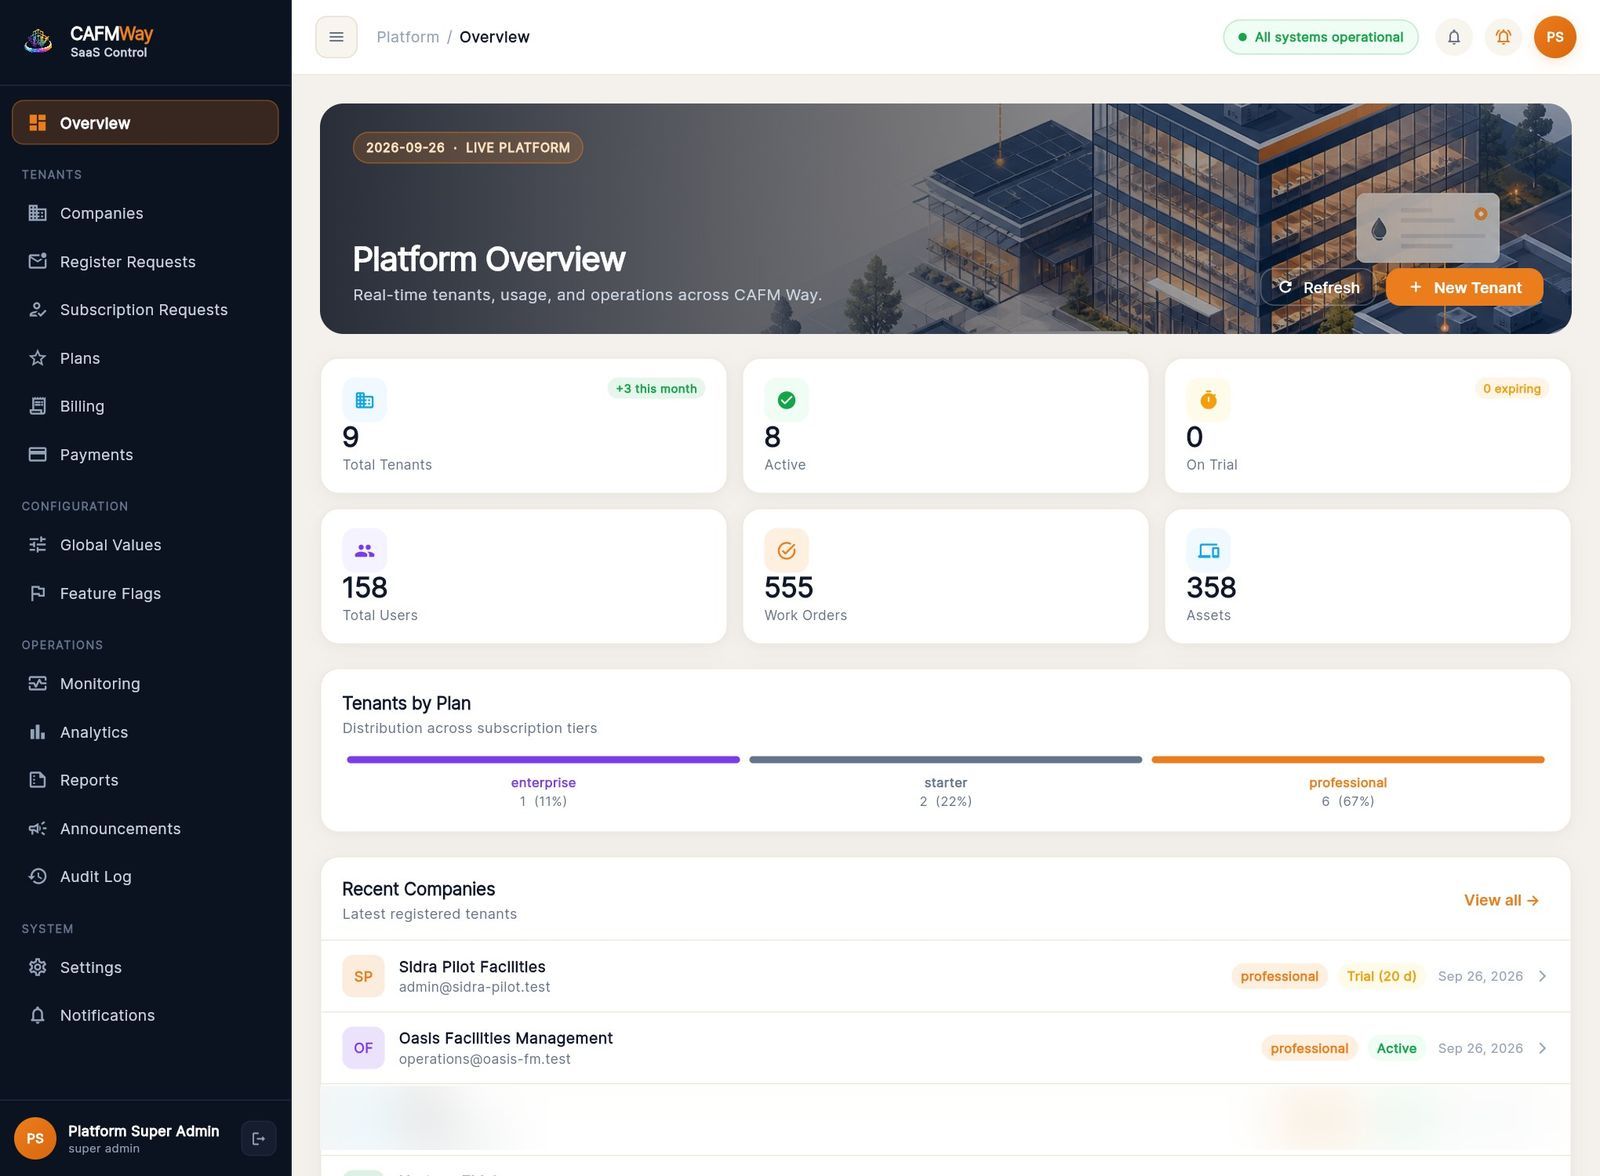
Overview dashboard
Overview shows total, active and trial companies (with trials expiring soon), total users, work orders and assets across the platform, companies by plan, and the latest companies to join.
Analytics
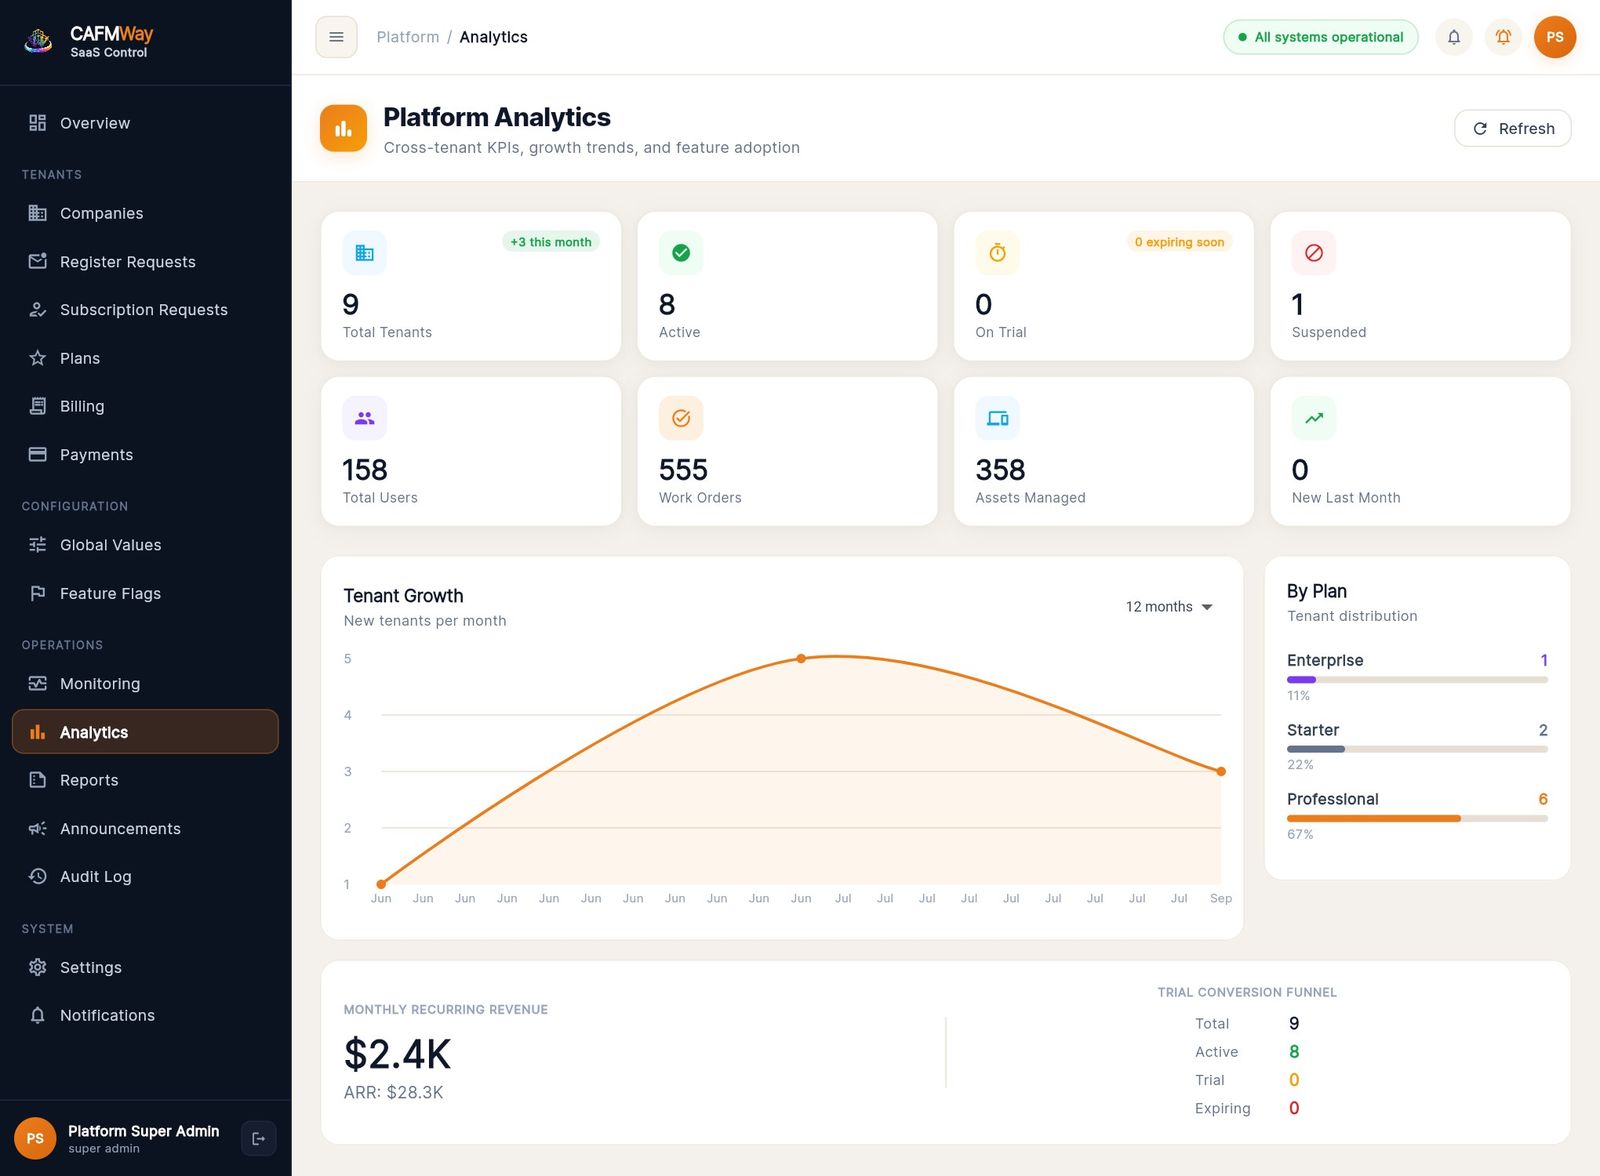
Cross-company figures: companies by status, users, work orders and assets managed, new companies last month, a Tenant Growth chart (6, 12 or 24 months), the plan mix, recurring revenue, and trial conversion.
Monitoring
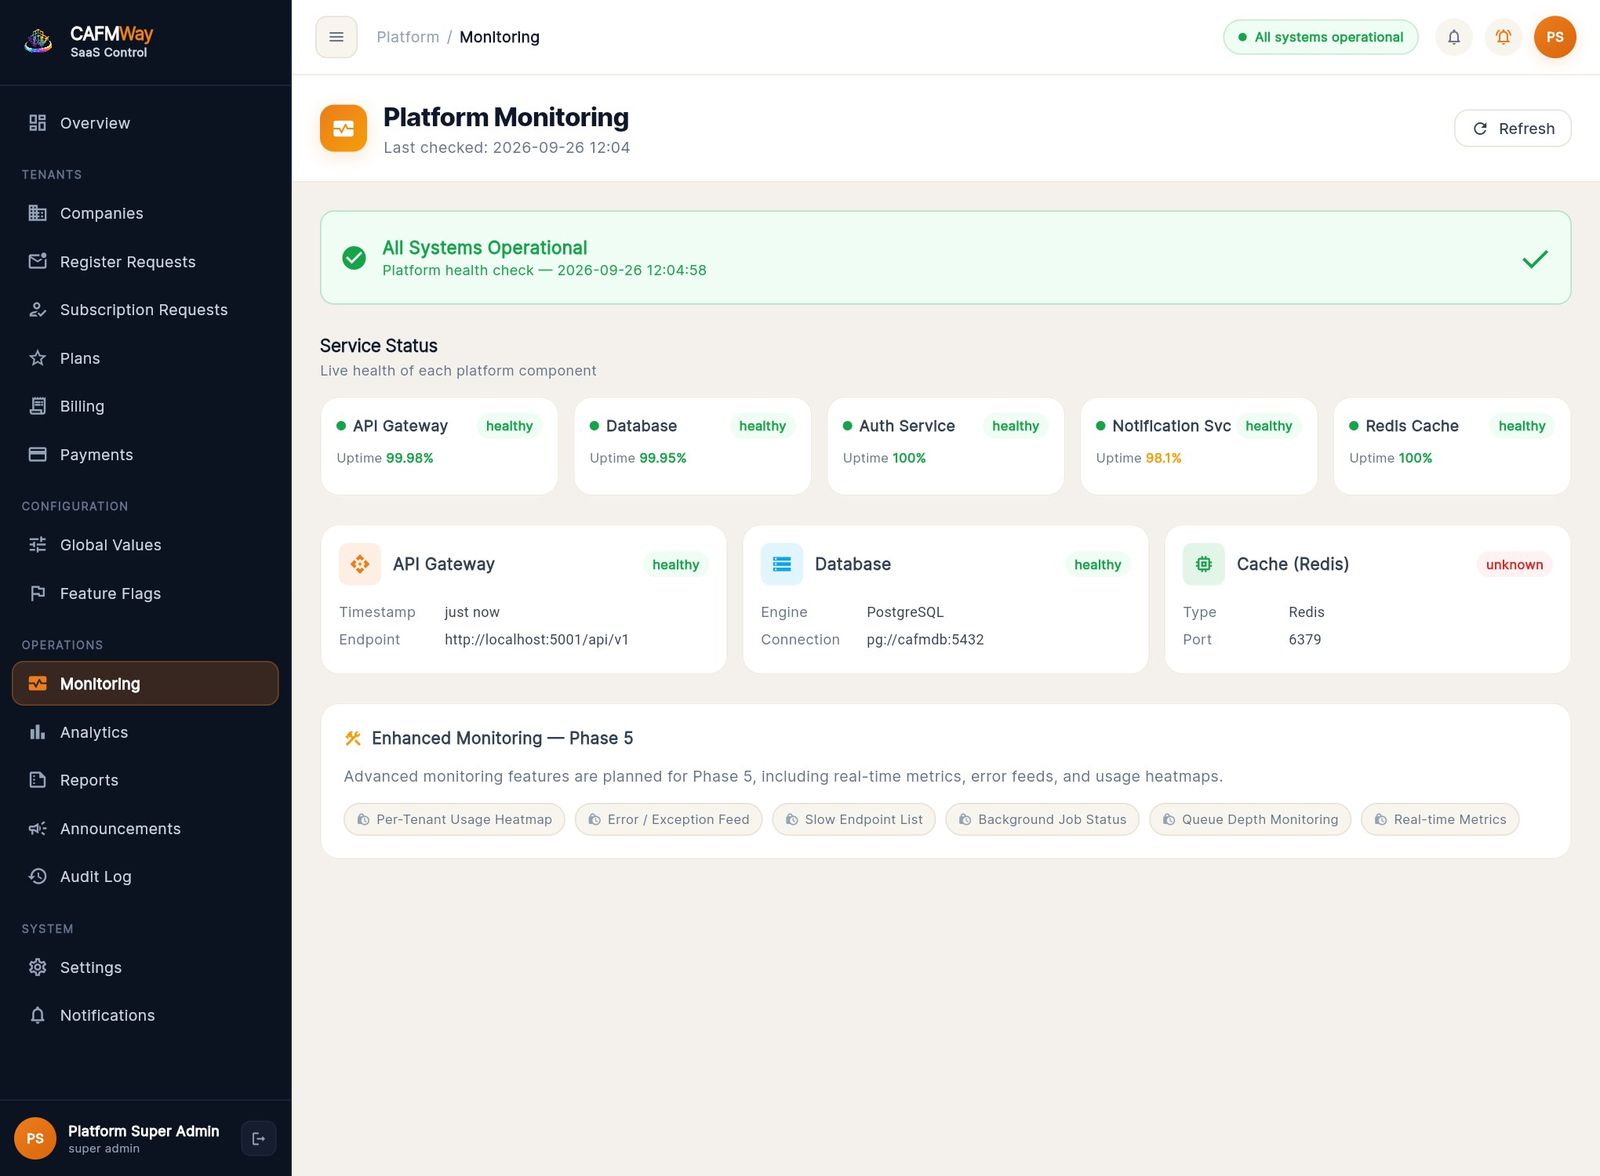
A quick health check of the API and the database, with the time of the last check. Click Refresh to check again.
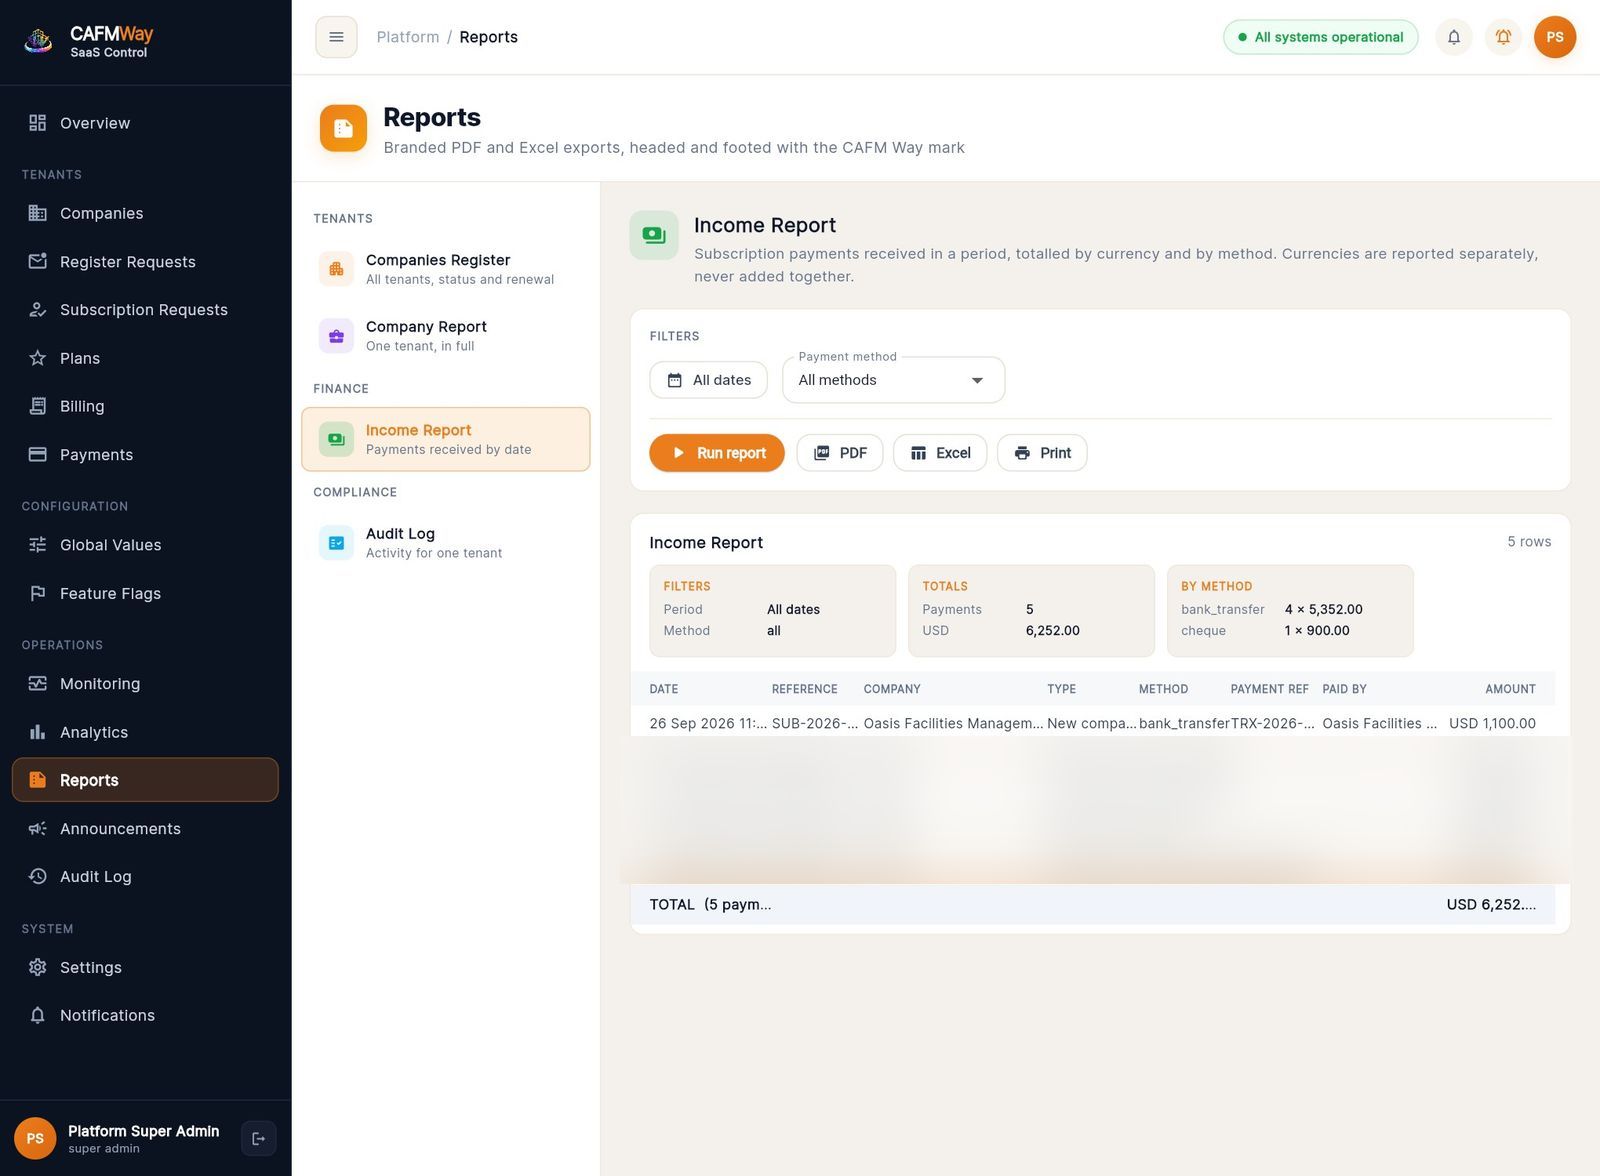
Reports
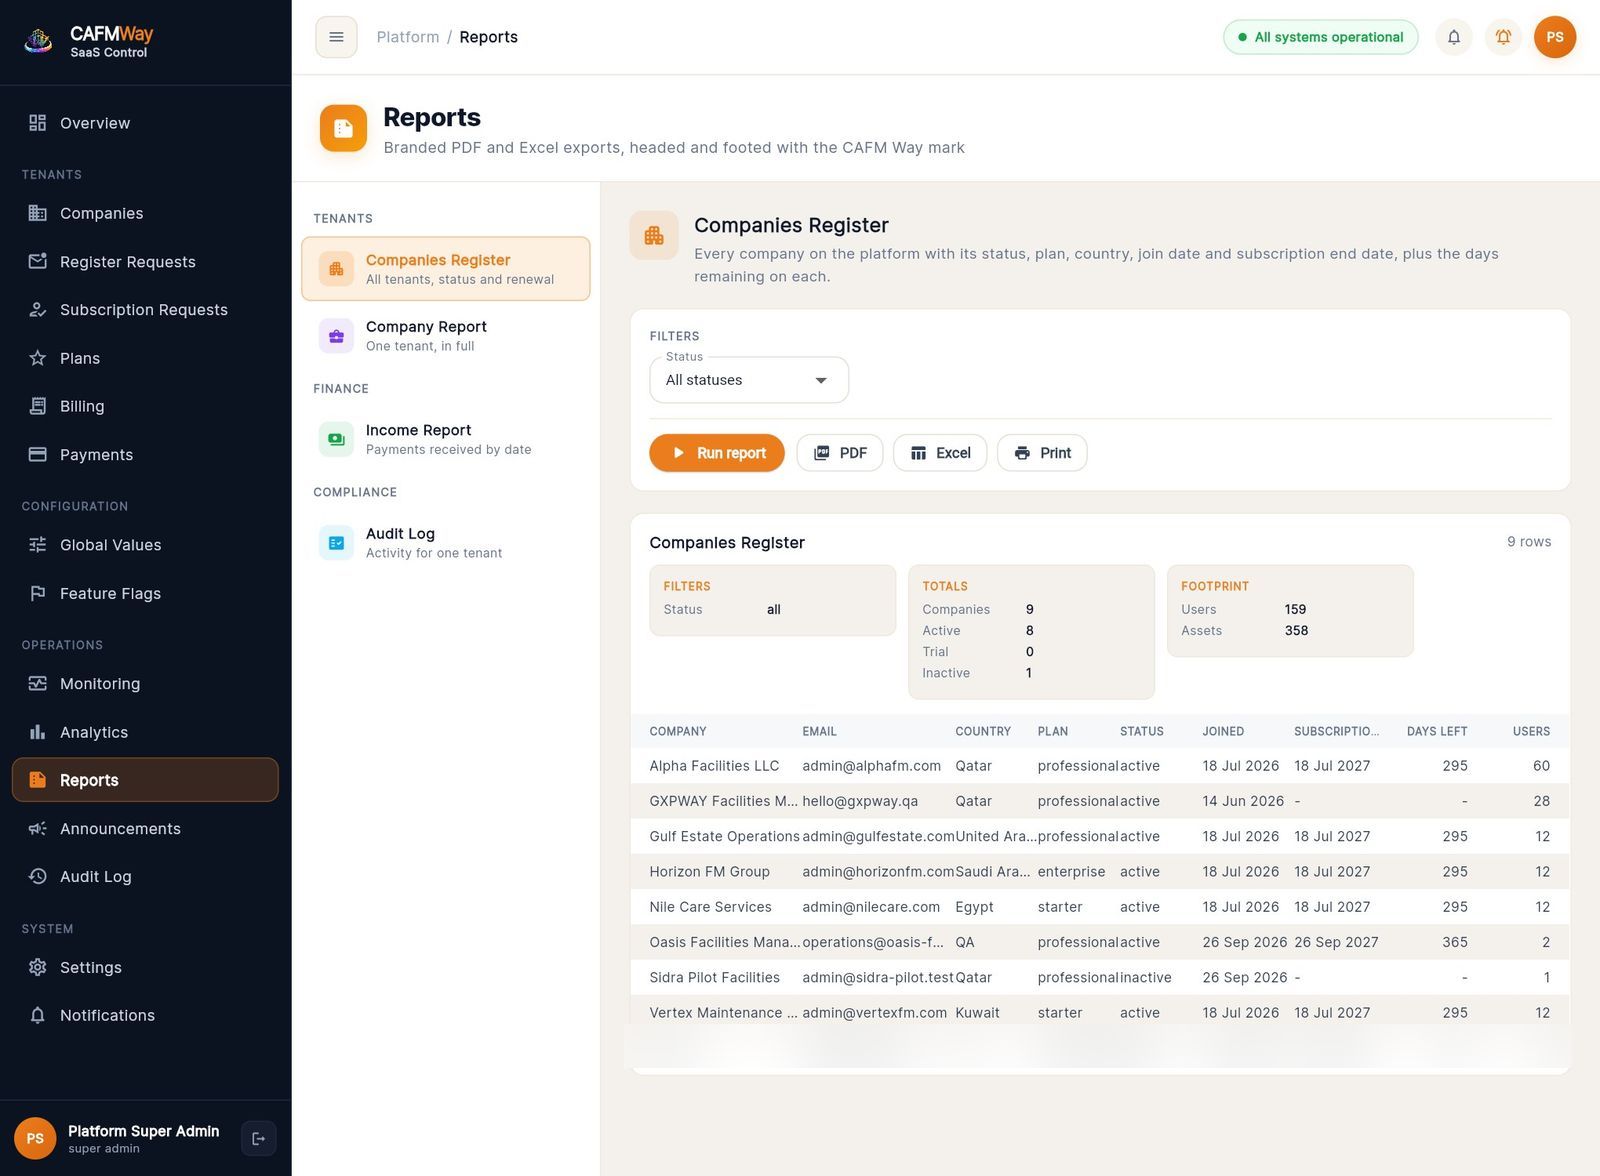
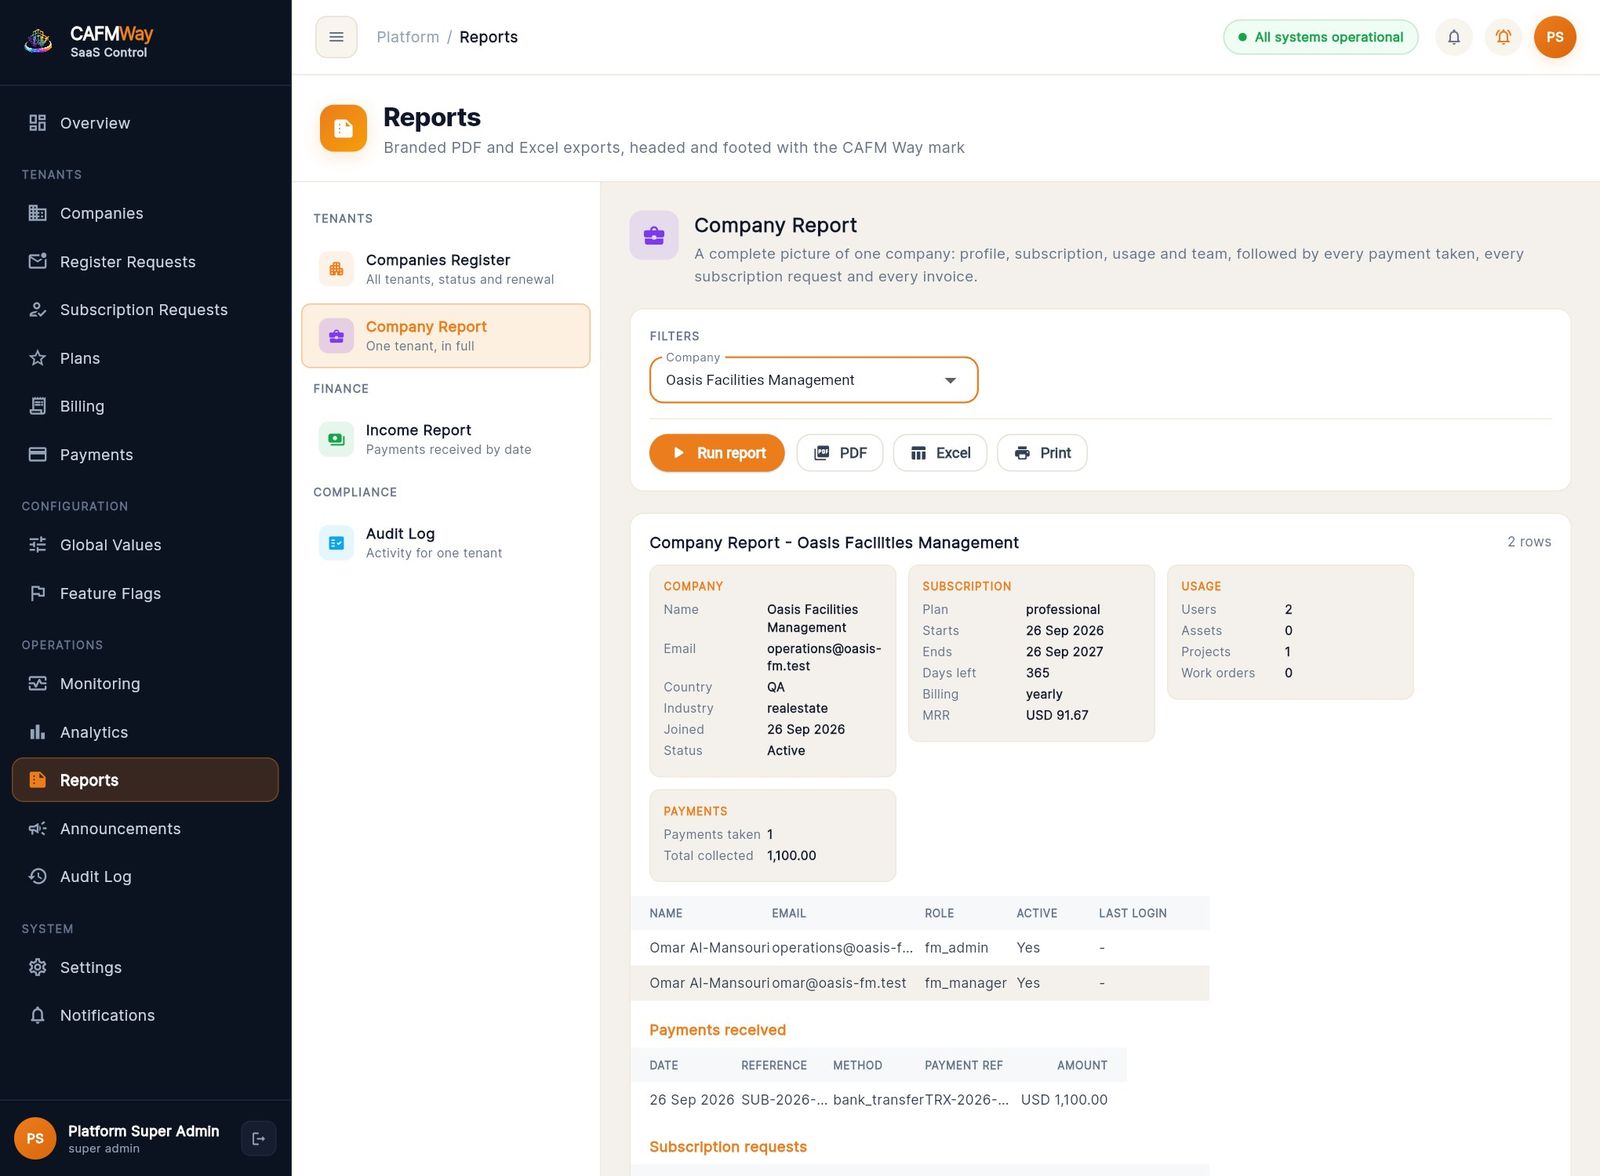
Reports are branded PDF and Excel exports.
- Choose a report on the left:
- Companies Register: all companies with status and renewal
- Company Report: one company in full
- Income Report: payments by date, totalled per currency and method
- Audit Log: activity for one company
- Set the filters, such as status, company, date range or payment method.
- Click Run report to preview exactly the rows that will be exported.
- Click PDF, Excel or Print.
Audit log
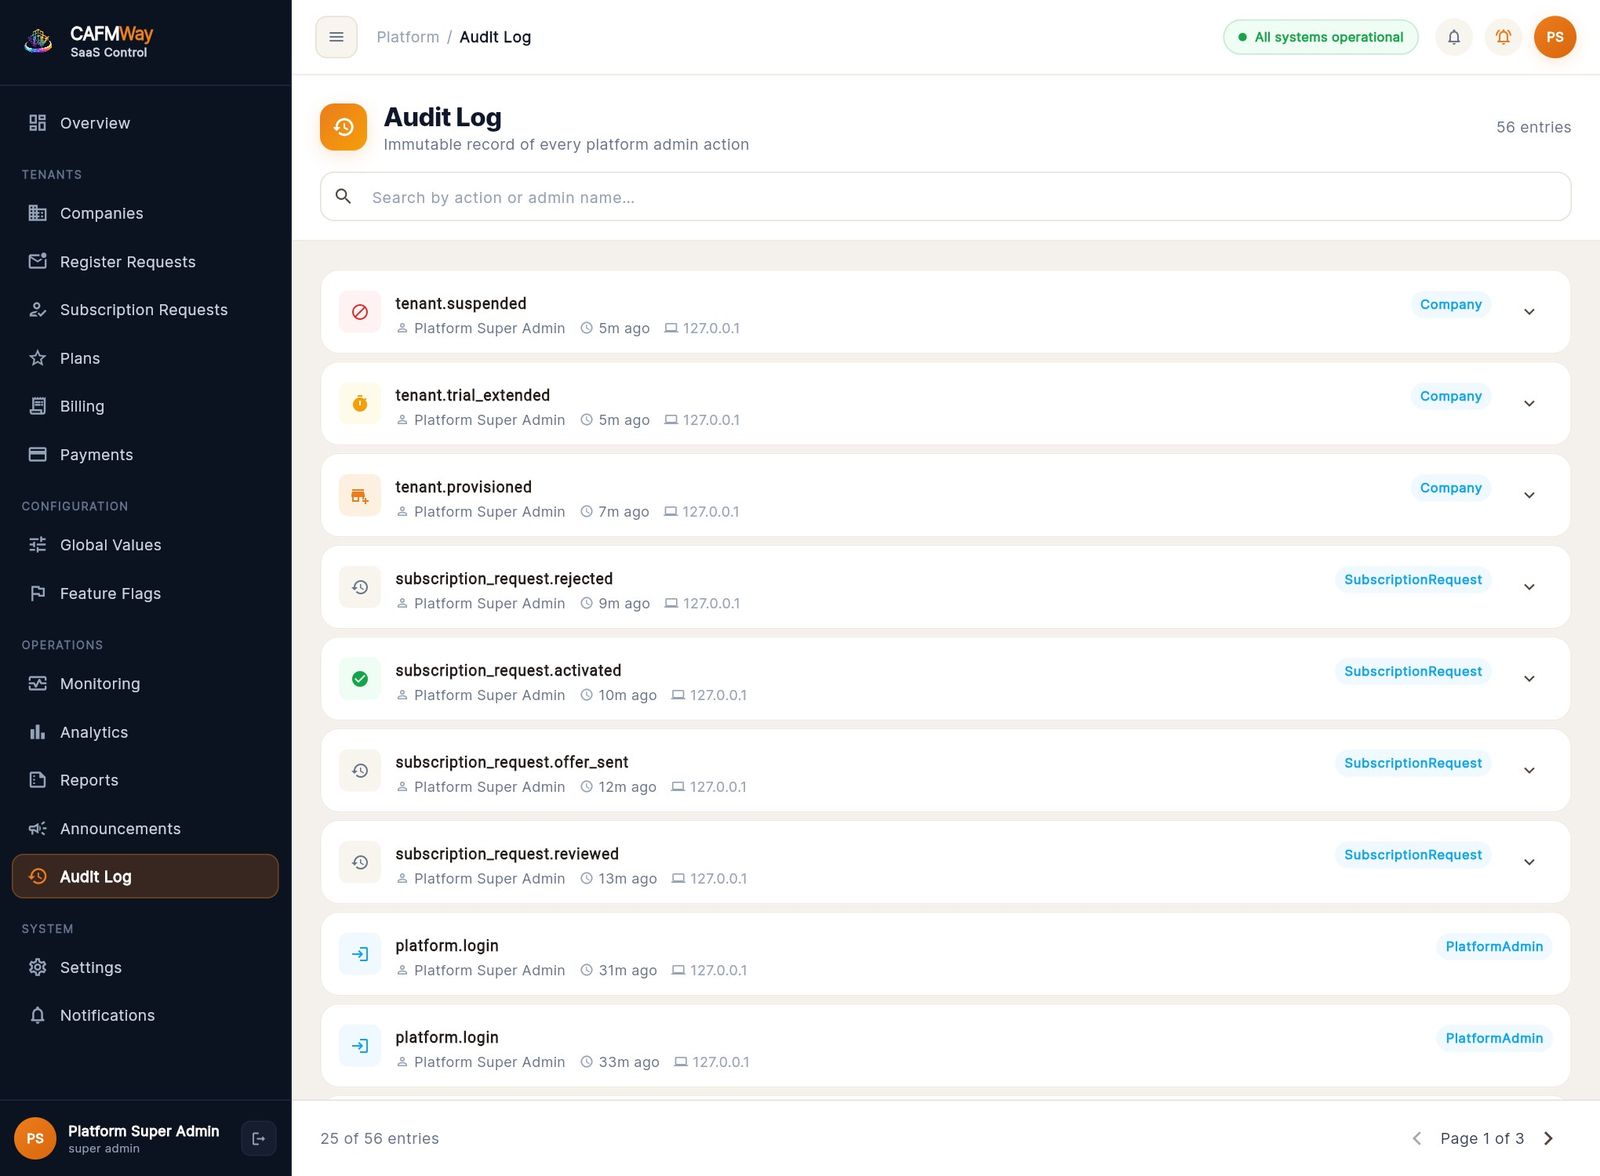
Every recorded console action appears with the administrator, the time and the IP address, for example sign-ins, company changes and request decisions. Search by action or name, and expand an entry to see what changed.
Notifications
The bell in the top bar and the Notifications page form the operator inbox:
- new enquiries and applications
- payments
- rejections
- subscriptions about to expire
- failed emails
- companies that hit their plan limit
A live alert appears in the console as each one arrives, with an Open button that takes you to the right screen. It also plays a chime unless you mute it with the bell icon next to the notifications.
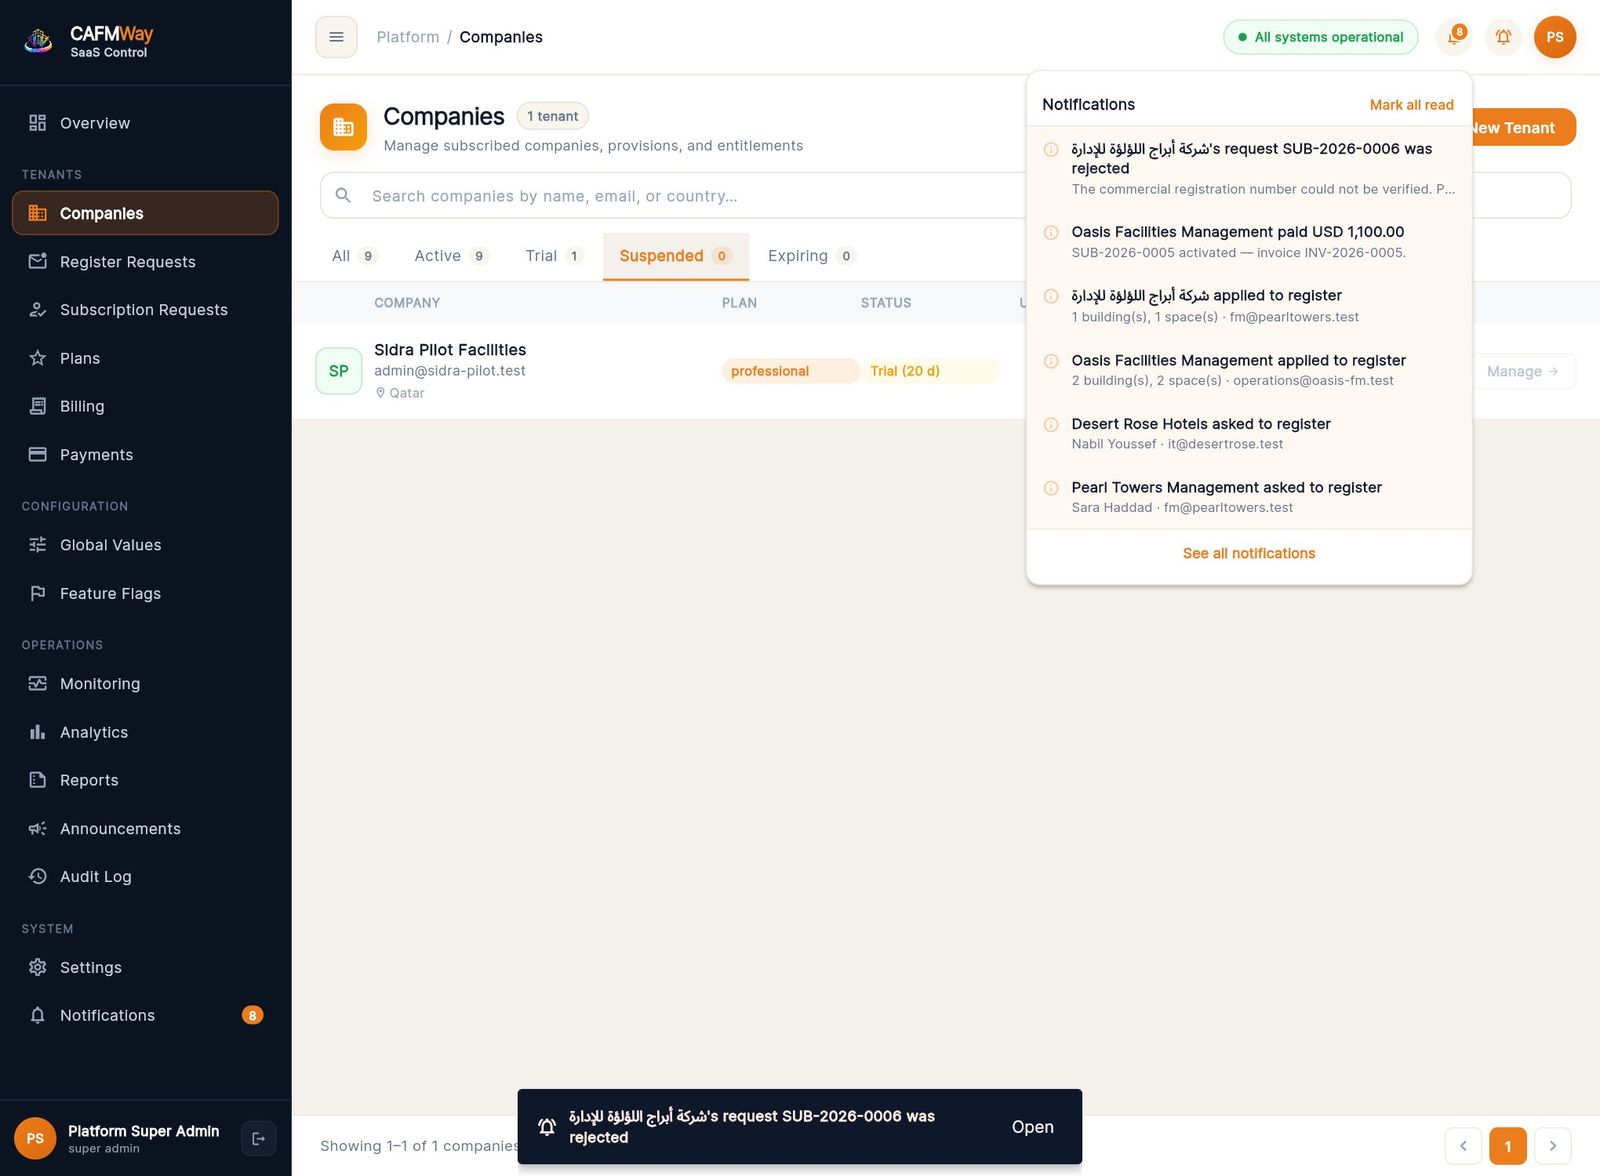
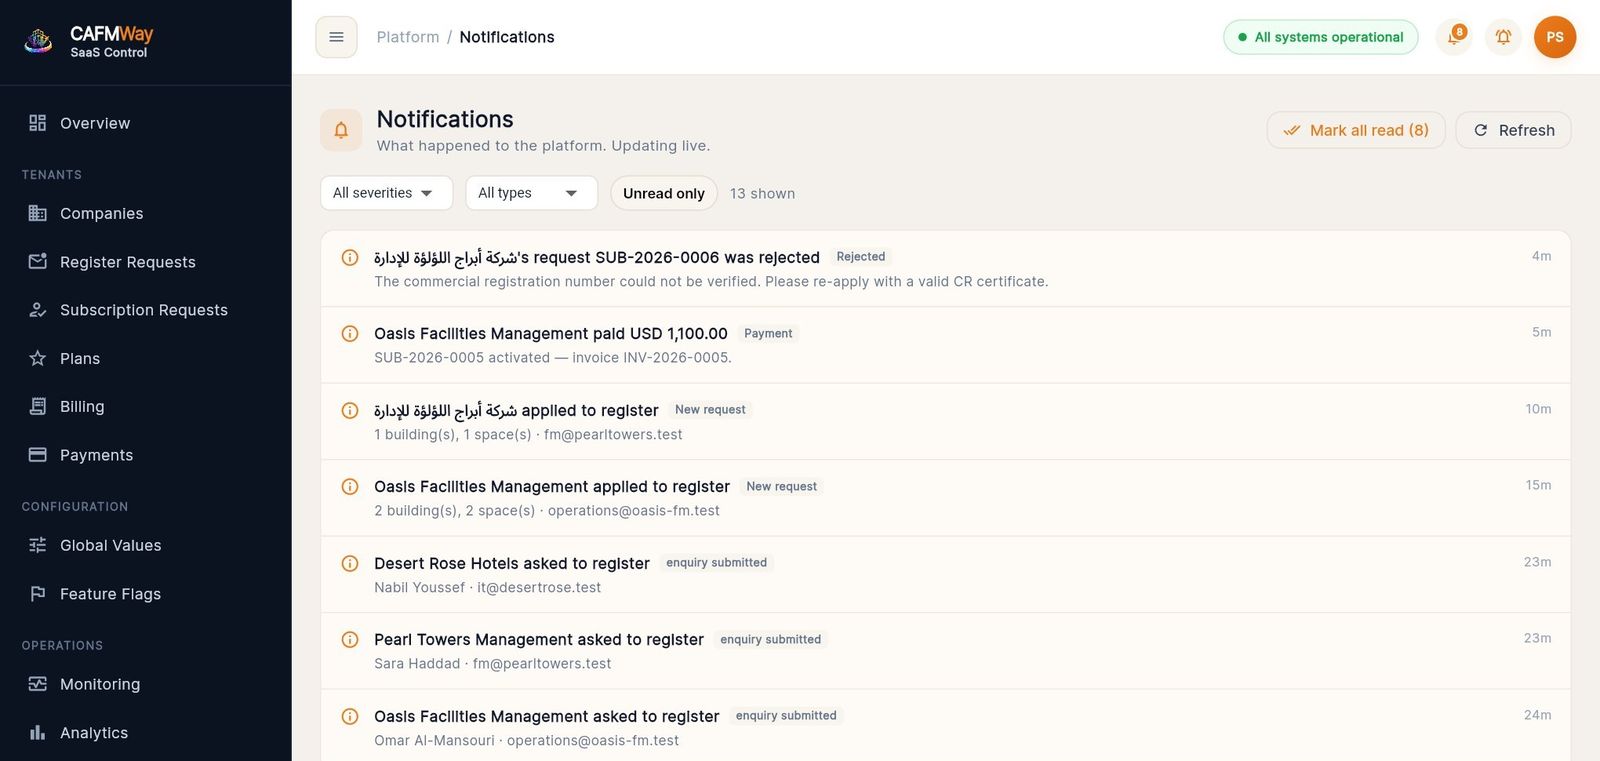
Click Mark all read to clear the unread count.
Settings
Platform administrators
- Screen: Settings → Platform Admins
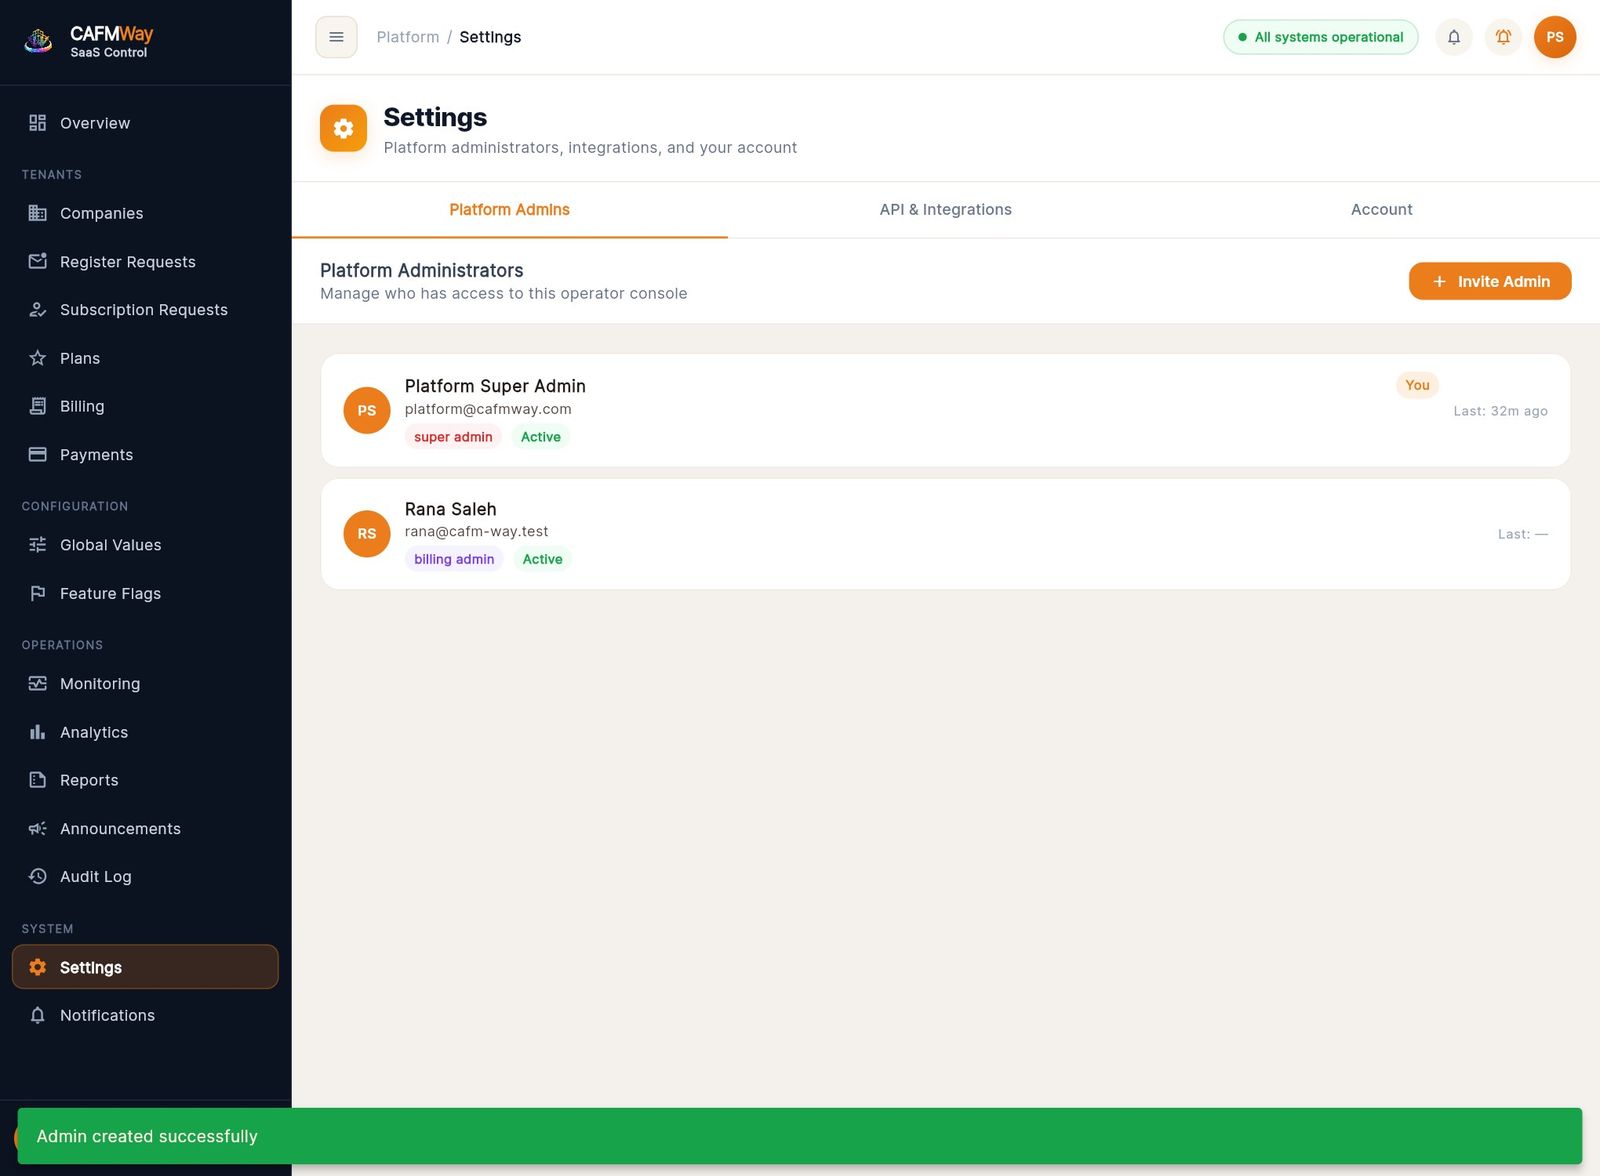
The list shows everyone who can use the console. Super admins can add more:
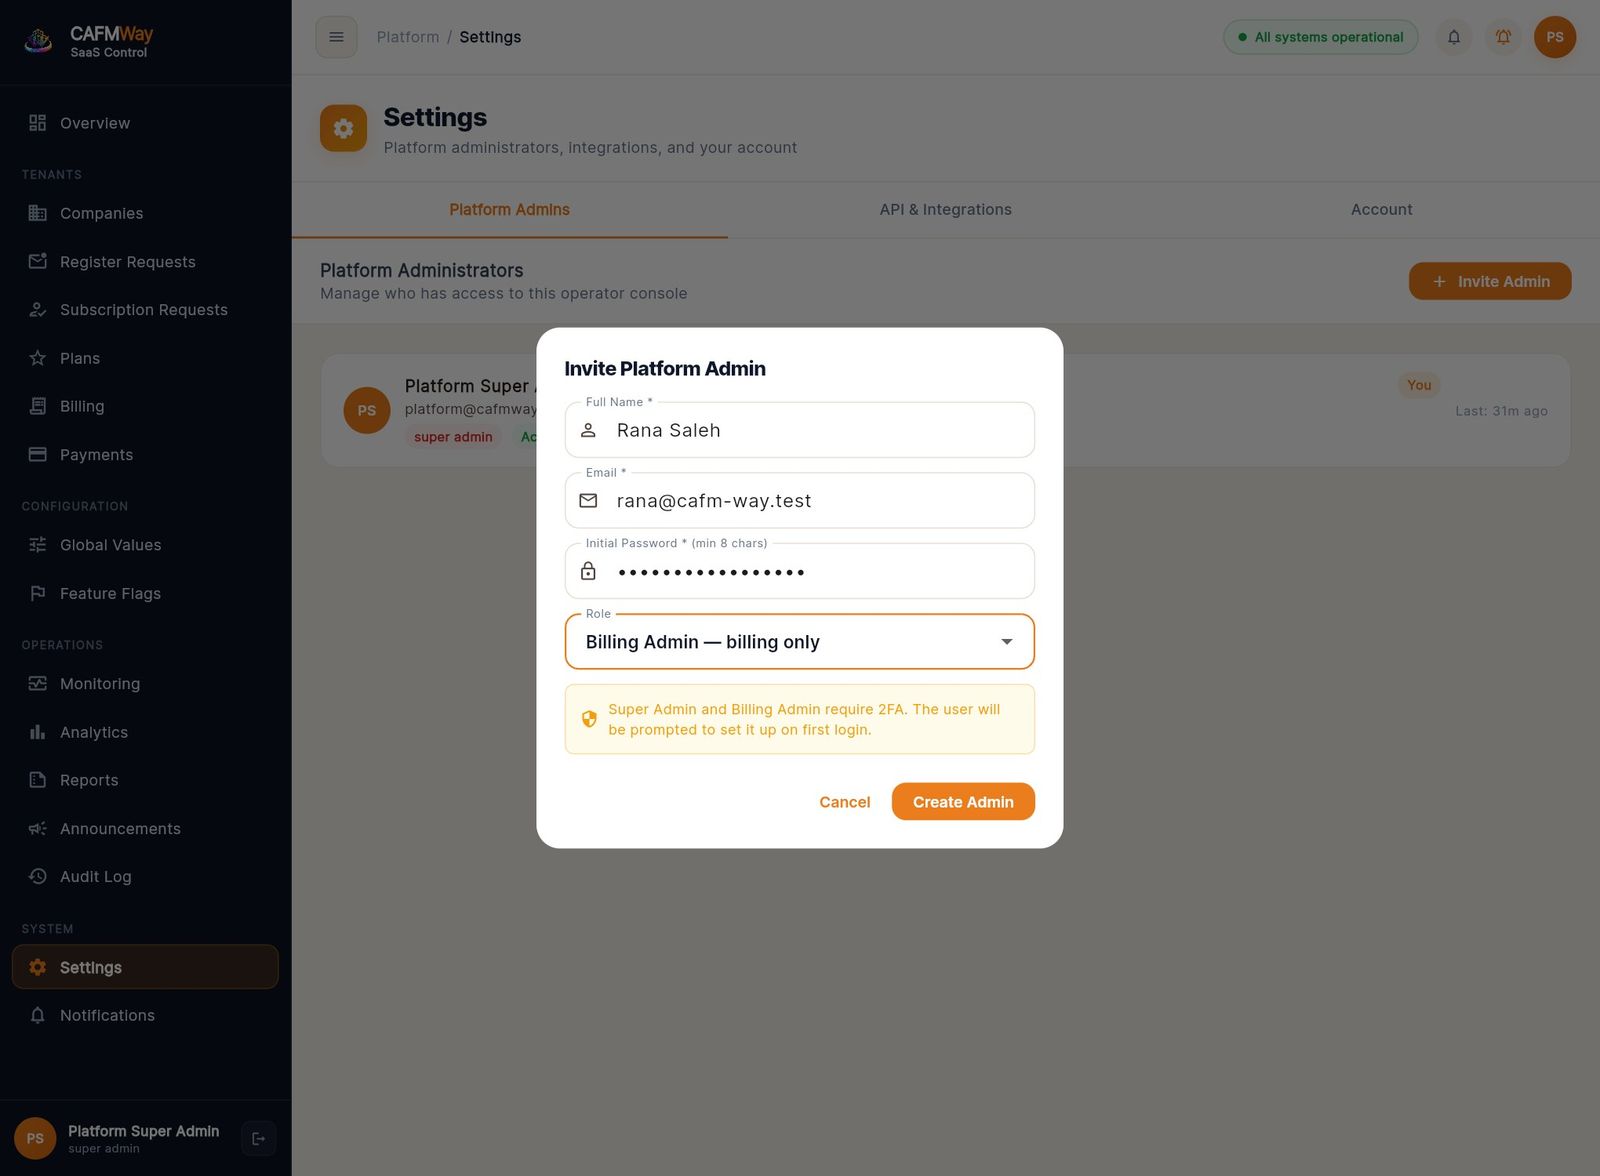
- Click Invite Admin.
- Enter the Full Name, Email and an Initial Password of at least 8 characters.
- Choose a Role: Super Admin, Platform Ops, Billing Admin or Read-Only Analyst.
- Click Create Admin, then share the password with the person yourself. No email is sent.
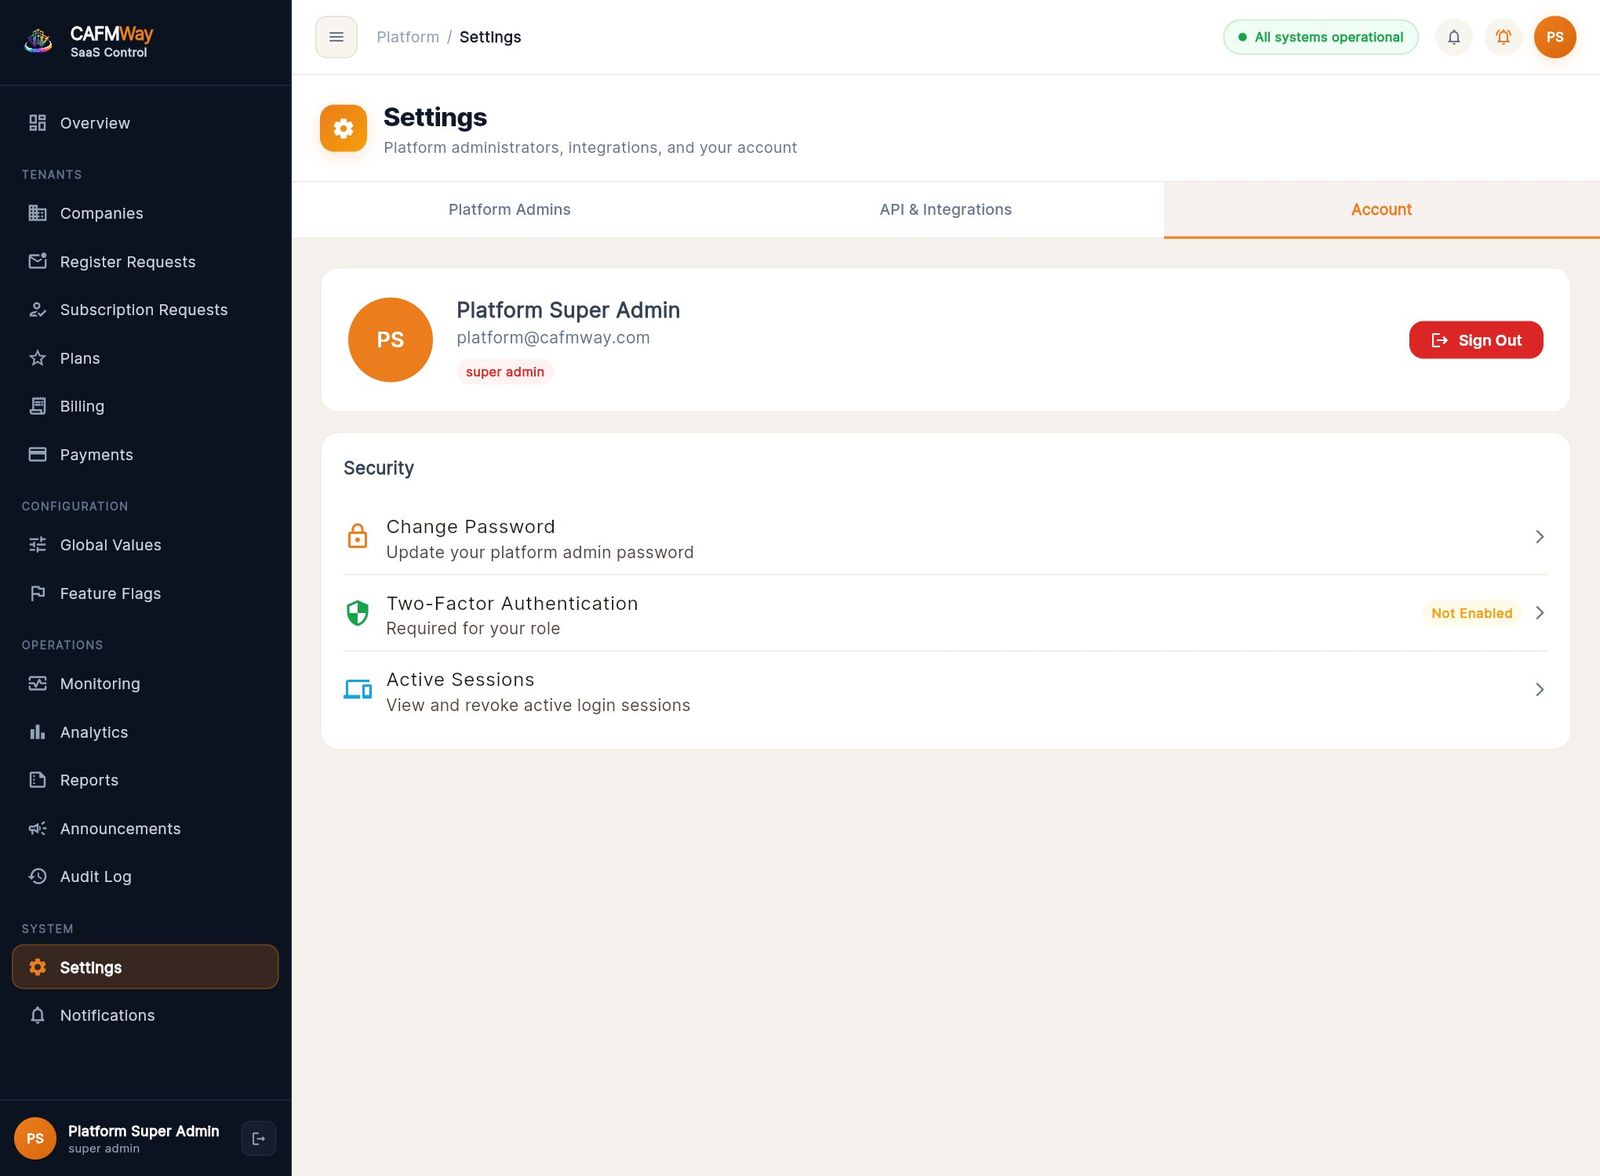
The API & Integrations and Account tabs hold placeholders for payment gateways, notification providers, API keys and account security.
Reference
Status reference
Registration requests
| Status | Meaning | What moves it |
|---|---|---|
| New | Enquiry received | Website form or New request |
| Invited | Link sent, valid 48 h | Approve & send link / Resend link |
| Link expired | Link not used in time | Time. Send a new link makes it Invited again |
| Registered | The company submitted the wizard | The company |
| Rejected | Closed by CAFM, company not emailed | Reject |
Subscription requests (numbered SUB-YYYY-NNNN)
| Status | Meaning | What moves it |
|---|---|---|
| New | Submitted by the company | Wizard or the customer's upgrade request |
| Under review | Limits and price saved | Save approved limits |
| Awaiting payment | Offer emailed | Send payment offer |
| Activated | Paid, invoice INV-YYYY-NNNN issued, account created or upgraded | Confirm payment & activate |
| Rejected | Closed, company emailed | Reject |
Companies: Active; Trial (active, with a trial end date in the future); Suspended (access cut off).
Automatic renewal reminders
Once a day the platform checks every active company that has a subscription end date. At 60, 30, 14 and 3 days before the end, and on expiry, it:
- emails CAFM and the customer
- raises an Expiring notification in the console
If several reminders were missed at once, only the most urgent one is sent. Expiring subscriptions also appear in the renewal banner on Companies.